
At its core, migrating a WordPress site is just the process of moving all its files and its database from one server to another. This comes up all the time when you're switching hosting providers, pushing a staging site live, or even consolidating multiple sites into one. Getting it right is crucial to making sure your website stays online and functional with zero data loss.
When and Why to Migrate Your WordPress Site

Understanding why you're migrating is just as important as knowing how to do it. This isn't just a technical chore; it's a strategic move that can seriously improve your site's performance, security, and ability to grow. Too many people wait until something goes horribly wrong, but spotting the signs early can save you a world of headaches.
The decision to migrate usually comes down to hitting the limits of your current setup. It’s a completely normal part of a website's lifecycle, especially for a platform as massive as WordPress.
Common Triggers for a Site Migration
One of the biggest reasons I see is simply outgrowing a hosting plan. That cheap shared server that was perfect for your brand-new blog might start to creak and groan under the weight of more traffic. This leads to slow load times and a terrible user experience. Moving to something more robust, like a Virtual Private Server (VPS), becomes an essential upgrade.
Here are a few other common situations that tell you it's time for a change:
- Performance Issues: Your site is consistently sluggish, even after you've tried all the usual optimization tricks.
- Security Concerns: Your current host has a sketchy security record, or you need more advanced features to protect your site.
- Scalability Needs: You're expecting a big jump in traffic and need a hosting environment that won't fall over.
- Development Workflow: You're ready to move a site from a local computer or a staging server to the live, public server.
The Strategic Value of a Well-Timed Move
A successful migration can pay off immediately. Faster load times keep visitors happy and can give your SEO rankings a nice boost. Better security protects not only your data but also your customers' trust.
The real goal of a WordPress migration isn't just to change servers. It's to put your site in an environment where it can run at its best, stay secure, and grow without hitting a wall. Think of it as an investment in your site's future.
As of 2025, WordPress powers an incredible 43.5% of all websites on the internet—that's over 522 million sites. With that many sites out there, migration is a frequent and necessary task for countless businesses and creators looking to level up their online presence. You can discover more insights about the global reach of WordPress and see just how common this is.
Ultimately, learning to recognize these triggers helps you shift from being reactive to proactive. Instead of waiting for a site crash, you can plan a smooth migration that supports your growth. This ensures a seamless experience for your audience and gives you a more stable, powerful platform to build on.
Your Pre-Migration Safety Checklist
Jumping headfirst into a site migration without a plan is just asking for trouble. A smooth move is all about the prep work, and this checklist is your best defense against the common disasters that can wreck a project. Think of these steps as your insurance policy against lost data, painful downtime, and that sinking feeling when things go wrong after launch.
Before you do anything else, you absolutely must create a complete, recent backup. I can't stress this enough—it isn't optional. An surprising number of migrations get derailed by corrupted files or a database that just won't import correctly. Without a clean backup, you have no way back.
A proper backup has two parts:
- All Your WordPress Files: This is the entire directory, but the real treasure is the
wp-contentfolder. It holds your themes, plugins, and every single image or file you've ever uploaded. - Your WordPress Database: This is the brain of your site. It stores every post, page, user, and setting. If you lose this, you lose your content.
For a full walkthrough on getting both your files and database squared away, check out our guide on https://wpfoundry.app/backing-up-your-wordpress-site/. Make sure you have a solid restore point before you start.
Trim the Fat with a Pre-Migration Cleanup
Before you zip up those files, it's time for a little digital spring cleaning. Trying to move a bloated website is slow and dramatically increases the chances of something breaking along the way. A lean site is a happy site, especially during a move.
Start with your plugins and themes. If you have 30 active plugins but are only really using half of them, it’s time to deactivate and delete the dead weight. Every inactive plugin is a potential security hole and just more baggage for your backup.
Next up is your database. Over time, it gets cluttered with old post revisions, spam comments, and junk data left behind by uninstalled plugins. A good database optimization plugin can clear this out quickly, shrinking your database file and making the import process on the new server much faster.
A clean, optimized site doesn't just migrate faster—it also performs better on its new server from day one. Taking an hour to remove unused assets is one of the highest-ROI activities in the entire migration process.
It's also a smart move to review some WordPress development SEO resources at this stage. A migration is a big deal for search engines, and a little planning now can prevent you from losing your hard-earned rankings.
Set Up a Safe Testing Environment
The last piece of the puzzle is creating a safe space to test everything before you flip the switch. Never, ever migrate directly onto your live domain if you can help it. This is where a staging area or a temporary domain becomes your best friend.
Most good web hosts offer one-click staging environments, which create an exact clone of your site on a private URL. You can upload your backup here, kick the tires on every form and link, and fix any bugs without your visitors seeing a thing.
If your new host doesn't have a staging feature, a temporary domain or subdomain works just as well. The process is identical: move the site to this temporary spot, test it thoroughly, and only point your main domain to the new server once you are 100% confident everything works perfectly. It’s a simple step that saves you from public-facing errors and protects your reputation.
Choosing the Right WordPress Migration Method
When it's time to move your WordPress site, there's no single "best" method—just the one that's best for you. Your decision really comes down to a few key things: your technical skill, your budget, and how much control you want to have over the whole process.
Getting this choice right from the start is the difference between a smooth move and a weekend-long headache. Let's walk through the three main ways you can tackle a migration.
This visual can help you see how your budget and needs play into your choice of hosting, which is often tied to the kind of migration support you'll get.
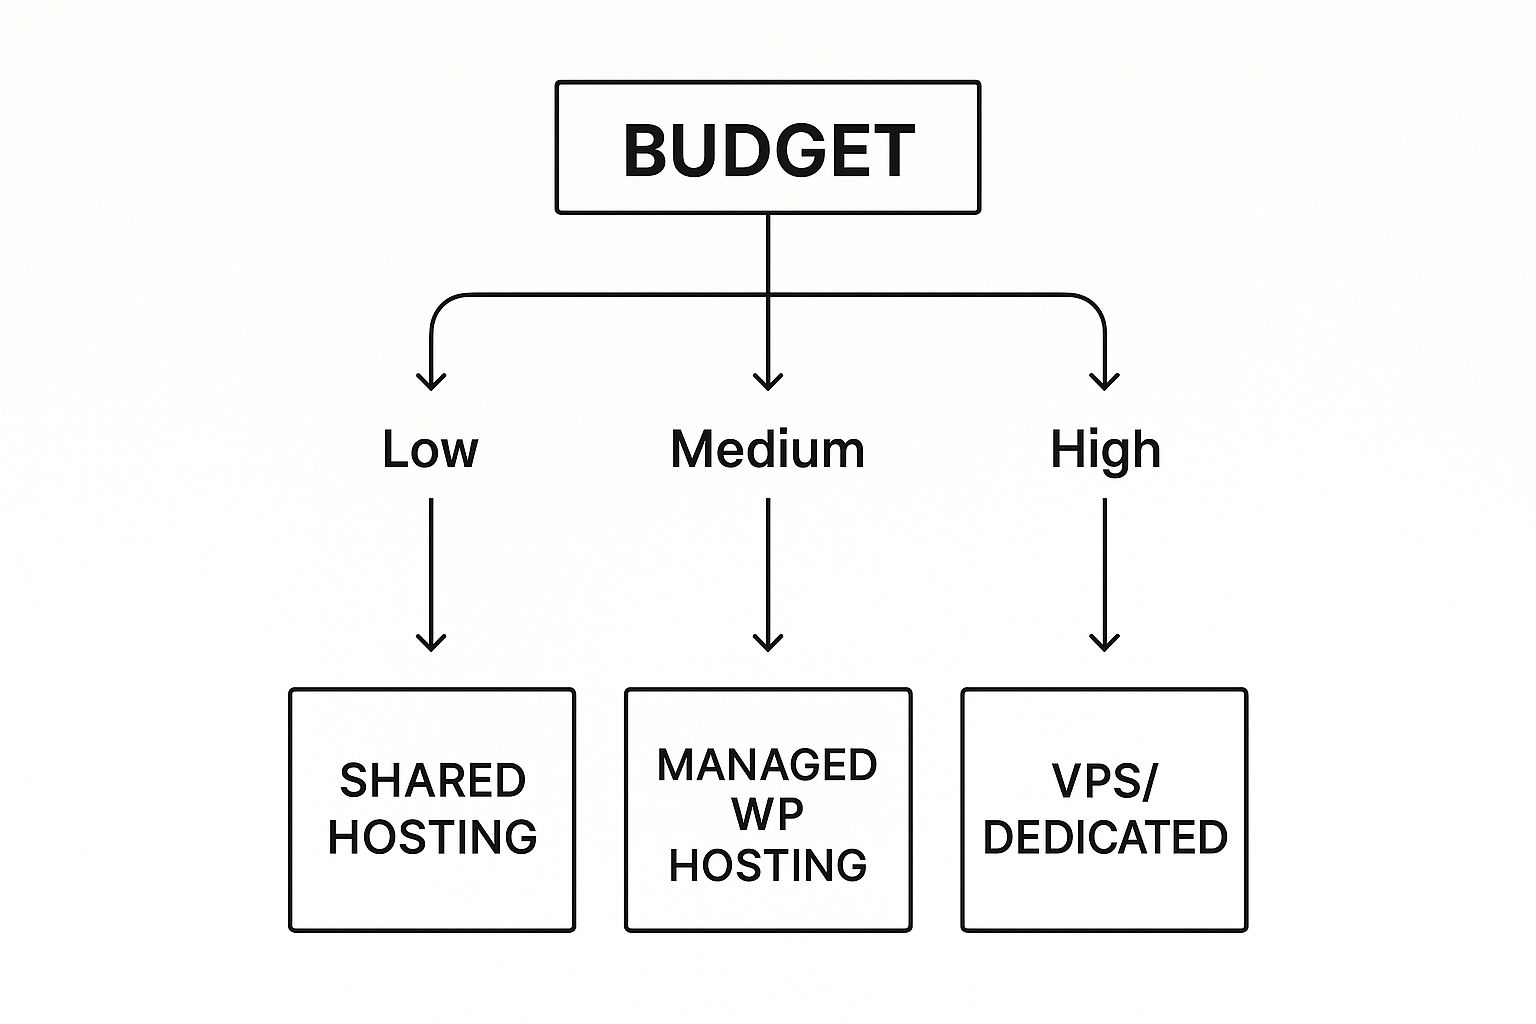
As you can see, your budget often sets the level of service you can expect, from basic shared hosting all the way up to premium managed solutions that usually throw in migration help.
Deciding between manual, plugin, or host-managed migration can be tough. I've put together a quick comparison table to help you weigh the options at a glance.
Comparing WordPress Migration Methods
| Method | Best For | Pros | Cons |
|---|---|---|---|
| Manual | Developers & tech-savvy users who need full control. | Total control over every file and database entry. No reliance on third-party tools. | Highly complex and time-consuming. Very easy to make critical errors. |
| Plugin-Powered | Most users, from bloggers to small businesses. | Fast, reliable, and user-friendly. Minimizes the risk of human error. | Free versions often have size limits. Premium plugins have a cost. |
| Host-Managed | Business owners or anyone who values time over control. | Completely hands-off and stress-free. Handled by experts to avoid downtime. | Can be costly (if not free), offers no control, and isn't available from all hosts. |
Each path has its place, and the "right" one is really about matching the method to your specific situation and comfort level.
The Manual Migration Method
This is the old-school, roll-up-your-sleeves approach. You'll be using an FTP client like FileZilla to download your site's files and a tool like phpMyAdmin to export your entire database. Once that’s done, you do it all in reverse on the new server: upload files, create a database, import your data, and then tweak the all-important wp-config.php file.
The biggest upside here is maximum control. You're not trusting a plugin or script; you’re handling the raw guts of your site yourself. For a developer, this is great. You know exactly what’s happening and can fix problems on a deep level.
But, and it’s a big but, this method is also the most likely to go wrong. It takes the longest and is packed with potential pitfalls. Forget one small step—like updating the database details in wp-config.php or running a search-and-replace for old URLs—and you’ll be staring at the dreaded "Error Establishing a Database Connection" or a site riddled with broken links.
The Plugin-Powered Migration
For the vast majority of people, this is the way to go. Plugins have totally changed the game, striking a perfect balance between ease of use and control. Tools like All-in-One WP Migration or Duplicator make moving a site almost foolproof. They neatly bundle up everything—files, database, plugins, themes—into a single, tidy package.
The process is refreshingly simple. Install the plugin on your old site, create the package, then install the same plugin on a new WordPress setup and import it. The plugin does the heavy lifting, including the tedious search-and-replace for your domain name, which saves a ton of time and potential errors.
This method is significantly faster and safer for anyone who isn't a developer. While many plugins have free versions, they sometimes have limits, like on the size of your site. For a bigger site, you might need to spring for a premium version, but it's a small price for the peace of mind it brings. It's the go-to approach for tons of scenarios, including cloning a WordPress site for a staging environment.
The Host-Managed Migration
If you want the easiest path possible, this is it: let your new hosting company do it for you. Many managed WordPress hosts, and even some of the better shared hosts, will move your site for free to win your business. It's the ultimate "set it and forget it" option.
You just give them the keys to your old hosting account, and their team of experts takes care of the rest. These folks do migrations every day, so they know how to sidestep common problems and get your site moved over with little to no downtime.
So, what's the catch?
- Cost: While many offer it for free, some hosts do charge a fee, especially for more complicated moves.
- Control: You have none. You're handing your site over to a third party, which isn't for everyone.
- Availability: Not every host offers this, especially budget providers.
This is the perfect choice for business owners, bloggers, and anyone whose time is more valuable than getting their hands dirty with the technical details. If you just want it done right, a managed migration lets you focus on your work while the pros handle the move.
A Practical Walkthrough of Your Migration
Alright, let's get our hands dirty. This is where we’ll go through the exact steps for the two most common do-it-yourself migration methods. We’ll kick things off with the manual approach, which gives you granular control, before moving on to a plugin-based method that handles most of the heavy lifting for you.
Both paths get you to the same place, but the journey couldn't be more different. The manual route demands a certain comfort level with servers and databases directly. The plugin method, on the other hand, is built for anyone who prefers a guided, more user-friendly experience.
The Manual Migration Process
Going manual gives you total control over every piece of your site's move. It’s a fantastic way to learn the nuts and bolts of WordPress, but it requires you to be methodical. One slip-up can cause errors, so take your time.
Your first job is to grab a copy of your site's two essential parts: the files and the database.
- Downloading Your Site Files: You’ll need an FTP (File Transfer Protocol) client for this. I recommend FileZilla. Connect to your old server with the FTP details from your host. Find your site's root directory—it’s usually called
public_htmlor something similar to your domain name—and download that entire folder to your computer. - Exporting Your Database: Log into your old host’s cPanel and fire up the phpMyAdmin tool. Pick your WordPress database from the list on the left, hit the "Export" tab up top, and stick with the "Quick" export option. This will download a
.sqlfile, which is a full snapshot of your site's content, users, and settings.
Once your files and database are sitting safely on your local machine, it's time to prep their new home.
Setting Up the New Environment
Over on your new hosting account, you need to get the space ready. This means creating a fresh, empty database where your old site's data will live.
In your new host's cPanel, look for "MySQL Databases" or a similar tool. You'll need to create a new database, a new database user, and then give that user full privileges for the database. Make sure you write down the database name, username, and password—you’ll need them in just a minute.
Now, you just reverse the process. Use your FTP client to upload all your site files into the new server's root directory. After the upload finishes, open phpMyAdmin on the new server, select your new database, and click the "Import" tab. From there, upload the .sql file you downloaded earlier. This can take a bit, especially for bigger sites.
A classic snag here is hitting a "max upload size" error when importing the database. If your
.sqlfile is too big, you might need to ask your new host to bump up the upload limit for you temporarily.
The last—and most critical—step is telling your files about their new database. Find the wp-config.php file in the root directory of your new server. Open it up and edit these three lines with the credentials you just created:
define( 'DB_NAME', 'new_database_name' );define( 'DB_USER', 'new_database_user' );define( 'DB_PASSWORD', 'new_database_password' );
Save the file, and that’s it! Your site should now be connected. But there's one more thing to do to fix all the internal links, which we'll cover later.
The Automated Plugin Method
If that manual process sounds a bit much, you’re not alone. This is exactly why migration plugins are so popular. They wrap up the entire process into just a few clicks, which seriously cuts down on the chances of human error. We'll use All-in-One WP Migration as an example because it's a solid, widely-used free plugin.
The idea is simple. The plugin bundles your whole site—files, database, themes, plugins, everything—into a single .wpress file. You then set up a clean WordPress install on the new server and use the same plugin to unpack it all.
Here’s how it works:
- On Your Old Site: Install and activate the All-in-One WP Migration plugin. From your dashboard, head to "All-in-One WP Migration" > "Export." Tell it to export to a "File," and the plugin will package everything up for you to download.
- On Your New Site: Get a brand-new, empty WordPress installation running on your new host. Log in, and install that same All-in-One WP Migration plugin.
- Importing the Package: Now go to "All-in-One WP Migration" > "Import." Just drag and drop the
.wpressfile you downloaded into the import window. The plugin takes care of everything from there: it unpacks your files, imports the database, and even runs a full search-and-replace to update all your URLs to the new domain.
This approach cleverly avoids the most painful parts of a manual move. That automatic search-and-replace feature is a massive time-saver, preventing the broken images and dead links that often show up after a manual migration.
It's also a good time to remember you're moving more than just files. You’re moving a whole system of plugins. With over 60,300 plugins out there, keeping things compatible and secure is key. In fact, research shows that 95% of security issues come from outdated plugins. A migration is the perfect chance to review and update your whole plugin library. You can learn more about the current WordPress ecosystem and its statistics to see the scale. The plugin method ensures all your active plugins and their settings transfer perfectly, so your site just works.
Finalizing Your Move and Going Live

Getting your site's files and database onto the new server is a huge step, but don't pop the champagne just yet. This last phase is like a pre-flight check for your website. I've seen too many people rush to go live, only to discover a broken site, lost sales, and a nasty dip in their search rankings.
Think of this as your go-live checklist. It's designed to catch all those small but critical issues that love to pop up after a WordPress migration. Working through these steps methodically ensures a seamless switch for your visitors and protects all your hard-earned SEO.
Conduct a Thorough Post-Migration Audit
Before you touch your domain's settings, you need to put the new site through its paces. If you used a staging or temporary URL for the move—and you really should—this is the perfect, safe environment for a deep-dive audit. Your mission is to use the site just like a brand-new visitor would.
I always start with the most basic functions and work my way up to the complex stuff. This systematic approach helps ensure nothing critical gets missed.
Here's what your testing checklist should cover:
- Core Functionality: Can users log in and out? Do all the admin functions in the WordPress dashboard work like they're supposed to?
- Forms and Submissions: Test every single form. Contact forms, quote requests, newsletter signups—all of them. Make sure the submissions are actually being delivered.
- eCommerce Workflows: This is a big one for any online store. Go through the entire buying process. Add items to your cart, try a coupon code, and complete a test checkout.
- Media and Links: Click through all your menus, internal links, and any download buttons. Check that all your images and videos are loading correctly.
Hunt Down Broken Links and Mixed Content
Two of the most common headaches after a migration are broken links and mixed content errors. Both are bad news for your user experience and SEO. Broken links are just frustrating, but mixed content warnings can make your site look untrustworthy.
Mixed content happens when a secure (HTTPS) page tries to load something insecure (HTTP), like an image or a script. This is a classic sign that the search-and-replace process missed a few hardcoded URLs. Most browsers will throw up a security warning, which is a surefire way to scare visitors off.
Don't just trust that your migration plugin or script caught every URL. Manually checking for these problems is your final line of defense against a bad user experience and potential SEO dings. A clean, secure site builds trust.
Once your site is live, running an audit for broken links is absolutely crucial. You can learn how to fix broken links to keep your site in good shape. For bigger sites with lots of URLs to update, using WP-CLI is a lifesaver; this guide on WP-CLI for search and replace operations is a great resource for fixing paths efficiently.
Flipping the Switch with DNS Updates
Okay, once you've tested everything and you're confident the site is working flawlessly on the new server, it's time for the final step: telling the internet where to find its new home. You'll do this by updating your domain's DNS (Domain Name System) records.
You'll need to log into your domain registrar—the company you bought your domain from, like GoDaddy or Namecheap—and find the DNS management section. Your new web host will give you their nameservers. All you have to do is replace the old nameservers with the new ones.
Just be aware, this change isn't instant. It can take anywhere from a few minutes up to 48 hours to fully "propagate" across the internet. During this time, some visitors might see the old site, while others see the new one. Once propagation is complete, all traffic will hit your new server, and your migration is officially done.
Common WordPress Migration Questions
Even with the best-laid plans, migrating a WordPress site can throw you a curveball. It’s a process with a lot of moving parts, and questions always come up.
Let's walk through some of the most common issues people run into. Getting these answers sorted out ahead of time can save you a lot of stress and help you fix problems on the fly.
How Can I Migrate a Very Large Site
Moving a huge website—especially one with a massive database or years of media uploads—comes with its own headaches. Your standard plugin or manual method is likely to time out or just plain fail when you're dealing with gigabytes of data.
If you find yourself in this spot, here are a few ways to tackle it:
- Use WP-CLI: The WordPress Command Line Interface is an absolute lifesaver for developers. It lets you run massive database imports and file transfers without the browser timeouts you’d hit with a tool like phpMyAdmin.
- Premium Migration Plugins: Paid tools like the pro version of Duplicator or WP Migrate DB Pro are built for heavy lifting. They’re smart enough to break your site into smaller chunks to get around server limits.
- Incremental Backups: Some services can sync your files and database changes piece by piece. This is way more efficient than trying to move the whole thing at once.
The trick is to use a tool that works around the usual HTTP and PHP restrictions that most web hosts have. Trust me, trying to upload a 5GB backup file through the WordPress admin is a recipe for frustration.
How Do I Minimize Downtime During the Migration
For any live site, the goal is zero downtime. Or at least, as close as you can get. The last thing you want is visitors hitting an error page for hours. The secret to a smooth transition is all in the workflow.
The best approach is to do the entire migration on a temporary domain or a staging site first. Get a full copy of your site running on the new server, test everything thoroughly, and squash any bugs before your live site is ever touched.
Once you are 100% certain the migrated site is working perfectly on its temporary URL, then you can update your DNS records to point to the new server. This way, live traffic only gets sent over once you know for sure it's ready.
With this method, the only "downtime" your users might see is the DNS propagation window, which is usually pretty brief.
What If My Site Looks Broken After the Move
It’s a heart-stopping moment. You've finished the migration, you load up the site, and it's a complete mess. Styles are gone, images are missing, and every link is broken. Nine times out of ten, this is a URL problem.
This mess usually happens because your old domain name is still hardcoded all over the database. You'll need to run a full search-and-replace to update every instance of http://olddomain.com to https://newdomain.com. While a lot of migration plugins handle this automatically, a manual move demands a dedicated tool like Better Search Replace or a quick WP-CLI command to get all the paths pointing to the right place.
Juggling multiple WordPress sites, from complex migrations to daily maintenance, can eat up your entire day. WP Foundry brings all your admin tasks into one desktop app, letting you update plugins, run backups, and manage users across unlimited sites from a single dashboard. Get your workflow simplified and your time back with WP Foundry. https://wpfoundry.app