
Launching a WordPress site involves more than just hitting 'publish'. A successful deployment requires a meticulous, step-by-step process that addresses everything from technical SEO and robust security to peak performance and content accuracy. A single overlooked detail can lead to broken user experiences, poor search rankings, or critical security vulnerabilities right out of the gate. This is why a comprehensive site launch checklist is not just helpful, it's essential for any serious project.
This guide serves as that definitive roadmap. We've compiled the most critical pre-launch tasks into seven distinct, actionable phases. Each step is designed to be a thorough yet manageable part of your workflow, preventing common pitfalls that derail otherwise great websites. By methodically working through this checklist, you can ensure every technical, creative, and strategic element is fine-tuned for success.
We'll break down the 7 essential phases every site owner must navigate, covering everything from performance optimization and security hardening to analytics setup and content quality assurance. For each item, we'll provide specific, practical details you can implement immediately. We will also highlight how specialized WordPress platforms like WP Foundry can streamline these complex tasks, transforming a daunting process into a controlled, efficient, and flawless launch. This detailed approach ensures nothing is left to chance, setting your new website on a firm foundation for growth and user engagement from day one.
1. Performance Testing & Optimization
Before your website goes live, its performance is a purely theoretical concept. Performance testing is the crucial step in a site launch checklist where you move from theory to reality, rigorously assessing how your site responds under various conditions. This involves more than just a quick speed check; it's a comprehensive evaluation of loading times, responsiveness, and stability across different devices, browsers, and network speeds.
A slow website doesn't just frustrate users; it directly impacts your bottom line. E-commerce giants have proven the value of speed for years: Walmart saw a 2% increase in conversions for every one-second improvement in load time, while Amazon calculated a 1% revenue increase for every 100ms of improvement. In today's digital landscape, users expect instant results, and search engines like Google reward it.
Key Performance Metrics to Measure
Your primary goal is to optimize for a seamless user experience, which Google quantifies with its Core Web Vitals. These metrics measure three specific aspects of user experience: loading performance, interactivity, and visual stability.
- Largest Contentful Paint (LCP): Measures how long it takes for the largest content element (like a hero image or text block) to become visible. A good LCP is 2.5 seconds or less.
- First Input Delay (FID): Measures the time from when a user first interacts with your site (e.g., clicks a button) to when the browser can respond. Aim for an FID of 100 milliseconds or less.
- Cumulative Layout Shift (CLS): Measures unexpected shifts in the visual layout of a page. A low CLS score (0.1 or less) ensures a stable, predictable experience for users.
This bar chart visualizes benchmark targets for key user experience metrics.
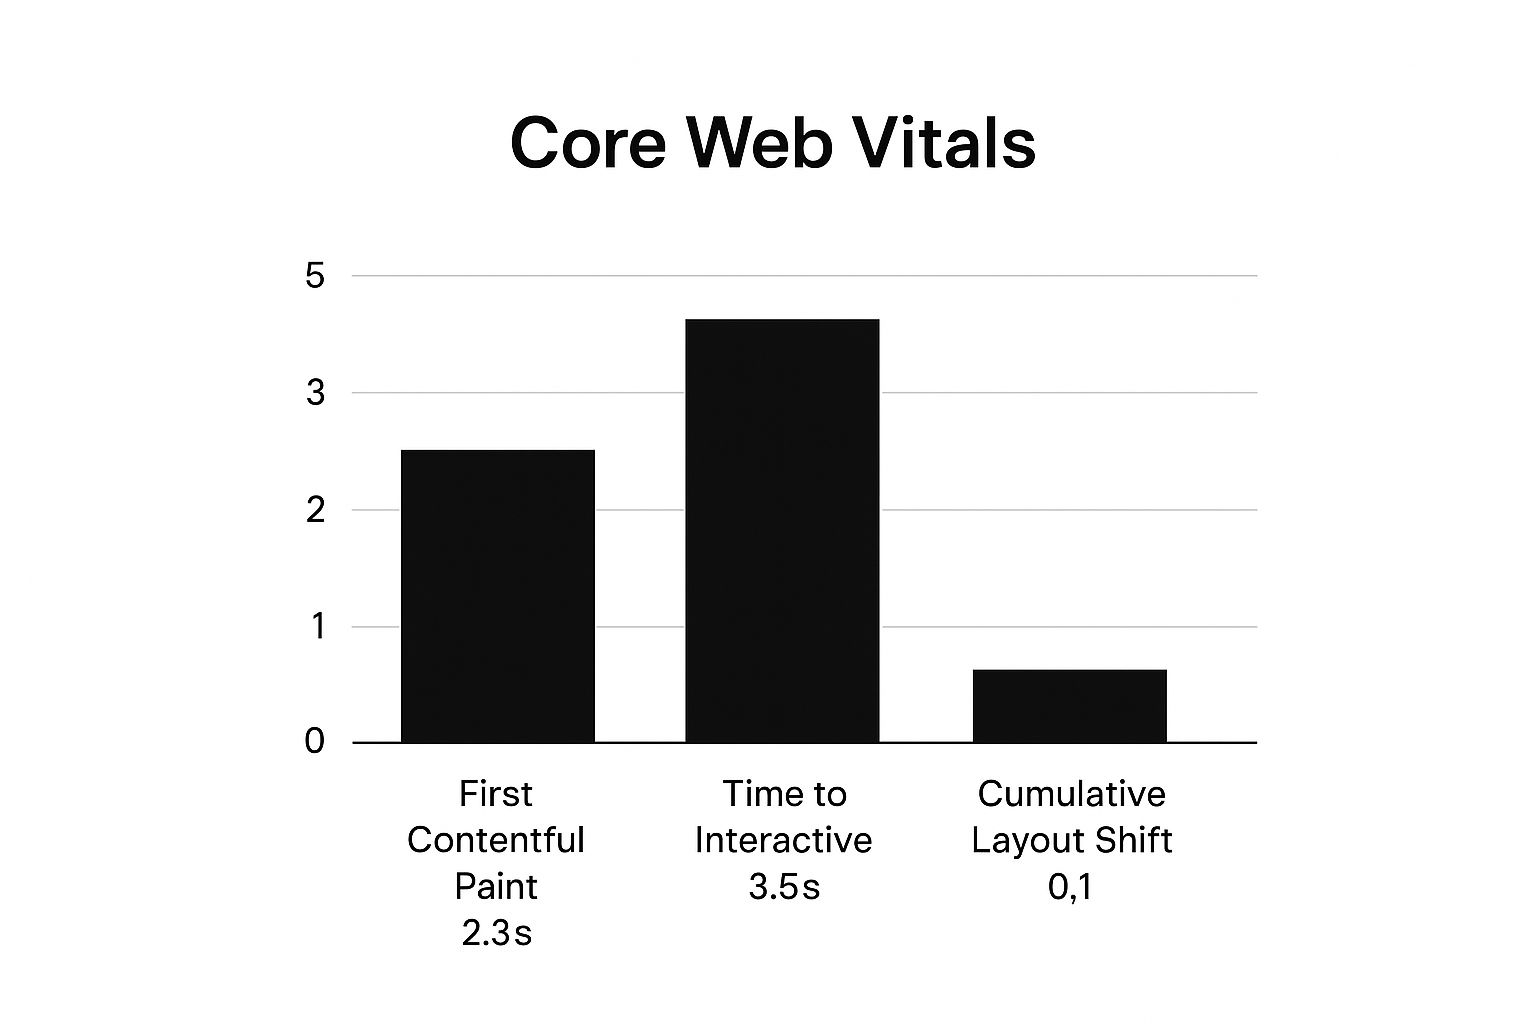
The chart highlights the specific, measurable goals your development team should aim for to ensure the site feels fast and stable to real-world visitors.
Actionable Optimization Tips
You can start improving these metrics immediately with a few targeted actions. Use free tools like Google's PageSpeed Insights or GTmetrix to get a baseline report, then focus on these areas:
- Image Optimization: Compress images without sacrificing quality using plugins like Smush or ShortPixel. Serve images in next-gen formats like WebP.
- Code Minification: Reduce the size of your CSS, JavaScript, and HTML files by removing unnecessary characters (like spaces and comments). Caching plugins often handle this automatically.
- Caching Strategy: Implement a robust caching solution (e.g., WP Rocket) to store a static version of your site, dramatically reducing server load and speeding up delivery for repeat visitors.
- Choose a Quality Host: Your hosting environment is the foundation of your site's performance. A managed WordPress host like WP Foundry provides a server infrastructure already optimized for speed, security, and scalability, handling many of these technical tasks for you.
For a deeper dive into these techniques, you can find a complete guide on how to supercharge your WordPress site speed. Continuous monitoring post-launch is just as important to catch performance regressions before they affect your users.
2. Cross-Browser & Device Compatibility Testing
Your website may look perfect on your high-resolution monitor and latest-gen Chrome browser, but your audience views it on a diverse ecosystem of devices. Cross-browser and device compatibility testing is a non-negotiable part of any site launch checklist, ensuring your site delivers a consistent, functional, and visually appealing experience for every visitor, regardless of how they access it. This process involves systematically checking your website's performance on different web browsers (like Chrome, Firefox, Safari, Edge), operating systems (Windows, macOS, iOS, Android), and screen sizes.
Failing to test for compatibility is like building a beautiful storefront but locking the door for 40% of your potential customers. A layout that breaks on Safari or a form that won't submit on a Samsung phone leads directly to lost traffic, engagement, and revenue. Major brands understand this well; for example, Airbnb’s seamless booking experience works flawlessly whether you're on a laptop, tablet, or smartphone, which is a direct result of rigorous cross-platform testing.

Key Compatibility Areas to Verify
The goal is to guarantee that core functionality and design integrity hold up across the board. This verification process should be structured around three critical areas: visual consistency, feature functionality, and responsive design.
- Visual Consistency: Checks if your site’s layout, fonts, images, and colors render correctly across different browsers. A common issue is CSS properties that are supported by one browser but not another, causing visual glitches.
- Feature Functionality: Ensures all interactive elements, such as contact forms, navigation menus, checkout processes, and pop-ups, work as intended on every platform. A user on Firefox should have the same functional experience as a user on Chrome.
- Responsive Design: Verifies that the website layout fluidly adapts to different screen sizes and orientations (portrait and landscape). Elements should resize, reposition, or hide appropriately without overlapping or becoming unusable on mobile phones, tablets, and desktops.
This methodical testing prevents frustrating user experiences, like a "buy now" button that's unclickable on an iPhone, which can decimate conversion rates.
Actionable Testing Tips
You can begin testing without a massive physical device lab. Use a combination of real devices and powerful testing tools to get comprehensive coverage. Start by defining the most popular browser and device combinations for your target audience using your analytics data.
- Use Browser Testing Tools: Services like BrowserStack or CrossBrowserTesting provide instant access to thousands of real browsers and devices in the cloud, allowing you to test your site in various environments without owning the hardware.
- Create a Testing Matrix: Develop a simple checklist or spreadsheet listing the browsers, devices, and operating systems you need to test. Track which features have been verified on each combination to ensure nothing is missed.
- Test Key User Journeys: Don't just look at the homepage. Test critical user paths like the registration process, adding an item to the cart, or submitting a contact form on each targeted platform.
- Verify Both Orientations: On mobile devices, always switch between portrait and landscape modes. A layout that works in one orientation can easily break in the other if not designed correctly.
A well-tested website builds trust and credibility. By ensuring your site works for everyone, you maximize your reach and create a professional, reliable impression from day one.
3. Security Implementation & SSL Configuration
Before your website welcomes its first visitor, its security infrastructure must be impenetrable. Security implementation is a non-negotiable part of any site launch checklist, where you proactively fortify your site against threats. This involves installing an SSL certificate to encrypt data, hardening your WordPress core, and implementing policies to protect user information and build trust from the very first click.
A security breach doesn't just damage your data; it shatters your reputation. Google has actively pushed for a more secure web by using HTTPS as a ranking signal, and modern browsers now flag non-HTTPS sites as "Not Secure." This makes robust security a prerequisite for both search engine visibility and user confidence. For example, Shopify ensures end-to-end encryption for all transactions, while major banking sites utilize multi-factor authentication to protect sensitive accounts.
This visual represents the layered approach to website security, from the server foundation to the user-facing application.

The image illustrates how a comprehensive security strategy combines multiple defenses, creating a resilient barrier against common vulnerabilities like brute-force attacks and malware.
Key Security Measures to Implement
Your primary goal is to create a secure environment that protects both your website and its users. This means focusing on encryption, access control, and vulnerability management to prevent unauthorized access and data breaches.
- SSL/TLS Certificate: Encrypts data transmitted between a user's browser and your server, making it unreadable to attackers. An active SSL certificate is identified by the padlock icon and "https://" in the address bar.
- Web Application Firewall (WAF): Acts as a protective shield between your website and incoming traffic, filtering out malicious requests and blocking common attack patterns before they can reach your site.
- Strong Password Policies: Enforce the use of complex, unique passwords for all user accounts, especially administrators. Combining this with Two-Factor Authentication (2FA) adds a critical layer of security.
- Regular Software Updates: Keep your WordPress core, themes, and plugins updated. Updates frequently contain patches for newly discovered security vulnerabilities that hackers can exploit.
Actionable Security Tips
You can immediately strengthen your site’s defenses with a few fundamental actions. Start by ensuring your hosting environment is secure, then move to the application level with these steps:
- Install an SSL Certificate: Most quality hosts, including WP Foundry, offer free Let's Encrypt SSL certificates that can be installed with a single click, instantly enabling HTTPS across your site.
- Use Security Plugins: Install a reputable security plugin like Wordfence or Sucuri to run malware scans, monitor file integrity, and implement a WAF.
- Limit Login Attempts: Prevent brute-force attacks by using a plugin to lock out IP addresses that fail to log in after a set number of attempts.
- Change Default Settings: Always change the default "admin" username and obscure your WordPress login URL to make it harder for automated bots to target your site.
For a complete walkthrough of these protective measures, explore our comprehensive guide on how to secure your WordPress site. Consistent security monitoring is crucial after launch to adapt to new threats and maintain a safe online presence.
4. SEO Foundation & Meta Data Setup
Before launch, your website is invisible to search engines. Establishing a solid SEO foundation is a critical step in any site launch checklist that transforms your site from a private project into a publicly discoverable asset. This process involves configuring the essential technical and on-page elements that allow search engines like Google to effectively crawl, index, and understand your content.
Ignoring SEO setup is like building a beautiful store with no doors or signs. It may be perfect on the inside, but no one will ever find it. Search engines drive the majority of website traffic, and a proper foundation ensures you are positioned to capture this audience from day one. It directly influences your visibility, organic traffic, and long-term growth potential.
Key SEO Elements to Configure
Your primary goal is to make it as easy as possible for search engine bots to understand your site's structure and content. This requires a few core technical configurations that act as a roadmap and a rulebook for search engines.
- XML Sitemap: This is a file that lists all the important pages on your website, telling search engines which content to prioritize for crawling. Most SEO plugins, like Yoast or Rank Math, generate this automatically.
- Robots.txt File: This simple text file instructs search engine crawlers which pages or sections of your site they should not access. It’s useful for blocking admin areas, thank you pages, or other non-public content from showing up in search results.
- Meta Tags (Titles & Descriptions): These HTML elements provide a summary of a page's content in search results. A well-crafted title tag and meta description can significantly improve click-through rates from the search engine results page (SERP).
- Structured Data (Schema Markup): This is code that helps search engines understand the context of your content, leading to "rich snippets" in search results. For example, recipe sites use it to show ratings and cooking times directly in the search listings.
Actionable SEO Setup Tips
You can implement these foundational elements quickly using standard WordPress tools. Start with an SEO plugin and focus on these initial configurations:
- Keyword Targeting: Research and assign a primary target keyword for each important page. This will guide your on-page optimization efforts.
- Optimize Titles and Descriptions: Keep title tags under 60 characters and meta descriptions under 160 characters to avoid them being cut off in search results. Make them compelling and relevant to the page content.
- Image SEO: Use descriptive alt text and file names for all your images. This helps with accessibility and allows your images to rank in Google Image Search.
- Install Google Search Console: Set up Google Search Console immediately. This free tool allows you to submit your sitemap directly to Google and monitor your site’s indexing status, performance, and any crawl errors.
- Check Site Visibility Settings: In WordPress, navigate to
Settings > Readingand ensure the box for "Discourage search engines from indexing this site" is unchecked before you go live. This is a simple but common mistake that can render your site invisible.
5. Analytics & Tracking Setup
Without data, you're flying blind. Setting up analytics and tracking is a non-negotiable part of any site launch checklist, transforming your website from a digital brochure into a measurable business tool. It's the process of implementing systems to monitor user behavior, traffic sources, conversions, and overall performance, giving you the insights needed to make informed decisions.
A website without analytics is a ship without a rudder. Data-driven giants prove its value daily: Netflix uses advanced analytics to personalize content recommendations and inform which original series to produce, while e-commerce sites meticulously track conversion funnels to identify and fix friction points in the checkout process. This data is the foundation of growth, telling you what works, what doesn't, and where to invest your resources.
Key Tracking Metrics to Monitor
Your goal is to translate raw data into actionable business intelligence. While vanity metrics like page views are interesting, focus on data that directly reflects user engagement and progress toward your business objectives.
- User Acquisition: Which channels (e.g., organic search, social media, paid ads) are driving the most valuable traffic to your site?
- User Behavior: What pages do users visit most? How long do they stay? What is the path they take before converting or leaving?
- Conversion Rate: What percentage of visitors complete a desired action, such as making a purchase, filling out a form, or signing up for a newsletter?
- Goal Completions: Tracks specific interactions you've defined as valuable, like video plays, PDF downloads, or clicks on a "request a quote" button.
These metrics provide a clear picture of how users interact with your site, revealing opportunities for improvement and strategic growth.
Actionable Setup Tips
Getting started with analytics is straightforward, but a thoughtful setup is crucial for data accuracy. Tools like Google Analytics 4 (GA4) are free and powerful, but proper configuration is key.
- Set Up Business-Aligned Goals: Before launch, define what a "conversion" means for your business. Is it a sale, a lead, or a subscription? Configure these as specific goals or conversion events in your analytics platform.
- Implement Enhanced E-commerce Tracking: If you run an online store, standard tracking isn’t enough. Set up enhanced e-commerce tracking to monitor product views, add-to-cart actions, and checkout funnel performance.
- Use UTM Parameters: Track the effectiveness of your marketing campaigns by adding UTM parameters to your URLs. This tells you exactly which ad, email, or social post is driving traffic and conversions.
- Create Key Stakeholder Dashboards: Filter out the noise. Build custom dashboards that display only the most critical KPIs for different team members (e.g., a marketing dashboard focused on campaign ROI, a content dashboard focused on page engagement).
- Filter Internal Traffic: Ensure your team's activity doesn't skew your data. Exclude IP addresses from your office and remote employees to get a clean view of real customer behavior.
6. Content Review & Quality Assurance
Your website's design and performance can be flawless, but if the content is riddled with errors, is inaccurate, or fails to communicate your brand message, the entire user experience collapses. Content review is a critical phase in a site launch checklist where you meticulously validate every piece of text, imagery, and interactive media. This goes beyond a simple spell-check; it's a comprehensive audit for accuracy, consistency, clarity, and brand alignment.
Flawless content builds trust and authority. For instance, medical and financial websites undergo rigorous fact-checking and legal reviews to ensure every claim is accurate and compliant, as errors could have severe consequences. Similarly, a brand like Apple ensures every word and image on its site reflects its core values of simplicity and premium quality. This level of detail communicates professionalism and respect for the audience.
Key Content Review Criteria
Your goal is to ensure all content is polished, professional, and serves its intended purpose. A systematic review process should cover several key areas to guarantee quality and consistency across the entire site.
- Accuracy & Factual Correctness: Verify all data, statistics, names, dates, and product specifications. Ensure contact information, including phone numbers, addresses, and email forms, is correct and functional.
- Brand Voice & Tone Consistency: Does the language align with your established brand style guide? The tone should be consistent across all pages, from the homepage to the privacy policy.
- Grammar, Spelling & Formatting: Check for typos, grammatical errors, and awkward phrasing. Ensure consistent formatting for headings, lists, bold text, and hyperlinks.
- Legal & Compliance: Make sure your privacy policy, terms of service, and any disclaimers are present, accurate, and compliant with regulations like GDPR or CCPA. All images and media should be properly licensed.
Actionable Quality Assurance Tips
You can systematize your content review to catch issues before they go live. A multi-layered approach involving different perspectives is often the most effective way to ensure nothing slips through the cracks.
- Create a Content Checklist: Develop a detailed checklist covering all criteria: accuracy, grammar, formatting, brand voice, and legal compliance. Use it for every single page.
- Assign Multiple Reviewers: Have different people review the content. One person can focus on technical accuracy (e.g., links, forms), another on copyediting (e.g., grammar, style), and a third on brand alignment.
- Test All Interactive Elements: Click every link, fill out every form, watch every embedded video, and test every call-to-action button. Ensure they all lead to the correct destination and function as expected.
- Verify Image Alt Text: Check that all images have descriptive alt text. This is crucial for both SEO and web accessibility, ensuring screen readers can describe the image to visually impaired users.
7. Backup & Recovery System Setup
Before launch, your website is a collection of code and assets. After launch, it becomes a dynamic entity, accumulating valuable user data, content, and transaction records. A backup and recovery system is the critical safety net in your site launch checklist, designed to protect this data from hardware failure, human error, security breaches, or faulty updates. It's not just about saving files; it's about ensuring business continuity.
Failing to implement a robust backup strategy is a gamble with your entire digital presence. A catastrophic data loss can erase years of work, destroy customer trust, and lead to significant financial repercussions. Major platforms understand this: WordPress.com provides automatic daily backups, and e-commerce giants implement real-time systems to ensure no transaction data is ever lost. A pre-launch backup plan moves you from a reactive to a proactive state of security.
Key Components of a Recovery Plan
A comprehensive backup strategy is more than just a nightly file dump. It’s a documented, tested system that ensures you can restore your site quickly and completely. Your plan should be built on established best practices for data integrity and availability.
- The 3-2-1 Rule: This is the gold standard for data protection. Maintain at least three copies of your data on two different types of media, with at least one copy stored offsite (e.g., in the cloud).
- Backup Scope: Ensure your backups include everything needed for a full restoration. This means not just the WordPress database and
wp-contentfolder, but also core files and server configuration files. - Restoration Testing: A backup is only useful if it can be successfully restored. Regularly test your recovery procedures to verify the integrity of your backup files and iron out any issues in the process.
- Automation & Monitoring: Backups should run automatically on a set schedule. Equally important is setting up automated alerts that notify you immediately if a backup fails, so you can address the problem before a data-loss event occurs.
Actionable Backup Tips
Setting up your system is the first step; maintaining it ensures its reliability. Here are specific actions to implement before you go live:
- Choose a Reliable Solution: Use a trusted backup plugin like UpdraftPlus or BlogVault, or opt for a host that provides this service. Managed hosts are ideal here.
- Document Everything: Create a step-by-step recovery guide for your team. This document should detail how to access backups, who has the authority to initiate a restore, and the exact procedure to follow.
- Secure Your Backups: Encrypt your backup files and store them in a secure, access-controlled location. An unencrypted backup in the wrong hands can be as damaging as a direct site breach.
- Leverage Managed Hosting: The simplest and most reliable approach is often to choose a hosting provider that handles this for you. A managed WordPress host like WP Foundry includes automated, offsite backups and one-click restore functionality as a core feature, removing the complexity and potential for human error.
For a more detailed walkthrough, you can find a complete guide on how to secure your WordPress site with a solid backup plan. By establishing this system before launch, you ensure your site is protected from day one.
Site Launch Checklist: 7 Key Components Comparison
| Aspect | Performance Testing & Optimization | Cross-Browser & Device Compatibility Testing | Security Implementation & SSL Configuration | SEO Foundation & Meta Data Setup | Analytics & Tracking Setup | Content Review & Quality Assurance | Backup & Recovery System Setup |
|---|---|---|---|---|---|---|---|
| Implementation Complexity 🔄 | High: requires technical expertise and ongoing adjustments | High: needs diverse devices, browsers, and maintenance | Medium-High: setup and continuous updates required | Medium: initial setup with ongoing updates needed | Medium: setup plus ongoing data interpretation | Medium: multi-stakeholder reviews, detailed checks | Medium: multiple backup methods and testing |
| Resource Requirements ⚡ | Moderate: testing tools, developer time | High: access to multiple devices and browsers | Moderate: security tools, monitoring, updates | Low-Moderate: SEO tools and monitoring | Moderate: analytics platforms and training | Moderate: reviewers, tools for proofreading and legal checks | Moderate: backup storage solutions and maintenance |
| Expected Outcomes 📊 | ⭐⭐⭐⭐⭐ Improved speed, UX, SEO, conversions | ⭐⭐⭐⭐ Ensures wide accessibility, reduces bugs | ⭐⭐⭐⭐⭐ Data security, trust, SEO boost | ⭐⭐⭐⭐ Better rankings, indexing, rich snippets | ⭐⭐⭐⭐ Data-driven insights, ROI measurement | ⭐⭐⭐⭐ Credible brand, legal compliance, better SEO | ⭐⭐⭐⭐ Data protection, quick recovery, compliance |
| Ideal Use Cases 💡 | Content-heavy, high-traffic, e-commerce sites | Multi-platform products, responsive sites | Sites handling sensitive data, e-commerce | Sites reliant on organic search traffic | Businesses requiring user behavior analysis | Brands needing quality control and compliance | Any live site needing risk mitigation |
| Key Advantages ⭐ | Page speed boost, engagement, lower bounce | Cross-platform reliability and user reach | User trust, regulatory compliance | Enhanced search visibility and CTR | Informed decisions, tracking effectiveness | Quality, consistency, legal risk reduction | Data safety, business continuity, quick restores |
Launch With Confidence, Manage With Ease
Navigating the complexities of a website launch can feel like commanding a multifaceted mission. You've meticulously planned, designed, and built your digital presence, and the final moments before liftoff are the most critical. This comprehensive site launch checklist is designed to be your pre-flight manual, transforming what could be a chaotic process into a systematic, controlled, and ultimately successful deployment. By methodically addressing performance, compatibility, security, SEO, analytics, content, and backups, you are not just flipping a switch; you are laying a robust foundation for future growth and digital excellence.
Each step we've covered, from optimizing load times to configuring SSL certificates and setting up a reliable backup system, represents a crucial pillar supporting your website's integrity and performance. A missed step doesn't just create a post-launch headache; it can actively undermine your efforts, leading to poor user experience, security vulnerabilities, or a complete absence from search engine results. This checklist ensures that every technical detail is accounted for, empowering you to launch with the assurance that your site is secure, fast, and ready for your audience.
From Checklist to Continuous Success
The true value of this process extends far beyond the launch day itself. Adhering to this structured approach instills a discipline of thoroughness and quality control that will define the entire lifecycle of your website. It shifts the mindset from a reactive "fix-it-when-it-breaks" mentality to a proactive strategy of building resilience and quality from the ground up. This initial investment of time and attention pays dividends in the form of reduced long-term maintenance costs, higher user satisfaction, and better business outcomes.
Remember, a successful launch isn't the finish line; it's the starting gun. The digital landscape is in constant flux, with new security threats emerging, search engine algorithms evolving, and user expectations rising. The principles embedded in this checklist, particularly those concerning security, performance, and backups, are not one-time tasks. They are ongoing commitments.
Integrating Launch with Long-Term Strategy
Once your site is live and technically sound, the focus naturally shifts towards growth and user engagement. While a thorough checklist ensures a flawless technical launch, truly managing your site with ease and achieving long-term success also depends on developing a comprehensive marketing strategy. This strategic layer will guide your content creation, user acquisition efforts, and overall business goals, ensuring your perfectly launched website reaches its intended audience and fulfills its purpose. The technical and strategic elements must work in harmony.
Ultimately, mastering this site launch checklist is about taking control. It’s about replacing anxiety with confidence and uncertainty with a clear, actionable plan. For freelance developers and digital agencies, it standardizes quality and enhances client trust. For small business owners and content creators, it demystifies the technical hurdles, allowing you to focus on your core mission. By embracing this detailed framework, you ensure that your website doesn't just go live; it launches with an undeniable competitive advantage, ready to perform, scale, and succeed from day one.
Ready to move from a single launch to effortless management of your entire WordPress portfolio? Stop juggling multiple dashboards and start streamlining your workflow. WP Foundry centralizes all your critical maintenance tasks, allowing you to run updates, schedule backups, and monitor security across all your sites from one powerful platform. WP Foundry is the logical next step after the checklist, turning post-launch management into your greatest efficiency.