
Proper WordPress users management is the bedrock of a secure and efficient site. It’s all about giving people the right level of access—enough to do their job, but not so much that they can accidentally break things.
Getting this right ensures your team can publish content, manage plugins, or tweak settings without stepping on each other's toes or compromising your site’s security.
Why WordPress User Management Matters
Think of your WordPress site as a building. You wouldn’t hand the master key to every single person who needs to get inside, would you? The intern gets a key to their office, the janitor gets a key for the supply closet, and only the building manager has the master key.
That's user management in a nutshell. Each person on your site should only have the permissions they absolutely need. This is a core security idea known as the principle of least privilege, and it's something I always stress to clients.
When you let user management slide, you're opening the door to all sorts of headaches:
- Big Security Holes: Giving everyone 'Administrator' access is like leaving the front door wide open. It multiplies the potential ways an attacker could get in and cause chaos.
- Operational Messes: Without clear roles, workflows get tangled. A writer might accidentally deactivate a critical plugin, or a designer could delete a page they shouldn't have access to. I've seen it happen.
- Growth Nightmares: As your team gets bigger, a sloppy user setup becomes completely unworkable. Bringing on new people or removing departing ones turns into a confusing, insecure scramble.
Understanding the User Hierarchy
WordPress is built around a pretty straightforward hierarchy of user roles, each with its own set of permissions. This system is crucial, especially when you consider how many sites rely on it. As of August 2025, WordPress powers an incredible 43.4% of all websites globally. That's over 541 million active sites depending on this exact user structure to stay secure and functional. If you're curious, you can dig into more WordPress statistics to see just how massive its footprint is.
This built-in structure is what makes managing a team, big or small, possible. Here’s a simple visual that breaks down the typical content-focused roles.
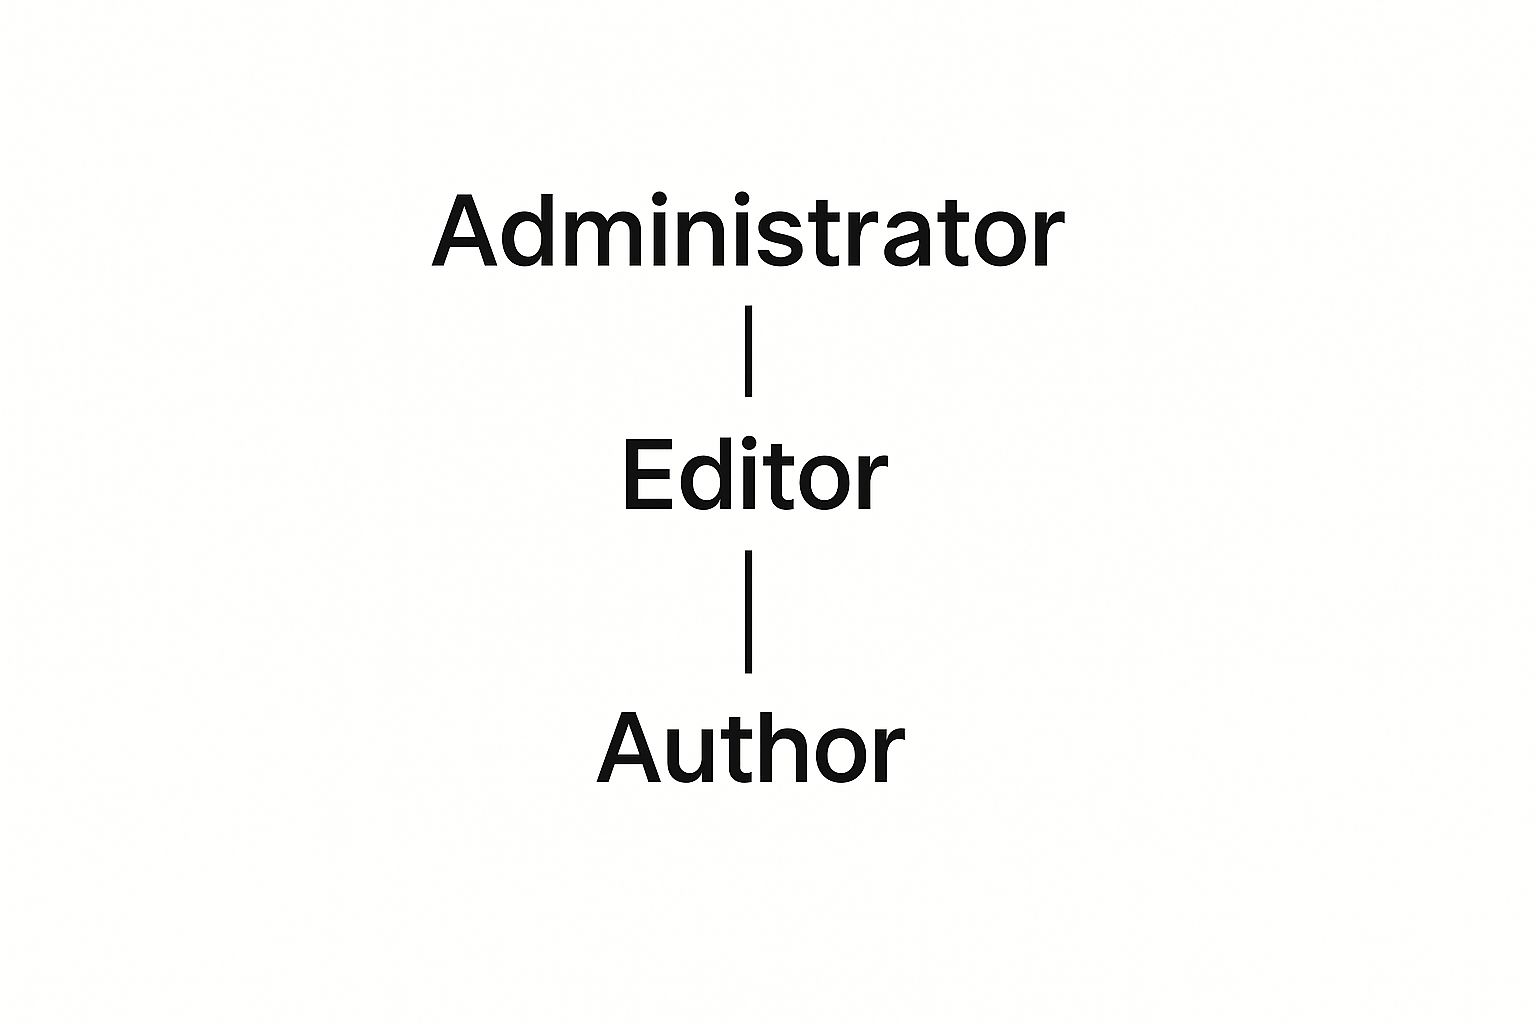
As you can see, the Administrator sits at the top with total control. Below them, the Editor manages all the site's content, while the Author can only create and manage their own. Each step down the ladder means fewer permissions, which creates a logical and secure workflow. Nailing this structure is the key to solid WordPress users management.
To make this even clearer, here's a quick-reference comparison of the five standard user roles in WordPress. It highlights their primary capabilities and limitations to help you make informed decisions when assigning roles to your team.
Default WordPress User Roles and Key Permissions
| User Role | Can Publish Content | Can Edit Others' Content | Can Manage Plugins/Themes | Best For |
|---|---|---|---|---|
| Administrator | Yes | Yes | Yes | Site owners, developers—full control. |
| Editor | Yes | Yes | No | Content managers, editors-in-chief. |
| Author | Yes (their own) | No | No | Regular content creators, bloggers. |
| Contributor | No (can write) | No | No | Guest writers, one-off contributors. |
| Subscriber | No | No | No | Users who need a profile (e.g., commenting). |
Choosing the right role from the start prevents a lot of problems down the road. Always start with the lowest level of permission a user needs and only grant more access if it's absolutely necessary.
Managing Individual User Accounts
This is where the rubber meets the road. Good WordPress user management isn't just about big-picture strategy; it's about the day-to-day work of handling individual accounts and making sure everyone has exactly the access they need, right when they need it.
Adding a new user might feel like a simple task, but it’s your first security checkpoint. When you head to Users > Add New, you're doing more than just filling in a form—you're defining a boundary. Getting the role right from the start is absolutely key to preventing headaches down the line, like a new writer accidentally stumbling into your theme settings.
Adding and Editing Users with Precision
Let's say you're bringing on a freelance writer. The best practice is to start them with the most restrictive role that still lets them do their job. In most cases, that’s the Contributor role. You can always bump them up later.
As their role on the team evolves, editing their profile is a breeze:
- Navigate to the Users screen in your WordPress dashboard.
- Find their username in the list and click on it.
- Scroll down to find the Role dropdown menu.
- Select their new role and click Update User. Done.
This simple workflow is perfect for adapting to changes in your team. For instance, if an Author gets promoted to manage the entire blog, a quick switch to the Editor role gives them the power to approve and edit other people's posts without handing over the keys to the kingdom (i.e., full admin access).
With WordPress powering sites in over 70 languages across the globe, having this kind of granular control is more important than ever. Your team could be spread out from the United States to Germany, and careful role assignment is what lets you manage their unique workflows effectively. For a deeper dive, check out the stats on WordPress's worldwide adoption on globalmediainsight.com.
The Right Way to Remove a User
Taking a user off your site requires a bit more care than just clicking "delete." When a team member or contractor moves on, you need to protect both your content and your site's security.
Crucial Takeaway: When deleting a user, WordPress gives you a choice about what to do with their content. Don't just delete it. Always reassign their posts and articles to another user, like a main admin account or their replacement.
This single step is the most important part of offboarding someone. By reassigning their content, you preserve all that valuable work and its SEO footprint while securely closing their access.
Nailing these individual user actions is the foundation of a solid management strategy. For more tips, check out our guide on how to manage WordPress users with tools like WP Foundry.
Streamlining Your Workflow with Bulk Actions
As your WordPress site picks up steam, you'll quickly find that managing users one by one becomes a real drag. Clicking into profile after profile to change a role or delete an account is fine when you're just starting out, but it's a massive time-sink for a buzzing online community or a growing business.
This is where getting comfortable with bulk actions in WordPress users management pays off big time.
Luckily, WordPress has a built-in way to handle this right from the dashboard. Just head to the Users screen, tick the checkboxes next to the accounts you want to manage, and look for the "Bulk actions" dropdown menu. That little menu is about to become your new best friend.
Using WordPress's Native Bulk Features
The default options are pretty straightforward but surprisingly powerful for quick cleanups. Let's say your company just restructured and you need to switch an entire team of ten Authors over to the Contributor role. Instead of slogging through ten separate profiles, you can knock it out in a few seconds.
Here's how you can handle a couple of common scenarios:
- Mass Role Changes: Just select all the users who need an update, choose "Change role to…" from the dropdown, pick their new role, and hit "Apply." Done.
- Removing Multiple Users: Got hit with a wave of spam registrations? Tick the box for every one of them, select "Delete," and they're gone.
Pro Tip: When you're bulk deleting users, WordPress will ask if you want to reassign any content they've created. This is a critical step. If you don't reassign their posts, you could lose valuable articles. Always attribute their content to an admin or another editor account to keep it safe.
Stepping Up Your Game with Plugins and Tools
While the built-in features are great for the basics, they have their limits. For instance, you can't just upload a spreadsheet to add a bunch of new users at once, nor can you easily export a user list for an audit. When you hit these walls, it's time to bring in some specialized tools.
Plugins like "Import and export users and customers" let you do things like upload a CSV file with usernames and roles, adding your whole team in one go.
For even more control, especially across multiple sites, a desktop app like WP Foundry centralizes all of these tasks. It allows you to add, remove, and edit users in bulk without ever having to log in to each site's dashboard individually. The time savings can be incredible.
Customizing User Roles and Capabilities

WordPress’s default user roles are a decent starting point, but they can feel a bit like a one-size-fits-all solution. In the real world, your needs are almost always more specific.
What if you want a team member to manage blog posts but keep them away from your site's main pages? Or maybe you have a guest writer who only needs permission to submit a draft for review, not publish it live. This is exactly why custom user roles are so crucial for proper WordPress users management.
Instead of trying to fit your workflow into WordPress's default roles, you can build a system that works for you. It's not just about convenience—it's a smart security practice.
Fine-Tuning Permissions with a Role Editor
The easiest way to get this done is with a good plugin. A tool like the popular User Role Editor gives you a simple interface with checkboxes to change existing roles or create new ones from the ground up. No coding required.
Let's say you want to create a "Content Manager" role. The goal is to give them full control over posts but block them from editing pages or changing site-wide settings.
Using a role editor plugin, you can clone the standard Editor role and then start trimming down its permissions, which WordPress calls capabilities.
edit_pages: Untick this, and they can no longer touch your "About Us" or "Contact" pages.manage_options: This one is powerful. Removing it means they can't mess with your site's core settings.activate_plugins: Unchecking this locks them out of the plugins area, preventing them from accidentally breaking something.
This level of control lets you apply the principle of least privilege—giving users only the access they absolutely need to do their jobs. It’s a foundational security concept that significantly cuts down your site's risk from both simple mistakes and intentional harm.
By tailoring roles, you're building a system where each user has a clear and secure boundary. A custom role ensures a marketing intern can't accidentally deactivate your e-commerce plugin, and a guest blogger can't edit your homepage.
Understanding Capabilities and Custom Roles
Every single action a user can perform in WordPress is governed by a capability. There are dozens of them, from publish_posts to moderate_comments. When you create a custom role, you're really just making a unique collection of these capabilities.
If you want to get into the weeds on how these permissions work, our complete guide to WordPress user roles breaks down all the important ones.
For instance, you could create a "Guest Contributor" role with just two key capabilities:
edit_posts: This lets them write and save their work as drafts.upload_files: This allows them to add images to their articles.
Critically, they would not have the publish_posts capability, forcing every piece of content to go through an approval process with an editor. This simple setup keeps your live site secure while making your editorial process smoother. It turns user management from a chore into a strategic tool for your site’s efficiency and safety.
Essential Security Practices for User Management
Smart user management and solid security are really two sides of the same coin. Think of your user access framework as one of your best defenses—it turns potential weak spots into heavily guarded gates. It’s all about being proactive instead of just reacting when something goes wrong.
This goes way beyond just handing out roles. It means actively building layers of security to protect your site from both hackers and honest mistakes. A few simple habits, applied consistently, can make a massive difference.
Enforce Strong Passwords and Two-Factor Authentication
A weak password is like leaving your front door wide open. It’s the most common way attackers get in. You can instantly beef up your security by forcing all users to create complex passwords. Plenty of plugins can help you enforce rules like minimum length, a mix of uppercase letters, lowercase letters, numbers, and symbols.
But even the strongest password can be stolen. That’s why Two-Factor Authentication (2FA) is an absolute must for any website that you’re serious about. 2FA adds a second security check, usually a time-sensitive code from an app on the user’s phone, that they need to enter along with their password. This simple step makes it incredibly difficult for someone to get in, even if they have the password.
Revisit the Principle of Least Privilege
I know we've mentioned this before, but it's a security rule that’s worth hammering home: always give users the absolute minimum level of access they need to do their job. This is the principle of least privilege, and it's a cornerstone of good security.
Before you give someone access, stop and ask a few questions:
- Does this contractor really need to install plugins?
- Should this writer be able to edit pages that other people created?
- Is an Administrator account truly necessary, or would the Editor role work just as well?
By being strict with permissions, you drastically limit the damage a compromised account or a simple mistake can cause. A user with fewer powers can do far less harm.
Conduct Regular User Audits
Over time, your user list can get cluttered with old, inactive accounts. Think former employees, one-off freelancers, or test accounts you forgot about. Every single one is a potential security risk just sitting there.
Make it a quarterly habit to go through your entire user list. Look at every single account and ask, "Does this person still need access to our site?" If the answer is no, delete their account right away. Just make sure to reassign their content first.
This bit of housekeeping is a surprisingly powerful security move. WordPress sites are under constant attack, so the fewer entry points you have, the better. This is especially true when you consider that outdated plugins are a huge source of vulnerabilities. Limiting who can manage plugins is critical. You can get more insights into WordPress security stats over on Hostinger.com.
Monitor User Activity
Knowing what’s happening on your site is just as important as locking it down. By installing an activity log plugin, you can see a detailed trail of what every user is doing—who logged in, what posts they edited, which plugins they activated, and more.
This log is a lifesaver for tracking down problems or spotting weird behavior before it becomes a disaster. If you see an editor account trying to mess with theme files at 3 AM, you can investigate and lock the account down before they do any real damage.
For a more structured approach to fortifying your site, you might be interested in our complete WordPress security checklist that covers these points and many more in greater detail.
Got Questions About Managing WordPress Users?
Once you've got the hang of the basics, you'll inevitably run into some specific situations that can be a bit tricky. This section is your go-to reference for the most common questions and sticking points we see site admins struggle with.
Think of it as your troubleshooting guide for everyday user management tasks.
What's The Real Difference Between an Editor and an Administrator?
It all comes down to site-wide control. An Editor has full command over all the content. They can write, publish, edit, and even delete any post or page on the site, no matter who wrote it. It's a role that’s laser-focused on your content pipeline.
But that's where their power ends. An Editor can't get into the technical guts of your site. They have zero access to things like installing themes or plugins, adding or removing other users, or tweaking core WordPress settings.
An Administrator, on the other hand, holds all the keys. They can do everything an Editor can, but they also have complete control over every single backend setting. This means themes, plugins, site settings, and every user account. Because this role is so powerful, you should only give Administrator access to people you trust completely with your site’s technical health.
Can I Make My Own User Roles Without a Plugin?
Technically, yes, you can. It involves writing PHP code and adding it to your theme's functions.php file (or a site-specific plugin) using built-in WordPress functions like add_role().
But honestly, this is a risky path. One tiny typo or syntax error in that code could bring your entire website down.
For almost everyone, using a dedicated plugin like User Role Editor is a much safer and faster solution. These tools give you a simple visual interface to build and manage custom roles and permissions, no coding required.
How Can I See What a User Sees on Their Dashboard?
The absolute best way to do this is with a role-switching plugin. Instead of the hassle of logging out and then back in with someone else's credentials, you can use a tool like User Switching.
These plugins add a "Switch To" link next to each user. With one click, you can instantly log in as that user—without needing their password. It gives you a perfect, firsthand view of their dashboard, what they can access, and what they can't. It's fantastic for making sure your custom roles are working exactly as planned. When you're done, you just click a link to switch right back to your admin account.
What Happens to a User's Posts When I Delete Their Account?
When you delete a user, WordPress forces you to make a crucial decision about the content they've created. You get two choices:
- Delete all content: This permanently wipes out every post, page, or custom post type created by that user. It's gone for good.
- Attribute all content to: This reassigns all their content to another user you select from a dropdown menu.
In nearly every situation—like when an employee moves on from the company—you’ll want to reassign their content. You can assign it to a general "Admin" account or to the person taking over their role. This keeps all that valuable content (and its SEO juice) live on your site while completely and securely locking the old user out.
Tired of juggling multiple WordPress dashboards? WP Foundry centralizes your site management, letting you handle plugin updates, user accounts, and backups across all your sites from one powerful desktop app. Get your time back and simplify your workflow. Visit https://wpfoundry.app to get started.