
So, what do we actually mean when we talk about WordPress theme "best practices"? At their core, these are really just a set of proven guidelines for building themes that are secure, fast, and accessible for everyone.
Following these standards isn't about jumping through hoops. It's about ensuring your theme is stable, easy to maintain, and plays nicely with the massive WordPress ecosystem.
Your Blueprint for a Flawless WordPress Theme
Before you even think about writing a single line of code, it’s critical to understand the why behind professional theme development. Building a great WordPress theme is a lot like constructing a house—you absolutely need a solid blueprint. Without one, you're just asking for trouble, and you'll end up with a final product that's unstable, insecure, and a nightmare to maintain.
Think of this guide as your blueprint.
Following established best practices isn’t about blindly adhering to rigid rules. It's about making smart, deliberate choices that result in a better theme for everyone involved. A well-built theme creates a smooth experience for the person browsing the site and for the next developer who has to work on it.
The Core Philosophy of Quality Themes
When you strip it all down, professional theme development is all about three things: a great user experience, iron-clad security, and future-proof compatibility. Getting these right means your theme won't just look good when you launch it; it will keep performing well as WordPress itself continues to evolve.
The infographic below gives a great visual breakdown of this hierarchy, showing how a top-tier theme is built on these core components.
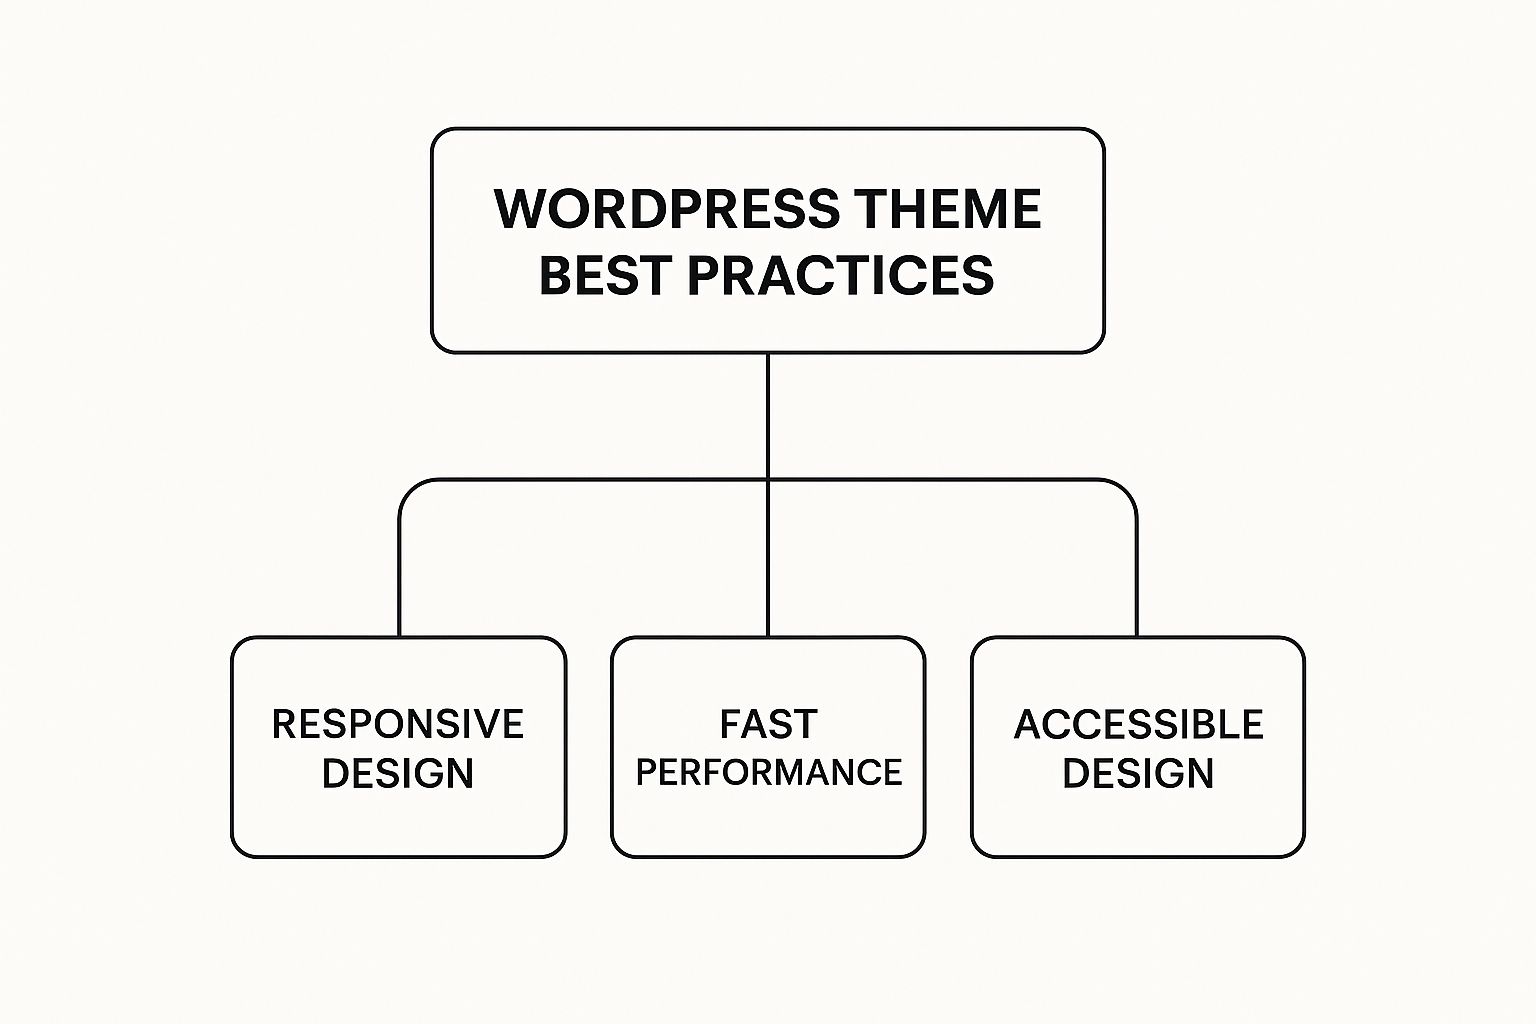
As you can see, things like responsive design, quick performance, and accessibility aren't just nice-to-haves. They're the very foundation of a quality WordPress theme. If you let one of these pillars crumble, the entire user experience can be compromised.
To give you a better overview before we dive into the details, here's a quick look at the core principles we'll be covering.
The Core Pillars of Modern Theme Development
A high-level view of the essential principles that guide professional WordPress theme creation, which we will unpack in this guide.
| Pillar | Primary Goal | Essential Action |
|---|---|---|
| Coding Standards | Write clean, consistent, and readable code. | Follow official WordPress coding standards for PHP, HTML, CSS, and JS. |
| Performance | Build a fast-loading and efficient website. | Optimize images, minify assets, and use efficient database queries. |
| Security | Protect the site from common vulnerabilities. | Sanitize inputs, escape outputs, and use nonces to validate requests. |
| Accessibility | Ensure the theme is usable by everyone. | Implement ARIA roles, provide text alternatives, and ensure keyboard navigation. |
| Workflow | Streamline the development and deployment process. | Use version control (like Git) and set up automated build tools. |
These pillars aren't just abstract ideas; they have real-world impact and are the key to building themes that truly stand out.
The sheer scale of WordPress makes these practices more important than ever. As of 2025, WordPress powers a staggering 43.4% of all websites on the internet, making it the most dominant platform by a long shot. This means your theme could be used in thousands of different hosting environments and plugin combinations. Sticking to a common set of standards is the only way to ensure it works reliably for everyone. You can find more data on WordPress usage and market share to see just how big its footprint is.
Think of theme best practices as the shared language of the WordPress community. When you "speak" this language, you ensure your work is understood, valued, and easily integrated by others—from DIY site owners to large agency development teams.
Ultimately, mastering these principles is what separates a simple "skin" from a robust, professional-grade product. It's the difference between a theme that just works and one that truly excels. By focusing on the core ideas we're about to explore, you're setting yourself up to create something great.
Write Clean Code with WordPress Standards
Think of your theme's code as its grammar. If the grammar is a mess, the message gets lost, and everything becomes confusing. The same goes for building a WordPress theme. Following the official WordPress Coding Standards is the first and most fundamental step to ensure your theme's "grammar" is on point.
These standards are just a shared set of rules for PHP, HTML, CSS, and JavaScript that keep everything consistent and easy to read. This isn’t just about making your code look tidy; it's about building something that actually works well, is easy to maintain, and won't give your future self a headache. A theme built on clean code is simply less buggy and much easier to update down the line.
This consistency is also a game-changer when you're working with others. If another developer jumps into your theme, they can get up to speed quickly without having to decipher a completely unique coding style. It also dramatically improves your odds of getting a theme approved on professional marketplaces, which all have strict quality checks.
The Anatomy of Clean Code
So, what does "clean code" actually mean in practice? It really just comes down to a handful of core principles that turn a chaotic mess into a professional, solid product. These rules dictate everything from how you space your code to how you name your functions.
Here's a look at the core of the WordPress coding standards:
- Proper Indentation: You should always use real tabs, not spaces, for indentation. This simple habit creates a clear visual structure, making it obvious how different blocks of code are nested.
- Clear Naming Conventions: Your function and variable names need to be descriptive. Use lowercase letters and separate words with underscores (e.g.,
my_custom_post_typeis good;myCustomPostTypeormyfunctionis not). - Braces and Spacing: Always wrap control structures like
if,else, andforeachin curly braces, even if it's just a single line of code. It’s also important to put spaces around operators (=,+,-) and after commas to make the code easier on the eyes. - Using WordPress Core Functions: Don't reinvent the wheel. If WordPress has a built-in function for something, use it. A great example is using
wp_remote_get()for API calls instead of rolling your own with PHP'sfile_get_contents().
If you're serious about taking your theme from good to great, it’s worth looking beyond just the basics and exploring some real strategies to improve code quality.
Good Code vs. Bad Code: An Example
The difference between standardized and non-standardized code is like night and day. Let's say you're trying to add a simple "Read More" link.
The "Bad" Way (Hard to Read):
This code might technically work, but it’s a mess. The spacing is all over the place, it's missing braces, and the PHP short tags just make it harder to scan and understand what’s happening.
Read More!‘;
}?>
The "Good" Way (WordPress Standard):
Now, look at this version. It's immediately clearer. The indentation is right, the function name is descriptive, it uses full PHP tags, and the consistent spacing makes it look professional and easy to work with.
‘ . esc_html__( ‘Read More’, ‘your-theme-text-domain’ ) . ‘‘;
}
?>
Did you notice the esc_url() and esc_html__() functions? That brings up another critical practice we'll dive into later: security. As you can see, clean code and secure code almost always go together.
Think of coding standards as the official "style guide" for WordPress. Just as journalists follow the AP Stylebook for consistency, developers follow WordPress standards to create a cohesive and reliable ecosystem.
By making these principles a habit, you’re not just writing code anymore—you're crafting a professional-grade product. That commitment to quality is what separates a great WordPress theme from the rest, ensuring your work is not only functional today but also ready to grow and adapt for years.
Build a Theme Optimized for Speed

When you're building a WordPress theme, speed isn't just a nice feature—it's everything. A sluggish theme doesn't just make for a bad user experience; it can actively hurt your search rankings and torpedo your conversion rates. That's why building for performance from the very beginning is one of the most important WordPress theme best practices you can adopt.
A fast site just feels better and keeps people on the page. But more than that, it's a huge signal to search engines that your site is a quality destination. The trick is to treat performance as a foundational element, not something you tack on at the end. Every script, every image, every function call matters.
Enqueue Scripts and Styles the Right Way
One of the most common things that drags down a WordPress site is loading CSS and JavaScript files the wrong way. The right way is to "enqueue" them using WordPress's built-in functions. Imagine it like asking a librarian for a specific book—they know exactly where it is and bring it to you just when you need it. The wrong way is like dumping the entire library's contents on your desk and making you sort through it.
That's exactly what wp_enqueue_script() and wp_enqueue_style() do. Instead of just dropping <link> and <script> tags into your header.php or footer.php files, you let WordPress manage the entire process.
This simple shift has some major upsides:
- No More Conflicts: WordPress is smart enough to see if two different plugins need the same script (like jQuery) and will only load it once.
- Keeps Things Tidy: All your asset registrations live in one place, usually your
functions.phpfile, which makes everything much easier to track and debug. - Plays Nice with Plugins: Performance and caching plugins need the enqueue system to do their magic—minifying, combining, and deferring assets. If you hardcode your scripts, these tools can't see them.
Once you've got that down, you can take it a step further with conditional loading. There's no reason to load a script for your contact form on every single page of your site. Using a simple conditional tag like is_page('contact') lets you load that script only on the contact page, cutting down on unnecessary bloat everywhere else.
Minimize HTTP Requests and Optimize Assets
Every single file your theme calls—a CSS file, a JavaScript file, an image—is a separate trip the browser has to make to the server. These are called HTTP requests, and they add up fast. Your goal is to keep these trips to a minimum. Combining multiple CSS or JavaScript files into one is a great start.
Then there's image optimization, which is absolutely non-negotiable. Giant, uncompressed images are a classic performance killer. Make sure you're always doing these three things:
- Compress Your Images: Use a tool to shrink the file size of your images. You can often cut the size dramatically without any noticeable loss in quality.
- Use the Right Size: Never upload a 3000-pixel-wide image if it's just going to be displayed in a 600-pixel container. Resize your images first.
- Lazy Load Images: This is a fantastic technique where images below the fold don't load until the user actually scrolls down to them. It makes the initial page load much, much faster. WordPress has this built-in now, so just make sure your theme supports it properly.
A theme's performance is a direct reflection of its developer's attention to detail. Efficient code isn't just about what a theme does—it's about what it doesn't do, like loading unnecessary assets or making redundant database calls.
This is all doubly important when you think about mobile users. With over 50% of WordPress site traffic now coming from mobile, a fast-loading theme is a must-have. Mobile connections can be spotty, and users are impatient; research shows 40% of users will ditch a site if it takes more than three seconds to load. You can see more data on this by checking out these detailed WordPress statistics.
Finally, caching is your secret weapon for speed. While it's usually managed by a plugin, a well-coded theme is built to work seamlessly with caching systems. To get a better handle on this, check out our guide on how to cache a website, which breaks down how these systems create static copies of your pages to serve them up almost instantly.
Implement Ironclad Theme Security

Security isn't a feature you tack on at the end. It needs to be baked into your theme from the very first line of code. A properly built theme acts as a security guard for the website's data and its visitors.
Skipping security in your code is like building a house and leaving the doors unlocked. Sooner or later, someone you don't want is going to wander inside.
When you follow WordPress best practices for security, you're actively shielding sites from the most common attacks out there. This is a massive responsibility—a single weak spot in your theme could put thousands of websites at risk. The core of this is a simple but powerful mantra: never trust user input.
The Security Trio: Validation, Sanitization, and Escaping
To build a secure theme, you need to master three key concepts that work hand-in-hand to manage data safely. Think of them as a three-stage security checkpoint for every bit of information that passes through your theme.
-
Validation: This is the first gatekeeper. It simply checks if the data you've received is in the format you expected. For instance, if you're asking for an email, validation makes sure the input actually looks like an email address, not just a random jumble of letters.
-
Sanitization: This is the cleanup crew. Sanitization scrubs any potentially dangerous code or characters from the data before it gets saved to the database. It’s like running user input through a fine-toothed comb to pull out anything malicious.
-
Escaping: This is the final step, and it happens right before data is shown on the screen. Escaping ensures that even if something nasty slipped through the first two checks, it can't run in a visitor's browser. It converts special characters into their harmless HTML versions, effectively defusing them.
Of these three, output escaping is arguably the most critical and something you'll do constantly. It's your last and best line of defense against Cross-Site Scripting (XSS) attacks, where a hacker tries to inject harmful scripts for other users to see. Luckily, WordPress gives you a whole set of functions to make this easy.
Your First Line of Defense: WordPress Helper Functions
WordPress comes with a ready-made toolkit of functions built specifically for escaping different kinds of data. Using them should become pure muscle memory.
esc_html(): Use this for any general HTML content. It turns characters like<and>into<and>, so they can't be mistaken for code.esc_attr(): This one is for data going inside an HTML attribute, like aclassoralttag.esc_url(): Always wrap your URLs in this function to make sure they are safe and correctly formatted before you use them in links or redirects.wp_kses(): This is the heavy-hitter. It lets you define exactly which HTML tags are allowed. It's perfect when you need to permit some basic formatting (like bold or italics) but want to strip out everything else.
Putting these functions to work is straightforward but has a massive impact on security. For a more in-depth look at total site protection, our guide on how to secure a WordPress site covers everything from server hardening to user permissions.
Preventing Unauthorized Actions with Nonces
Another major threat you need to guard against is Cross-Site Request Forgery (CSRF). This is a sneaky attack where a hacker tricks a logged-in user into performing an action they never intended, like deleting a post or changing their email address.
To stop this, WordPress uses nonces—unique, temporary security tokens.
A nonce (which stands for "number used once") acts like a secret, one-time-use password for a specific action. When a user tries to do something sensitive, your theme checks for a valid nonce. If it’s missing or wrong, the request is flat-out rejected, stopping the attack cold.
Creating and checking nonces is a fundamental security step for any form or link that changes data. You use wp_create_nonce() to make the token and wp_verify_nonce() to check it on the other side. This simple check guarantees the request really came from your site and was triggered intentionally by the user.
While these practices will harden your theme, you can also check out this comprehensive guide on how to secure your WordPress site for a wider view of platform-level security. By making these habits part of your everyday workflow, you’ll build themes that don't just work well—they actively protect the sites they power.
Design for a Global and Accessible Audience
A truly great WordPress theme should work just as well for someone in Tokyo as it does for a visitor in Toronto using a screen reader. It needs to be usable, no matter the language, device, or physical ability of the person viewing it.
This is where two core development practices come in: internationalization (i18n) and accessibility (a11y). Getting these right isn't just a technical box-ticking exercise; it's about making your work inclusive and welcoming. Ignoring them means you're actively shrinking your potential audience and creating a frustrating experience for many.
Make Your Theme Translation Ready
Internationalization, often shortened to i18n, is how you build your theme so it can be easily translated without touching the code.
Imagine all the text in your theme is written in permanent marker. To change the language, you'd have to start over. i18n is like writing in pencil instead—the original text can be erased and replaced with a new language at any time.
The way to do this is with WordPress's Gettext functions. Instead of writing text directly into your theme files, you wrap every piece of user-facing text in one of these functions. This flags the text for translation tools like Poedit, which can then scan your files and generate a .pot file for translators to use.
You can think of Gettext functions as special labels for your text. They tell WordPress, "Hey, this string is for a human to read, so it might need to be translated."
Here are the two main functions you'll use:
__(): Returns a translated string. This is what you'd use when you need to assign the text to a variable or pass it to another function._e(): Directly prints (echoes) the translated string onto the page. It's a handy shortcut.
Here’s what that looks like in a theme file:
- Incorrect:
<h2>Recent Posts</h2> - Correct:
<h2><?php _e( 'Recent Posts', 'your-theme-text-domain' ); ?></h2>
That 'your-theme-text-domain' bit is really important. It’s a unique name for your theme that tells WordPress which translation file to use, stopping it from getting mixed up with text from plugins.
Prioritize Web Accessibility
Accessibility, or a11y, means making sure people with disabilities can use your website. This covers a wide range of needs, including visual, auditory, motor, and cognitive impairments. The good news is that designing for accessibility almost always makes for a better, more robust theme for everyone.
Running a quick accessibility check can highlight major roadblocks you might not have noticed. Luckily, many of the fixes are straightforward to implement.
A Practical Accessibility Checklist:
- Use Semantic HTML: Use HTML5 tags like
<header>,<footer>,<nav>, and<main>for their intended purpose. This creates a logical map of the page for screen readers. - Ensure Keyboard Navigability: Someone should be able to get to every interactive part of your site—links, buttons, forms—using only the Tab key. The focus state (the outline that shows what's selected) must always be easy to see.
- Check Color Contrast: Text needs to stand out from its background. The Web Content Accessibility Guidelines (WCAG) require a minimum contrast ratio of 4.5:1 for standard text.
- Add
altText for Images: Any image that conveys information must have descriptivealttext. This gives context to users who can't see the image. - Use ARIA Roles Wisely: ARIA (Accessible Rich Internet Applications) attributes can add extra context where plain HTML falls short. But don't overdo it. A common example is adding
role="button"to a<div>that you've styled to look and act like a button.
Building these habits into your development workflow is the best way to ensure your theme offers an equal experience for all users. To maintain this standard over time, it's a good idea to include these checks in a regular review, much like you would with a WordPress website maintenance plan.
By treating i18n and a11y as essential parts of your process, you move beyond just building functional themes and start creating ones that are truly universal.
Common Questions on Theme Development
Jumping into theme development can feel like wading into a deep pool of questions, especially since WordPress is always changing. Figuring out the right path from the very beginning is key to following WordPress theme best practices and building something solid.
Here, we'll tackle some of the most common questions that pop up for developers. Getting these right from the start will help you build themes that work well, are easy to maintain, and keep up with modern standards.
Should I Build from Scratch or Use a Starter Theme?
This is usually the first big fork in the road. The best route really hinges on what you're trying to accomplish and how much time you've spent in the trenches.
Building a theme from a completely blank slate is a fantastic way to learn, giving you absolute control over every piece of code. Be warned, though: it takes a lot of time.
For almost any professional job, a starter theme is the smarter, more efficient choice. A good starter, like _s (Underscores) or a modern block-based equivalent, gives you a solid, well-tested foundation. It comes with best practices baked right in, from a sensible file structure to basic security, so you're not reinventing the wheel.
A starter theme is like getting a professional-grade car chassis. The frame is already welded perfectly, the engine mounts are in the right spot, and the basic electrical is run. You can skip straight to the fun part: designing the body, picking the paint, and tuning the engine.
Using a starter cuts down your development time significantly and helps you sidestep common mistakes. It's the go-to method for building professional themes for clients.
What Is the Difference Between a Parent and Child Theme?
Getting your head around the parent/child theme concept is an absolute must for any serious WordPress work. A parent theme is the complete package—it has all the files, functions, and styles needed to run a site on its own.
A child theme, on the other hand, piggybacks on its parent. It inherits all the parent's features and is used specifically to hold your custom changes. This could be a few lines of CSS, a new function in functions.php, or a modified template file. Best practice is clear: always use a child theme when you need to customize anything.
There are a couple of huge benefits to this:
- Painless Updates: You can update the parent theme without a second thought whenever security patches or new features are released. All your custom work lives safely in the child theme's folder, completely untouched.
- Clean Code: It keeps your modifications separate and organized, which makes troubleshooting and future maintenance much, much easier.
- Smart Fallbacks: If WordPress looks for a template file in your child theme and doesn't find it, it automatically falls back to using the one from the parent.
If you skip the child theme and edit the parent directly, any update will completely wipe out your hard work. It's a lesson most developers only need to learn once.
How Should I Manage Theme Options?
The one and only "right" way to handle theme settings is through the Theme Customizer API. This is the native WordPress way of doing things.
The Customizer gives users a familiar interface with a live preview, so they can see exactly how their changes will look before committing them. It’s tempting to build your own custom options page in the admin area, but fight that urge. It creates a clunky, disconnected experience for the user and risks breaking with future WordPress updates.
Stick to the Customizer for global settings that apply across the entire site, like:
- Uploading a logo
- Setting color schemes
- Controlling typography (fonts, sizes)
- Choosing default layouts (like sidebar position)
By using the Customizer, you make your theme feel like a natural part of WordPress, which is exactly what users expect.
How Does the Block Editor Change Theme Development?
The Block Editor (you might know it as Gutenberg) has completely changed the game. Theme development isn't about creating rigid PHP templates anymore. The new focus is on flexibility and building with components.
Modern themes are now built around a central theme.json file. This one file is incredibly powerful; it lets you define global styles, set up color palettes, control spacing, and manage typography for the entire site and within the editor. It gives users a ton of creative control, but within the guardrails you've set up.
For building themes in the block era, you'll want to focus on:
- Custom Block Patterns: Build pre-designed sections or complex layouts that users can drop into a page with a single click.
- Styling Core Blocks: Make sure every default WordPress block looks great and matches your theme's design.
- Creating Editor Styles: The goal is to make the backend editor look as close as possible to the live front-end (WYSIWYG). This gives users a true preview as they build.
The modern approach is less about locking everything down and more about giving the user a well-designed toolkit of flexible blocks to build with.
Juggling plugins, themes, and updates across a bunch of sites can be a real headache. With WP Foundry, you can manage everything from a single desktop app, run vulnerability scans, create backups, and get your entire WordPress workflow under control. Stop wasting time and start managing your sites with confidence. Discover how WP Foundry can simplify your workflow.
Comments
One response to “WordPress Theme Best Practices Guide”
[…] to be well-coded for long-term success. To learn what to look for, take a look at our guide on WordPress theme best practices. Following these tips will help ensure your site is not just beautiful, but also fast, secure, and […]