
When we talk about WordPress site speed optimization, what we're really doing is making your website load faster for everyone who visits. It's a mix of different jobs: tuning up your hosting, shrinking image files, using caching smartly, and cleaning up your site's code. The end goal is a better experience for your users and a nice boost in search engine rankings.
Why Site Speed Is a Critical Business Metric
Before we get our hands dirty with the technical stuff, let's get one thing straight: why does speed even matter? A slow website is more than just a little annoyance; it's a direct roadblock to whatever you're trying to achieve with your business.
We live in a world where attention spans are incredibly short. Every millisecond counts. A sluggish site frustrates visitors, and they'll often bounce to a competitor before your page even gets a chance to show them what you've got.
This isn't just a hunch—the numbers back it up. The data is clear: just a 1-second delay in how fast your page loads can lead to a 7% drop in conversions, 11% fewer page views, and a 16% nosedive in customer satisfaction. If you want to dig deeper into these numbers, WP Web Life's guide has some great insights.
Connecting Speed to Search Rankings
Google has been very direct about site speed being a ranking factor. With the rollout of Core Web Vitals, they started measuring user experience with very specific performance metrics. These vitals look at loading speed, how quickly a user can interact with the page, and whether the layout shifts around unexpectedly. All of this directly impacts your visibility in search results.
So, a fast, snappy website gives you a powerful one-two punch:
- Better User Experience: Visitors stick around, actually read your content, and are far more likely to buy something or sign up.
- Improved SEO: Google sees your site as a quality result and rewards you with better rankings, which means more organic traffic.
In short, optimizing your site's speed isn't just a tech chore anymore. It's a core business and marketing strategy that directly affects your bottom line.
To get a clear picture of what we're working with, we've broken down the main areas of WordPress speed optimization into a few key pillars. These are the foundational components that, when addressed, deliver the most significant improvements to your site's performance and user experience.
Key Pillars of WordPress Speed Optimization
| Optimization Pillar | Primary Goal | Common Methods |
|---|---|---|
| Hosting & Server | Create a fast, reliable foundation for your site. | Choosing high-quality managed hosting, using the latest PHP version, enabling server-side caching. |
| Content Delivery | Reduce the distance data travels to reach the user. | Setting up a Content Delivery Network (CDN) to serve assets from global locations. |
| Page Caching | Serve pre-built HTML files instead of processing PHP on every visit. | Using caching plugins (e.g., WP Rocket), browser caching, object caching. |
| Asset Optimization | Shrink the size of files the browser has to download. | Compressing images, minifying CSS/JavaScript, deferring non-critical scripts. |
| Database & Plugins | Keep the WordPress backend running efficiently. | Cleaning the database, removing unused plugins, choosing lightweight alternatives. |
Each of these pillars plays a crucial role. Neglecting one can undermine your efforts in another, which is why a holistic approach is the only way to achieve truly impressive loading times.
How to Measure Your Starting Point
You can't improve what you don't measure. Before you start tweaking anything, you need a baseline. Tools like Google PageSpeed Insights are perfect for this, giving you a detailed report card on how your site performs on both mobile and desktop.
Here’s an example of what that PageSpeed Insights report looks like. It gives you a score and, more importantly, a list of actionable recommendations.
This report points you to specific problems, like images that are too big or scripts that are blocking the page from rendering. Understanding this data is your first real step toward a much faster website.
Building Your Foundation on High-Performance Hosting

Let's start with the bedrock of your website: the hosting. It’s a lot like the engine in a car. You could have the most stunning, aerodynamic vehicle, but with a lawnmower engine under the hood, you’re not winning any races. The same goes for your website; all the WordPress site speed optimization in the world won't matter if your hosting is slow and struggling.
A lot of people kick things off with shared hosting. It's cheap, and that's the main draw. But "shared" means you're splitting resources like CPU, RAM, and bandwidth with who-knows-how-many other websites. If one of your server "neighbors" suddenly goes viral, their traffic spike can drag your site's performance right down with it—a problem totally out of your hands.
When to Upgrade Your Hosting
Knowing when you've outgrown your starter hosting plan is crucial. Are you noticing frequent slowdowns? Or worse, periods of downtime? Do you get a sense of dread instead of excitement when you think about a surge in traffic? Those are the classic warning signs that your site's engine is on its last legs.
Moving to a better plan shouldn't be seen as just another cost. It’s a direct investment in your site's performance, reliability, and ultimately, the experience you give your users.
The two most common upgrade paths are:
- Managed WordPress Hosting: This is a fantastic option built from the ground up specifically for WordPress. These providers manage all the tricky server-side stuff for you—security, backups, updates, and even performance-tuned caching. It's the perfect "set it and forget it" choice if you'd rather focus on your business than become a part-time server admin.
- Virtual Private Server (VPS): A VPS gives you your own dedicated slice of a server. It's a major step up from shared hosting, with far more resources and control. This route does require a bit more technical know-how to manage, but it delivers incredible scalability and flexibility for sites with serious traffic.
One of the key metrics to watch here is your server's response time. A slow "time to first byte" (TTFB) is a dead giveaway that your server is struggling to keep up, which can tank both your user experience and your SEO rankings. This is where using a Content Delivery Network (CDN) to serve up your static files from servers closer to your visitors becomes essential. For a deeper dive into this, the team at MobiLoud's blog has some great insights.
The Magic of Caching
Right after quality hosting, caching is the single most powerful tool in your speed optimization arsenal. It works by creating static HTML copies of your pages and storing them, ready to be served up instantly to visitors.
Instead of your server having to piece together the page from scratch for every single person who lands on it, it just hands over a pre-built version. This slashes the load on your server and makes your site feel incredibly snappy.
There are two main types of caching you'll want to get working for you:
Browser Caching
This is a set of instructions you send to a visitor's web browser, telling it to save static files—things like your logo, CSS stylesheets, and JavaScript files—on their local computer. When they click to another page on your site, those files load directly from their hard drive instead of being downloaded all over again. The result? Subsequent page loads feel almost instantaneous.
Server-Side Caching
This is where your hosting company or a dedicated caching plugin (like WP Rocket) saves the complete, ready-to-go HTML pages right on the server. It's what prevents WordPress from having to run all its PHP scripts for every single page load, which is one of the platform's biggest performance bottlenecks.
A powerful caching strategy is non-negotiable for any serious website. By combining a quality hosting provider with robust server-side and browser caching, you create a foundation that can handle traffic and deliver a consistently fast experience.
Optimizing Your On-Page Assets and Media
The content that truly brings your site to life—your images, videos, and graphics—can also be its heaviest burden. These assets are often the biggest culprits behind slow load times, so getting a handle on media optimization is a non-negotiable part of any serious WordPress speed optimization strategy.
The real trick is to shrink those file sizes way down without your visitors ever noticing a drop in quality. It's a bit of a balancing act, but with the right tools and a few smart techniques, it's easier than you might think. You don't have to sacrifice a beautiful, media-rich site for the sake of speed.
Choosing the Right Image Format
It all starts with picking the right file format for the job. For a long time, the go-to choices have been JPEG for photos and other complex images, and PNG for graphics that need a transparent background. JPEGs are fantastic at compressing photographic detail, while PNGs keep sharp lines and transparency perfectly intact.
But there's a newer player in town: WebP. This modern format, developed by Google, often delivers much better compression than both JPEGs and PNGs, leading to some seriously smaller files with virtually identical visual quality. The best part? Many of today's image optimization plugins can automatically convert your images to WebP and serve them only to browsers that support it, giving you a huge performance boost without any extra work.
The Art of Image Compression
Once your format is sorted, it's time to talk compression. This is where we algorithmically strip out unnecessary data to make the file smaller. You'll run into two main types:
- Lossless Compression: This method shrinks the file size without tossing out any of the original image data. The quality is a perfect 1:1 match with the original, but the file size reduction is usually pretty modest. It's great for simple logos or technical diagrams where every pixel counts.
- Lossy Compression: This is where the magic happens for most websites. Lossy compression strategically removes bits of data that the human eye is unlikely to notice. It sounds a bit drastic, but a moderate amount of lossy compression can slash file sizes by over 70% without any perceptible loss in quality.
For the vast majority of photos and complex graphics on a website, a smart lossy compression approach provides the biggest and most immediate performance win. I love using a tool like Squoosh.app to see the difference in real-time before I commit.
Here's a look at the Squoosh interface. You can drag a slider back and forth to get an instant side-by-side comparison of the original and the compressed version.
This kind of visual feedback is priceless. It lets you dial in the exact compression level that gives you the smallest possible file without making your images look muddy or pixelated.
To help you decide which format and compression method to use, here’s a quick breakdown of the most common options.
Image Format and Compression Comparison
This table compares common image formats and compression methods to help you choose the best option for performance and quality.
| Format/Method | Best For | Key Advantage | Potential Drawback |
|---|---|---|---|
| JPEG | Photographs, complex images with gradients | Excellent compression for realistic images | Does not support transparency; quality degrades with high compression |
| PNG | Logos, icons, graphics with sharp lines, transparency | Perfect transparency support, lossless quality | File sizes can be very large for complex images |
| WebP | A modern replacement for both JPEG and PNG | Superior compression, supports transparency and animation | Not yet supported by all very old browsers |
| Lossy | Most website images (photos, banners) | Massive file size reduction | Can introduce artifacts if over-compressed |
| Lossless | Simple graphics, text-heavy images, icons | No loss of quality, perfect detail retention | Modest file size reduction compared to lossy |
Ultimately, a combination of WebP for modern browsers and a smart lossy compression strategy for your JPEGs will give you the best results across the board.
Automating Optimization with Plugins and Lazy Loading
Now, compressing every single image by hand before you upload it would be a nightmare. Thankfully, we can automate the whole thing. WordPress plugins like Imagify or ShortPixel are lifesavers here. They can automatically optimize every new image you upload and even go back and chomp through your entire existing media library. Set it and forget it.
Beyond just shrinking files, you absolutely need to implement lazy loading. This is a game-changer. Instead of trying to load every single image on a page right away, lazy loading tells the browser to wait and only load an image right before it's about to scroll into view. This makes the initial page load feel incredibly fast, especially for long, image-heavy articles or product pages.
Key Takeaway: Turning on lazy loading for your images, videos, and even iframes is one of the single most impactful changes you can make to improve both perceived performance and your Core Web Vitals scores. It's a must-do.
Streamlining Your Code and Database

So far, we've focused on the big, visible parts of your site. Now it's time to look under the hood. The code and data that power your WordPress site have a huge say in how fast it runs. A lean, efficient backend is a core part of WordPress site speed optimization, and if you ignore it, even the best hosting and image optimization won't save you.
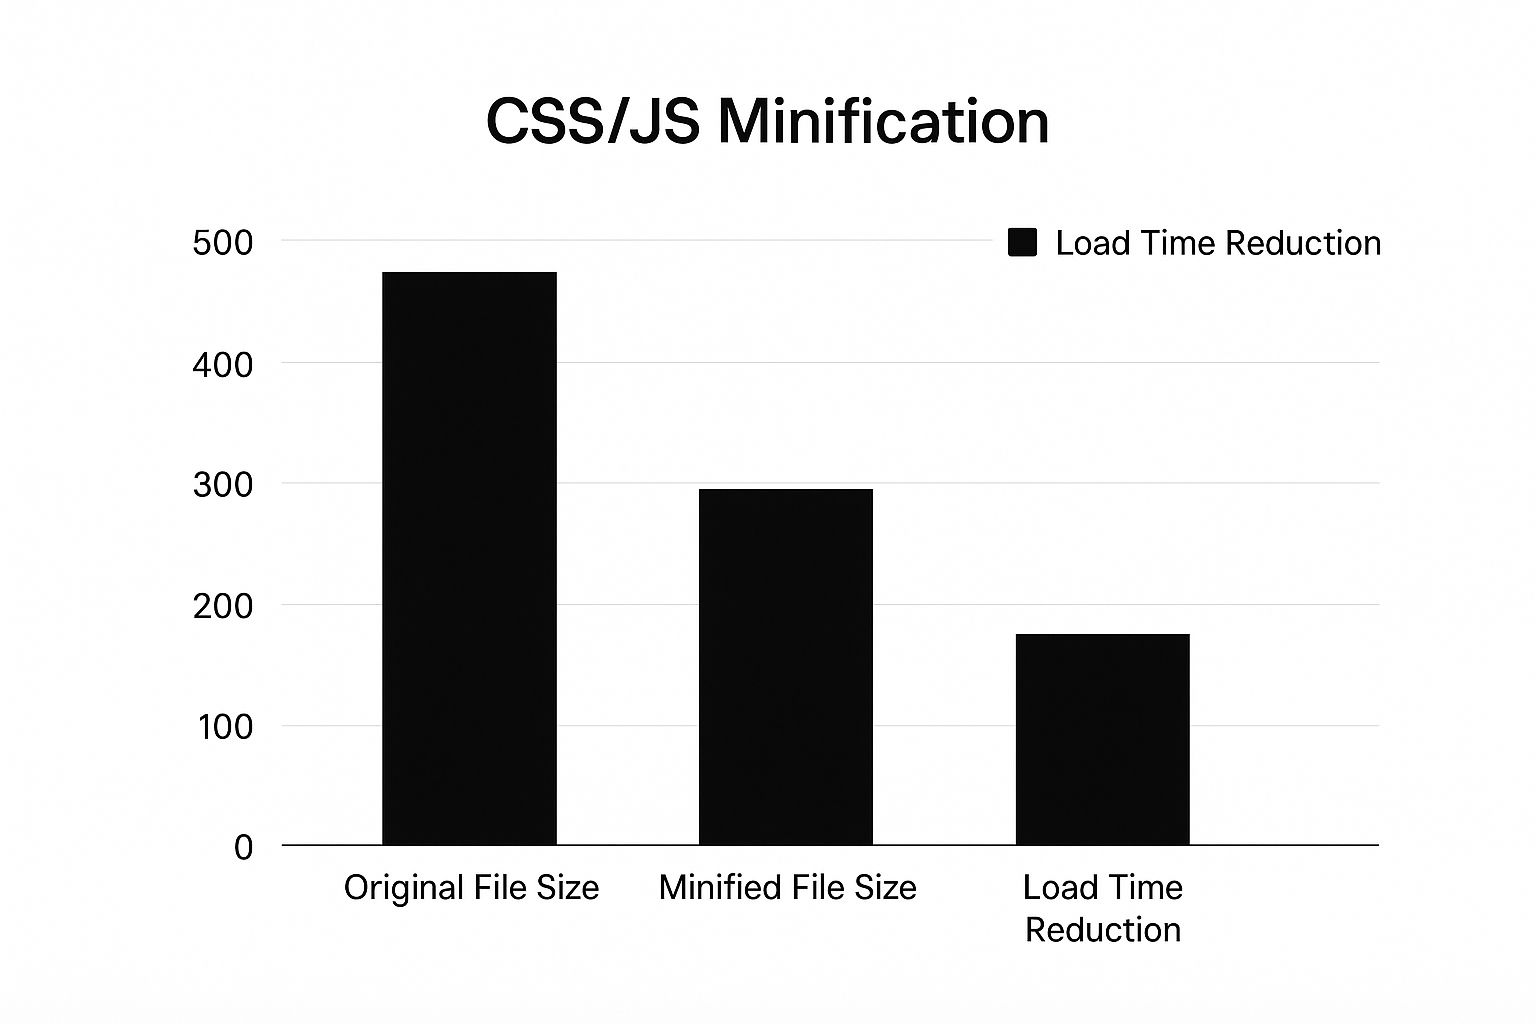
Think of your site's code—the CSS and JavaScript files—as a long instruction manual the browser has to read. Minification is the process of ripping out all the fluff, like developer comments and extra spaces, without affecting what the code actually does. It just makes the file smaller, so it's quicker to download and process.
Then there's concatenation. Instead of having the browser fetch ten separate little JavaScript files, concatenation combines them all into one. This drastically cuts down on HTTP requests, which is a massive performance win. The good news? Most decent caching plugins can handle both minification and concatenation for you automatically.
Taming Render-Blocking Resources
Even with smaller, combined files, when they load is critical. By default, a browser will try to download and run every JavaScript file it finds before it bothers showing your page to the visitor. The result is that dreaded blank white screen, a classic "render-blocking" scenario.
We need to tell the browser to be smarter about its loading order.
- Defer Non-Critical JavaScript: This tells the browser to load certain scripts after the important visual content is already on the screen. It's perfect for things like social media sharing buttons or analytics trackers that your visitor doesn't need to see in the first split-second.
- Prioritize Critical CSS: This is a bit more advanced. It involves finding the bare-minimum CSS needed to style the top part of your page (the "above-the-fold" area) and loading it first. The rest of the stylesheet can load in the background.
The real goal here is to improve perceived load time. By showing your visitor something meaningful as quickly as possible, they're far less likely to get impatient and leave.
Maintaining a Healthy Database
Over the months and years, your WordPress database gets bloated. Every post revision you've ever made, every spam comment you've trashed, and every bit of temporary data (known as a transient) just sits there, adding weight. It's like trying to find a book in a library that has never thrown anything out.
Regularly cleaning your database is non-negotiable maintenance. This means:
- Deleting old post revisions.
- Clearing out the spam and trash folders for comments.
- Removing expired transients.
- Optimizing the database tables themselves.
This might sound a bit scary, but plenty of plugins can automate this for you safely. A clean database means your server can find and deliver content faster, which translates to quicker page loads and a much snappier WordPress admin panel.
For a full step-by-step guide, you can learn more about how to optimize your WordPress database from our detailed walkthrough. It’s a small, recurring task that keeps your site’s foundation rock-solid and fast.
Conducting a Plugin Audit for Peak Performance
Plugins are what give WordPress its incredible power and flexibility. But they're also one of the biggest culprits when it comes to slow-loading sites. It's a classic case of too much of a good thing.
Every active plugin you have adds its own code, scripts, and stylesheets. This all adds up, creating more work for your server and for your visitor's browser to process. That’s precisely why a key part of any WordPress site speed optimization plan is a thorough plugin audit.
The goal isn't just about deleting plugins for the sake of it. It's about figuring out the performance "cost" of each one. You have to ask: is the value this plugin provides worth the speed it eats up?
A good way to start is by deactivating your plugins one by one, running a speed test after each deactivation. A tool like GTmetrix is perfect for this. Its "Waterfall" chart shows you exactly which plugin files are causing the longest delays.
If you find a plugin that’s adding significant load time—let's say more than a few hundred milliseconds—it's decision time. Is it absolutely essential? Could you get the same result with a lighter plugin, or maybe even a custom code snippet?
Evaluating Plugin Quality and Finding Alternatives
It’s important to remember that not all plugins are built the same. A badly coded plugin can absolutely cripple your site's performance, even if its function seems simple.
When you're looking at a plugin, check for a few signs of quality:
- Recent Updates: Has it been updated recently? A plugin that hasn’t been touched in over a year might be abandoned, which is a red flag for both performance and security.
- Active Installations: A high number of installations is usually a good sign. It suggests the plugin is trusted and well-maintained by the community.
- Lightweight Philosophy: The best developers build plugins with performance as a priority. They’ll often mention this in the plugin's description.
This kind of evaluation is critical, especially for those big, feature-heavy plugins that handle major parts of your site.
For example, many popular page builders are notorious for adding a ton of "code bloat." If your tests point to your page builder as a major bottleneck, you might want to look at a more performance-focused alternative like GeneratePress with its companion, GenerateBlocks. This duo offers incredible design freedom without the heavy baggage of older builders.
A plugin should solve a problem without creating a new one. If a plugin's main contribution is a slower website, it has failed its primary purpose, no matter how convenient it seems.
The same logic applies to something like contact forms. A plugin like WPForms is a great example of smart, lightweight design. Instead of loading its code on every single page, it only loads scripts on pages where you've actually placed a form. It's a small detail, but it makes a big difference.
Finalizing Your Plugin Stack
After you've done your testing, you should have a clear hit list of underperforming plugins. Your job now is to either find a better replacement or decide to remove that functionality altogether.
From my experience, the fastest WordPress sites are almost always run by people who are ruthless with their plugin choices. They stick to what's absolutely necessary and always opt for the lightest, most efficient tool for the job.
Think of this audit not as a one-time fix, but as a new mindset for managing your site. It's about continuous improvement for the long-term health and speed of your WordPress site.
Maintaining Speed with Ongoing Monitoring
Getting your website to load quickly is a huge win, but don't pop the champagne just yet. WordPress site speed optimization isn't a "set it and forget it" task; it's an ongoing commitment. Every time you add a new blog post, update a product, or install a new feature, you're introducing variables that can slowly chip away at the speed gains you worked so hard for.
This is where you need a long-term game plan. The two most important parts of this strategy are using a Content Delivery Network (CDN) and getting into a regular performance monitoring routine. These two things work together to make sure your site stays fast for everyone, everywhere, no matter what new content you've published.
The Global Reach of a Content Delivery Network
A Content Delivery Network (or CDN) is basically a network of servers spread across the globe. Its main job is to take a copy of your site's static files—things like images, CSS, and JavaScript—and store them in various locations worldwide. When someone from another country visits your site, the CDN serves those files from a server that's physically close to them. This cuts down latency in a big way and makes your site load much faster.
Think about it: if your main server is in Dallas, a visitor from Tokyo has to download every single file all the way from Texas. But with a CDN, that same visitor gets most of the page's assets from a server in or near Japan. The speed difference is massive.
A few popular CDN options to look at are:
- Cloudflare: Their free plan is incredibly powerful and more than enough for most websites.
- Bunny CDN: A great-value premium option known for its fantastic performance and simple setup.
- RocketCDN: If you're already using the WP Rocket caching plugin, this integrates perfectly.
Setting up a CDN is usually pretty straightforward—often just a matter of changing your site's nameservers, and most providers walk you right through it. For the effort involved, the performance boost is one of the biggest you can get, especially if you have a global audience.
Establishing a Routine for Performance Audits
Once your CDN is up and running, the last piece of the puzzle is ongoing monitoring. You can't fix what you don't know is broken. By setting a regular schedule to test your site's performance, you can catch slowdowns before they start annoying your visitors and hurting your business.
This is especially critical for e-commerce stores. There's a direct line between site speed and sales. Research has shown time and again that for WordPress stores running on WooCommerce, faster pages lead to much better conversion rates. The data is clear: even small improvements, like getting your load time down from 5 seconds to under 3, can boost sales conversions by 15% or more. You can read more about these findings in Panalinks' e-commerce speed research.
Your monitoring routine doesn't need to be complex. A simple, consistent check-in is all it takes to maintain peak performance and protect your conversions.
A good place to start is to run your site through Google PageSpeed Insights or GTmetrix every month. It's also a good idea to run a test after you make any big changes, like installing a new plugin or switching themes. I like to keep a simple spreadsheet to track the key metrics over time. This kind of vigilance is a key part of any good website maintenance plan. For more ideas on what to track, have a look at our comprehensive WordPress maintenance checklist. This methodical approach turns optimization from a stressful, reactive chore into a calm, proactive process.
Comments
2 responses to “WordPress Site Speed Optimization Tips to Boost Performance”
[…] Technical performance is a huge part of the user experience, which is why focusing on aspects like WordPress Site Speed Optimization is so critical. A fast website feels like a quality […]
[…] improve your site's user experience and search engine rankings, delve into detailed WordPress site speed optimization tips. For a complete guide on optimizing for mobile users, check out this comprehensive mobile SEO […]