
A WordPress staging site is simply a private, offline copy of your live website. You can think of it as a development playground or a professional sandbox. It’s the perfect place to test out new plugins, experiment with a theme redesign, or push through updates without touching your public-facing site.
This means you can work without any risk to your live traffic, existing customers, or sales.
Why a Staging Site is Your Website's Best Friend
For anyone serious about their website, a staging environment isn't a luxury—it's essential. It’s the safety net that stands between a smooth update and a total site meltdown.
Making changes directly on your live site is like performing surgery in the dark. A tiny tweak can cause unexpected conflicts, leading to the infamous "white screen of death" or breaking key features that send visitors packing.
A staging site creates a controlled, isolated space to prevent these kinds of disasters. It gives you the freedom to innovate, test new ideas, and confidently grow your site without putting your live operations on the line.
Here’s a quick comparison of the risks and benefits associated with making changes directly on a live site versus using a proper staging environment.
Live Site Changes vs Staging Site Changes
| Action | Risk on Live Site | Benefit on Staging Site |
|---|---|---|
| Installing a new plugin | High risk of plugin conflicts, breaking functionality, or causing the white screen of death. | Test for compatibility issues and bugs in isolation. No impact on live users. |
| Updating WordPress core | Potential for theme or plugin incompatibilities, leading to site errors or downtime. | Run the update safely, identify problems, and fix them before they affect anyone. |
| Theme customization | CSS or PHP errors could break your site's design or functionality for all visitors. | Experiment with design changes freely. Only push to live when it's perfect. |
| Testing a new feature | A buggy feature launch can lead to a poor user experience, lost sales, and reputation damage. | Thoroughly vet the new feature, gather team feedback, and ensure it's 100% stable. |
Using a staging site clearly shifts your workflow from a reactive, high-stress process to a proactive and controlled one.
Real-World Scenarios Where Staging Saves the Day
Imagine you run a busy WooCommerce store. You find a great new plugin for advanced shipping calculations. If you install it directly on your live site and it conflicts with your payment gateway, your entire checkout process could fail instantly. Every minute of downtime means lost sales and angry customers.
With a staging site, you can install and configure that new plugin, test every possible customer scenario, and make sure it plays nicely with your entire setup. Only when you're 100% confident do you push it to the live store.
Or, let's take a simple WordPress core update. These are critical for security, but they can sometimes clash with older themes or plugins. A staging site lets you run the update in a safe space first. If something breaks, you can figure out the problem without your live site's traffic or SEO rankings taking a hit. This proactive approach turns a potentially stressful event into a routine task, which you can manage with our complete https://wpfoundry.app/wordpress-maintenance-checklist/.
This level of caution is crucial, especially when you consider that as of mid-2025, WordPress powers roughly 43.4% of all websites. With such a massive number of businesses depending on it, preventing errors is a top priority.
The Professional Workflow Advantage
Using a staging environment isn't just a technical precaution; it’s a professional workflow. It encourages a disciplined, structured approach to website management and is a cornerstone of good quality assurance. In fact, a major reason to use a staging site is to master software QA management and guarantee top-tier testing before any changes reach your audience.
Here's why it's a core part of a sound strategy:
- Risk Mitigation: It isolates every change from your live environment, effectively eliminating the risk of downtime or data loss from a botched update.
- Quality Control: It provides a dedicated space to thoroughly test new features, designs, and plugins for bugs or compatibility problems.
- Improved Collaboration: It allows developers, designers, and content creators to work on new things simultaneously without disrupting the live site or stepping on each other's toes.
In essence, a staging WordPress website transforms your development process from reactive to proactive. It allows you to catch problems before your users do, preserving your site’s integrity, your brand’s reputation, and your peace of mind.
Choosing Your Ideal WordPress Staging Method
Let's be clear: there's no single "best" way to create a staging site for WordPress. The right choice really comes down to your technical comfort level, your budget, and what your hosting provider offers. Picking the right path from the get-go can save you a world of hurt later, so it pays to understand your options before diving in.
Ultimately, you have three main routes you can take. We'll walk through each one, breaking down who they're for and what the real-world trade-offs are. This should give you the clarity you need to pick a method that fits your workflow like a glove.
One-Click Staging via Your Hosting Provider
For the vast majority of people, this is the way to go. It's the gold standard for a reason—it's incredibly simple and reliable. Quality managed WordPress hosts like Kinsta, WP Engine, and SiteGround build this feature right into their dashboards. With just a click or two, you can spin up a perfect, private copy of your live site.
This approach is a fantastic fit for:
- Beginners who want a completely foolproof method without touching code or databases.
- Small business owners who need to test updates quickly without a lot of fuss.
- Anyone who puts a high value on convenience and is happy with a hosting plan that includes this feature.
The biggest win here is the sheer speed and ease of use. Your host does all the heavy lifting in the background, copying your files and database without you having to worry about it. They also make pushing your changes from staging back to your live site just as easy, usually with another simple button click. The only real catch is that this feature is tied to your hosting plan, and you won't typically find it on cheaper, budget-shared hosting.
Key Takeaway: If your host offers one-click staging, just use it. Seriously. The time and peace of mind it buys you is almost always worth any small difference in hosting costs.
Using a Dedicated Staging Plugin
What if your host leaves you high and dry with no built-in staging tool? Your next best option is a dedicated WordPress plugin. Tools like WP Staging or BlogVault are designed to handle this right from your WordPress admin area. They work by creating a clone of your site, which usually lives in a subfolder of your main installation.
This route gives you a ton of flexibility. The free version of a plugin like WP Staging is often more than enough for basic testing, like checking if a new plugin is going to break your site. But if you want the magic "push to live" button to automatically deploy your changes, you'll almost always have to spring for the premium version.
This infographic breaks down the typical workflow, which is the same core process whether you're using a host, a plugin, or even doing it manually.
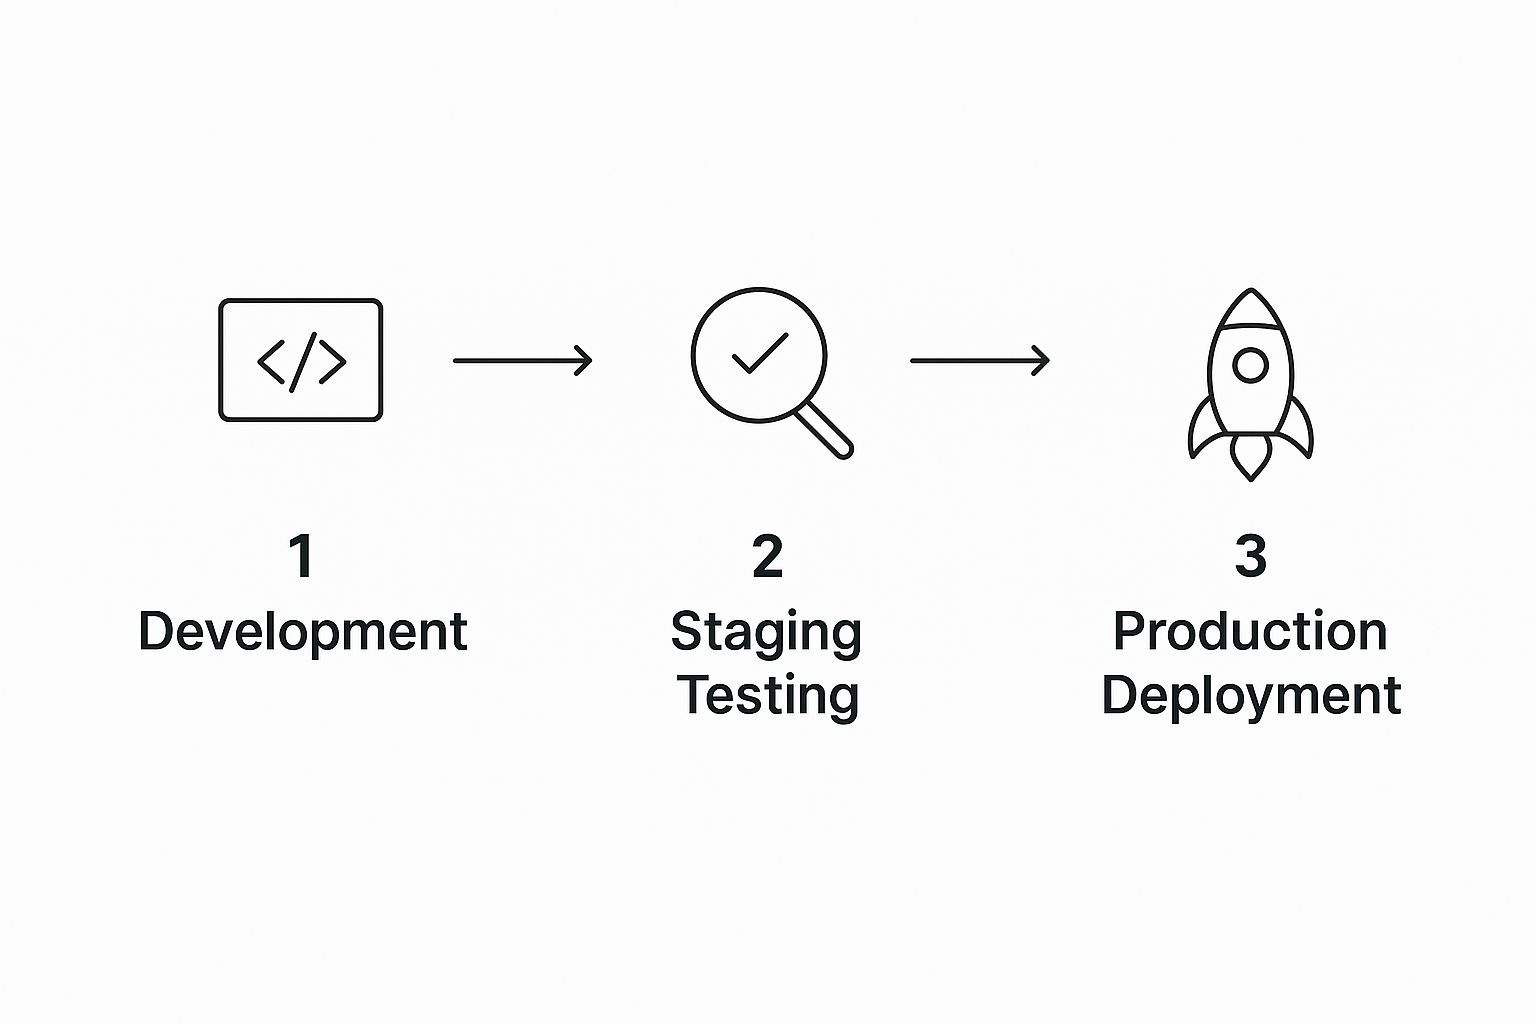
The flow really drives home the main point of a staging environment—it's that essential safety net between development and going live, making sure everything works perfectly.
The Manual Method for Full Control
The third path is the old-school, roll-up-your-sleeves manual approach. This means you're doing everything yourself: creating a subdomain (like staging.yourwebsite.com), setting up a fresh database, copying all your site files over with SFTP, and then exporting and importing your database tables using a tool like phpMyAdmin. It's by far the most complex and time-consuming method.
So, who on earth would choose this?
This is really the domain of developers and seasoned technical users who demand absolute control. It allows for custom server setups and deep-dive troubleshooting that the automated solutions might hide from you. For the average user, though, the risk of making a critical mistake somewhere in this multi-step dance is incredibly high. And pushing your changes back to the live site? That's another equally complex manual job.
Unless you have a very specific technical need to do it this way, stick with the hosting or plugin methods. They are infinitely safer and more efficient.
Building Your Staging Site with a Hosting Provider
For most people, the easiest and safest way to set up a staging environment is to use the tools built right into your hosting account. Most good managed WordPress hosts include a "one-click" staging feature in their dashboard, which turns a complex technical job into a simple, automated process. This completely sidesteps any need for manual file transfers or database wrangling, making it perfect for anyone who wants to get things done quickly and without risk.
When you use your host's staging tool, it creates an exact copy of your live website. It duplicates everything—all your themes, plugins, and uploaded media—and makes a perfect clone of your database, which includes all your posts, pages, and user info. This clone is then placed in a completely separate, isolated environment, usually on a temporary address like staging.yourwebsite.com. This ensures that nothing you do there can possibly affect your live site.
The One-Click Cloning Process
Getting started is usually as simple as finding the "Staging" or "Development" area in your hosting control panel. The name might change from one host to another, but the function is the same. Look for a button that says something like "Create Staging Site" or "Add Staging."
Once you click it, the system takes over. You might be prompted to name your new staging site, which is handy if you ever need to create more than one. After you confirm, the cloning begins automatically. This can take anywhere from a few minutes to half an hour, really depending on how big and complex your site is.
The real beauty here is that it's a hands-off process. You don't have to mess with SFTP, edit wp-config.php files, or struggle with database imports. Your hosting provider does all the heavy lifting for you.
Pro Tip: Before you start the cloning process, it's a great idea to clear your website's cache (if you use a caching plugin). This ensures the staging copy is made from the absolute latest version of your site, preventing any strange inconsistencies.
What Happens After the Clone
Once the process is finished, your hosting dashboard will give you a direct link to your new staging site. It will have its own unique URL and, usually, a separate WordPress admin login. Now you can log in and start tinkering, testing, and making changes without any fear of breaking your live site.
Here's what this kind of interface often looks like inside a host's control panel.
As you can see, the process is incredibly straightforward. It often comes down to just naming the environment and clicking one button. These tools are designed to be user-friendly, putting powerful features into the hands of regular users, not just developers.
Once your staging site is ready, there are a few quick checks you should always run:
- Check Site Functionality: Click around your main pages, test your contact forms, and if you have a store, try adding a product to the cart. Just make sure the core functions are working as they should.
- Confirm It's Not Indexed: Most hosts automatically tell search engines not to crawl the staging site. You can double-check this yourself. In the staging site's dashboard, go to Settings > Reading and make sure the "Discourage search engines from indexing this site" box is checked.
- Review Your URLs: Give a few links a click to ensure they point to the staging URL (e.g.,
staging.yourwebsite.com/about) and not back to your live site. A good staging tool handles this automatically, but it never hurts to be sure.
By using your host's built-in tools, you can create a professional staging WordPress website workflow with very little effort. This frees you up to focus on what actually matters—testing and improving your site with confidence.
Using a Plugin for Your Staging Environment
What if your hosting plan doesn't have a staging feature built-in? Don't sweat it. A dedicated staging plugin is your best bet and a surprisingly powerful alternative. With a plugin, you can build and manage a complete WordPress staging site right from your own admin dashboard.
This is the perfect route if you're on shared hosting or if your provider simply doesn't offer one-click staging. It gives you all the control without ever needing to open an SFTP client or poke around in phpMyAdmin.
Getting Started with a Staging Plugin
First things first, you need to pick and install a staging plugin. A great place to start is WP Staging. Its free version is more than capable of creating a full clone of your website for testing. Just install and activate it like any other plugin you've used before.
Once it's active, you'll see a new menu item in your WordPress dashboard. From there, creating the staging site is refreshingly simple, usually just a matter of following a short setup wizard.
You'll be asked to name your staging site. It sounds minor, but it's important for keeping things straight. Calling it something obvious like "dev" or "testing" makes it immediately clear you aren't on your live site.
One of the biggest perks of using a plugin is the ability to do a selective clone. You can tell it to copy only certain database tables or leave out hefty folders, like your media uploads. This is a lifesaver for managing server resources, especially if you're working with a hosting plan that's tight on disk space.
Essential Configuration and Cloning
After you've named your site, the plugin gets to work cloning everything. It duplicates your files and database, creating a full replica inside a subfolder of your main WordPress installation. This can take a few minutes, depending on how large your site is.
A good staging plugin also handles a couple of critical background tasks to protect you:
- Preventing Public Access: It automatically makes the staging site private, so only logged-in administrators can see it. No risk of customers or visitors stumbling upon your work-in-progress.
- Discouraging Search Engines: The plugin adds a
noindextag, telling Google and other search engines to ignore this duplicate version. This is crucial for avoiding SEO penalties.
This is also the perfect time to vet your plugins for security. It's a serious concern, with a staggering 95% of WordPress security issues tracing back to plugins. With over 59,000 free plugins out there, you absolutely must test them in a safe staging environment before they ever get near your live site.
Navigating and Using Your New Staging Site
When the cloning is done, the plugin gives you a special link to your new staging environment. You'll log in with the same WordPress username and password you always use.
Most plugins, WP Staging included, add a very obvious visual cue—like a bright orange admin bar—to constantly remind you that you're working on the staging copy. It's a simple trick, but incredibly effective at preventing those "oops, I edited the wrong site" moments.
It's important to know the limits of free plugins, though. They're fantastic for creating a test environment, but the ability to "push" your changes from staging back to the live site with one click is almost always a premium, paid feature.
Without that one-click push, you'll have to manually repeat any successful changes on your live site. Even so, for testing plugin updates, theme modifications, or new WordPress core versions, a free staging plugin is an invaluable safety net that lets you experiment without risking your live business.
Pushing Staging Changes Back to Your Live Site
You’ve put in the work. The new feature is solid, the design tweaks look great, and you’ve hammered on it in your staging environment. Now for the moment of truth: pushing those changes to your live, public-facing website.
This part of the process, often called "pushing to live," is where you need to be the most careful. One wrong click can derail all your preparation. The good news is that whether you're using a hosting tool or a plugin, the process is generally safe—as long as you follow the right steps. This is what your staging site was built for.
The Pre-Flight Checklist Before You Push
Hold on. Before you even think about hitting that "Deploy" button, you need to do one critical thing: take a fresh, complete backup of your live site. I can't stress this enough. This is your get-out-of-jail-free card. If something goes sideways, you can instantly roll back to the last working version.
Seriously, this isn't just a friendly tip—it's a professional requirement.
Once that backup is safely tucked away, run through this quick checklist:
- Final Staging Test: Give your staging site one last, thorough once-over. Click through the main pages, check your forms, and test any new functionality again.
- Review Changes: Be 100% clear on exactly what you're about to push. Many tools will show you a "diff" or a summary of what’s different between staging and live. Read it.
- Schedule for Low Traffic: If you can, plan the deployment for when your site traffic is at its lowest. This minimizes any potential disruption for your users.
Pushing from staging to live is often a "stomp-over" operation. The staging version completely overwrites the live version—there's no merging. What's on staging is about to become the new reality for your live site.
Selective Syncing: Files vs. Database
Modern staging tools have gotten incredibly smart, often letting you choose what you push live. This selective syncing gives you much-needed control over the process. You'll typically see a few options.
Push Files and Database (Full Sync)
This is the most common choice. It copies everything from staging to live: your themes, plugins, uploads, posts, pages, and all settings. It's the way to go for big redesigns or complex features that involve both code and content.
Push Files Only
This is a fantastic option when you've only been editing theme files, plugin code, or CSS. Your live database remains completely untouched. It’s the safest route if your live site has been collecting new data while you were working—things like new user sign-ups, comments, or form entries.
Push Database Only
This is less common, but it has its uses. Let's say you've only been writing new blog posts or tweaking page content. You can push just the database, leaving any file-level changes on the live site intact.
The Post-Deployment Routine
You've pushed the changes live. Great! But you're not done just yet. Any professional will tell you that the job isn't finished until you've verified everything on the live site.
Immediately after the push, here's what to do:
- Clear All Caches: Your website probably has multiple caching layers—from your server, a plugin like WP Rocket, or even a CDN. Purge everything so that you and your visitors see the latest version.
- Test Critical Paths: Walk through the most important user journeys on the live site. Test your contact forms, your email sign-up, and if you have a store, go through the entire checkout process.
- Visual Confirmation: Open your site in a private or incognito browser window. This shows you what a brand new visitor sees. Make sure all the styles and scripts loaded correctly and that nothing looks broken.
Following these final steps turns a potentially stressful deployment into just another smooth, predictable part of managing your staging WordPress website.
Mastering Your Staging and Development Workflow
https://www.youtube.com/embed/uxudCwMAhx4
Having a staging wordpress website is a great starting point, but it's a disciplined workflow that really makes the difference between smooth sailing and a site-breaking catastrophe. The key is to develop good habits that turn your staging area from a simple technical tool into a bulletproof system for making changes.
Think of it like building muscle memory. The goal is to make safe testing and deployment feel like second nature. These practices, learned from years in the trenches, will give you the confidence to update your site without causing chaos.
Test One Major Change at a Time
It’s easy to fall into the trap of bundling a plugin update, a theme edit, and a new feature test all into one go. Don't do it. If something breaks, you’ll spend hours just trying to figure out which change was the real problem.
Instead, isolate every test. Update a single plugin, then give your site a thorough check. If it's all good, then you can move on. This methodical process makes troubleshooting a breeze. When an error does pop up, you know exactly what caused it and can reverse that one specific change.
Keep a Simple Changelog
You don't need fancy software for this. A basic text file or a Google Doc works perfectly. Before you touch anything on your staging site, just jot down what you're about to do.
A simple entry might look like this:
- Date: Updating WooCommerce from version 8.1 to 8.2.
- Reason: Applying the latest security patches.
- Outcome: Update was successful. I've tested the checkout and product pages, and everything is working as expected.
This simple log gives you a clear history of changes. It's incredibly helpful for teams or even just for reminding yourself what you did a few weeks down the line.
A well-defined workflow is the heart of a successful development process. For a broader understanding of how to plan and utilize various pre-production setups effectively, delve into a comprehensive guide on test environment strategy to move from chaos to confident delivery.
Handle E-commerce Data with Extreme Care
This is absolutely critical for any online store. While you're busy making changes on your staging site, your live site is still processing orders and signing up new customers. If you just push the entire staging site over to live, you will overwrite and lose all of that new, valuable data.
To avoid this disaster, you should only push the files (your updated themes and plugins), not the database. Most modern hosting and staging tools let you do this selective sync. This way, your site’s functionality gets updated while your recent orders and customer info remain safe and sound on the live server.
Refresh Your Staging Site Periodically
A staging site can get "stale" surprisingly fast. If it's been weeks or months since you last cloned your live site, your staging copy no longer mirrors what's actually running. New blog posts, user comments, and other data are missing.
Get into the habit of refreshing your staging site from your live site before you start any new work. This guarantees you're testing on the most current version of your site, which helps you avoid nasty surprises when it's time to go live. Making this a regular part of your process is a core component of smart ongoing WordPress website maintenance and keeps your site stable and secure.
WordPress Staging: A Few Common Questions
After walking through the setup process, a few questions almost always come up. Let's tackle some of the most common ones I hear about staging a WordPress website.
Will a Staging Site Mess Up My SEO?
No, as long as it's set up correctly, your staging site will have zero impact on your live site's SEO.
Good staging tools, whether from your host or a plugin, handle this for you automatically. They put two key protections in place:
- Blocking Search Engines: A
noindextag is added to the site’s code. This is a direct command telling search engines like Google to completely ignore the staging site. - Restricting Access: The site is made private, so only logged-in administrators can view it. Search engine crawlers can't get in, so they can't index what they can't see.
These two things prevent any "duplicate content" penalties, keeping your live site’s search rankings safe. If you're building a staging site from scratch, you absolutely have to remember to do this yourself.
Isn't a Staging Site Just a Backup?
This is a great question, and it's easy to see why people get them confused. While both are copies of your site, they have completely different jobs.
A backup is a static, frozen-in-time copy. Think of it as your insurance policy for disaster recovery. If your site gets hacked or a major error takes it down, you restore from a backup.
A staging site, on the other hand, is a live, working clone of your website. It's your workshop—a safe place to test updates, try new designs, and generally break things without any real-world consequences.
Key Takeaway: A staging site is for testing future changes. A backup is your safety net for past states. You need both.
Can I Still Post on My Live Site While Working on Staging?
You can, but it's usually not a good idea, especially for major changes.
Here's the problem: any new content you add to the live site—like a new blog post or, critically, a new WooCommerce order—won't exist on your staging copy.
When you're ready to push the staging version live, you'll likely overwrite and lose that new data. To avoid this mess, the best practice is to freeze content changes on your live site while you're deep in a staging project. If you're just tweaking a few files, it's less of a worry.
Are you tired of juggling multiple WordPress sites? WP Foundry centralizes your workflow, allowing you to manage unlimited sites from one powerful desktop app. Update plugins, run backups, scan for vulnerabilities, and more—all from a single dashboard. Take control of your sites by learning more at https://wpfoundry.app.