
So, you've got a backup of your WordPress site. That's a great start. Restoring it simply means you're replacing the current, possibly broken, site files and database with your saved copies. You can do this with a dedicated plugin like UpdraftPlus or by getting your hands dirty and doing it manually with an FTP client and phpMyAdmin. Think of it as the ultimate "undo" button.
Why You Need a WordPress Restoration Plan
Let’s be honest about why you’re probably reading this. A broken website isn't some far-off, theoretical problem. For most site owners, it's a matter of when, not if. A simple plugin update goes haywire, a new theme conflicts with something crucial, or—worst-case scenario—you find out you've been hacked.
Every second your site is down, you're losing traffic, trust, and potentially a lot of money. Just having a backup file tucked away somewhere is only half the solution. The real test comes when you're under pressure and need to restore WordPress from backup without a hitch. This is why having a solid, tested restoration plan is one of the most critical parts of managing a website today.
The True Value of a Tested Backup
A backup is completely worthless until the moment you actually need to restore it. In 2025, with cyber threats on the rise, this process is your main line of defense. So many attacks target WordPress specifically, exploiting old plugins or simple configuration mistakes. Being able to get your site back online quickly is what truly protects your business.
This is why I always recommend testing your backups at least once a month. Don't do it on your live site, of course—use a staging environment to make sure everything works just as it should.
The harsh reality is that an untested backup is just a hope. A tested restoration plan is a strategy. It's the difference between a minor hiccup and a full-blown business crisis.
Your First Line of Defense
WordPress is the engine behind a massive chunk of the internet, and you can grab the latest version from its official download page.
That incredible popularity, however, also makes it a prime target. This is precisely why a bulletproof recovery plan isn't just nice to have; it's non-negotiable. This guide will walk you through exactly how to restore your site, step-by-step, so you're ready for anything.
Preparing for a Flawless Site Restoration
A smooth WordPress restoration is won long before disaster ever strikes. The proactive steps you take today are what turn a potential crisis into a manageable task. It all starts with having a solid backup strategy that actually matches your website's rhythm and activity.
Think about it: a busy e-commerce store with constant orders and inventory changes needs a far more aggressive backup schedule than a personal blog you update once a week. This is a critical detail many site owners miss until it's too late. When you finally need to restore WordPress from backup, having a recent copy is everything.
Files and Database: The Two Halves of Your Site
A complete WordPress backup has two distinct parts: your files and your database. It's vital to understand what each one does, because you need both for a successful restoration.
- Your WordPress Files: This is the skeleton of your site. It includes your
wp-contentfolder which holds all your themes, plugins, and uploaded media like images and documents. - Your WordPress Database: This is the brain. It's where all your content lives—every post, page, comment, user profile, and site setting is stored right here.
A common and painful mistake is backing up only one of these. If you restore just the files without the database, you'll be looking at a broken, empty shell of a website. You absolutely need both for a full recovery.
The Importance of Backup Frequency and Storage
Regular, scheduled backups are the bedrock of any good restoration plan. How often should you back up? Let your site's activity be your guide. Best practices for 2025 suggest daily backups for any site with frequent content changes. For less dynamic sites, weekly or even monthly schedules can work just fine.
Many hosting providers are getting wise to this. You'll often see premium plans that include weekly backups, while business-tier plans might offer daily ones. It's worth checking with your host to see what they provide.
Just as important is where you keep your backups. Relying only on your server is a huge gamble. If that server fails or gets compromised, your backups could disappear along with your live site. The golden rule is to always store copies in a secure, off-site location—think Google Drive, Dropbox, or a dedicated cloud backup service.
If you're planning something bigger, like moving your site to a new host, a simple backup isn't enough. For complex moves, a good website migration checklist is invaluable for protecting your data. And for more general tips, you can check out our guide on how to perform a complete WordPress site backup.
Restoring Your Site with a WordPress Plugin
When your site goes down, every second feels like an eternity. For most WordPress users, the quickest and least painful way to restore WordPress from backup is to lean on a dedicated plugin. This route completely bypasses the need for mucking around with files via FTP or poking at your database with intimidating tools like phpMyAdmin.
Think of a good backup plugin as your emergency "get out of jail free" card. It’s built to be intuitive, walking you through a series of clicks to fix what would otherwise be a stressful, technical nightmare. The whole point is to get your site from broken back to beautiful without breaking a sweat.
We've seen this approach become incredibly popular, especially as the tools themselves have gotten so much better. By 2025, the demand for simple backup and restore solutions has skyrocketed. UpdraftPlus continues to be a crowd favorite, with over 3 million active installs. But newer tools like WPvivid Backup are catching up fast, now powering over 700,000 sites. It’s clear that people want reliable, straightforward recovery options. You can learn more about the leading backup plugins of 2025 to see which one fits you best.
Comparing Popular WordPress Backup and Restore Plugins
Choosing the right plugin from the start is key. When you're in a panic, you want a familiar tool. Here’s a quick look at how some of the most popular options stack up, helping you decide which one makes sense for your needs.
| Feature | UpdraftPlus (Free) | WPvivid (Free) | Jetpack Backup (Paid) |
|---|---|---|---|
| One-Click Restore | Yes | Yes | Yes (automated) |
| Cloud Storage | Google Drive, Dropbox, S3 | Google Drive, Dropbox | Proprietary cloud |
| Scheduled Backups | Yes | Yes | Yes (real-time) |
| Migration | Paid add-on | Yes | Yes |
| Ease of Use | Good | Very Good | Excellent |
Ultimately, the best plugin is the one you have installed before you need it. Even the free versions of UpdraftPlus and WPvivid offer more than enough power for most site owners.
The Restoration Starting Point
Most plugin-based restores should start with a totally clean slate. This is a critical point that a lot of people miss. If your site was hacked or has corrupted files, restoring your clean backup over that mess is asking for trouble.
The best practice is to wipe the slate clean with a fresh WordPress installation. Your hosting provider almost certainly has a one-click installer for this. Doing this first ensures your restored site is built on a solid, uncompromised foundation.
With a blank WordPress site in place, you’ll install the very same backup plugin you used to create the backup, whether that’s UpdraftPlus, WPvivid, or another tool. Activate it, and you're ready to get your site back.
Uploading and Initiating the Restore
Now for the main event: getting your backup files into the new installation. Your backup plugin will have bundled everything—your database, plugins, themes, and uploads—into one or more archive files.
Just find the plugin's restore or backup/restore menu. You should see a big, friendly "Upload Backup Files" button. Click it and select the backup archive from your computer. If you saved your backup to a cloud service like Google Drive, you’ll just need to connect the plugin to that account, and it'll find the files for you.
Pro Tip: If your backup file is huge, your server might time out during the upload. I’ve run into this plenty of times. The easiest workaround is to use an FTP client (like FileZilla) to upload the file directly to the plugin's backup folder, which is usually something like
/wp-content/updraft/. Then, back in the plugin's settings, hit the "Rescan" button, and it will discover the file you just uploaded.
Once the plugin sees your backup, it will show you a quick summary and ask you to confirm what you want to restore. You'll see a checklist:
- Plugins: All your add-on features.
- Themes: Your site's look and feel.
- Uploads: Your entire media library of images and files.
- Database: The absolute core of your site—all your posts, pages, users, and settings live here.
For a full recovery, you’ll want to check every single box. Click that final "Restore" button and let the plugin work its magic. It will unpack everything, replace the default WordPress files and database, and put your site back together. Depending on your site's size, this might take a few minutes or a bit longer. When it’s done, you can breathe a sigh of relief. Your site will be back online, just as it was.
The Manual Restore with cPanel and FTP
While plugins are great, they aren't always an option. What happens when your WordPress dashboard is completely out of reach? If you're staring at the dreaded "white screen of death" or a critical error message, you can't just log in and click a restore button.
This is exactly where the manual method comes into play. It gives you direct access to restore WordPress from backup even when every other door is slammed shut. It's a bit more hands-on, but it's often the only surefire way to get a completely broken site back online.
You'll be working with two main tools that nearly every web host provides: an FTP client and phpMyAdmin. Think of it as performing surgery on your website—it requires care and precision, but it's incredibly effective.
Rebuilding Your Site with an FTP Client
First up, let's tackle your website's files. Your backup should have a complete snapshot of your WordPress directory. The most critical piece here is the wp-content folder, as it holds all your themes, plugins, and media uploads.
You’ll use an FTP (File Transfer Protocol) client, like the popular and free FileZilla, to connect directly to your server and manage these files.
Before you start uploading anything, it’s a good idea to clear out the old, corrupted files on the server. This prevents any bad code from sticking around and causing problems with your clean backup. Once you're connected via FTP, find your site's root directory (this is usually public_html) and delete the existing WordPress files.
With a fresh, empty directory, you can simply drag and drop your backup files from your computer into the FTP client window. This upload can take a while, especially if you have a lot of images or videos, so just be patient and let it run.
Reviving Your Database with phpMyAdmin
Once your files are back in place, it's time to bring your content back to life. Every post, page, comment, and setting from your site lives in your database, which you've hopefully backed up as a .sql file. We'll use phpMyAdmin to import it.
You can find phpMyAdmin in your hosting account's cPanel. After opening it, you'll see a list of your databases on the left-hand side. Click on the one that your WordPress site uses.
To make sure the import goes smoothly, it's best to wipe the old, broken database tables first. At the bottom of the table list, you'll find a "Check All" box. Tick that, and then from the dropdown menu next to it, select "Drop." This empties the database, preparing it for your clean backup.
Now, click the "Import" tab at the top. You'll see an option to choose a file. Find the .sql database backup file on your computer, select it, and then click "Go." phpMyAdmin will handle the rest, running all the commands in the file to perfectly recreate your database tables and fill them with your content.
This handy visual breaks down the manual restore workflow into its three main parts.
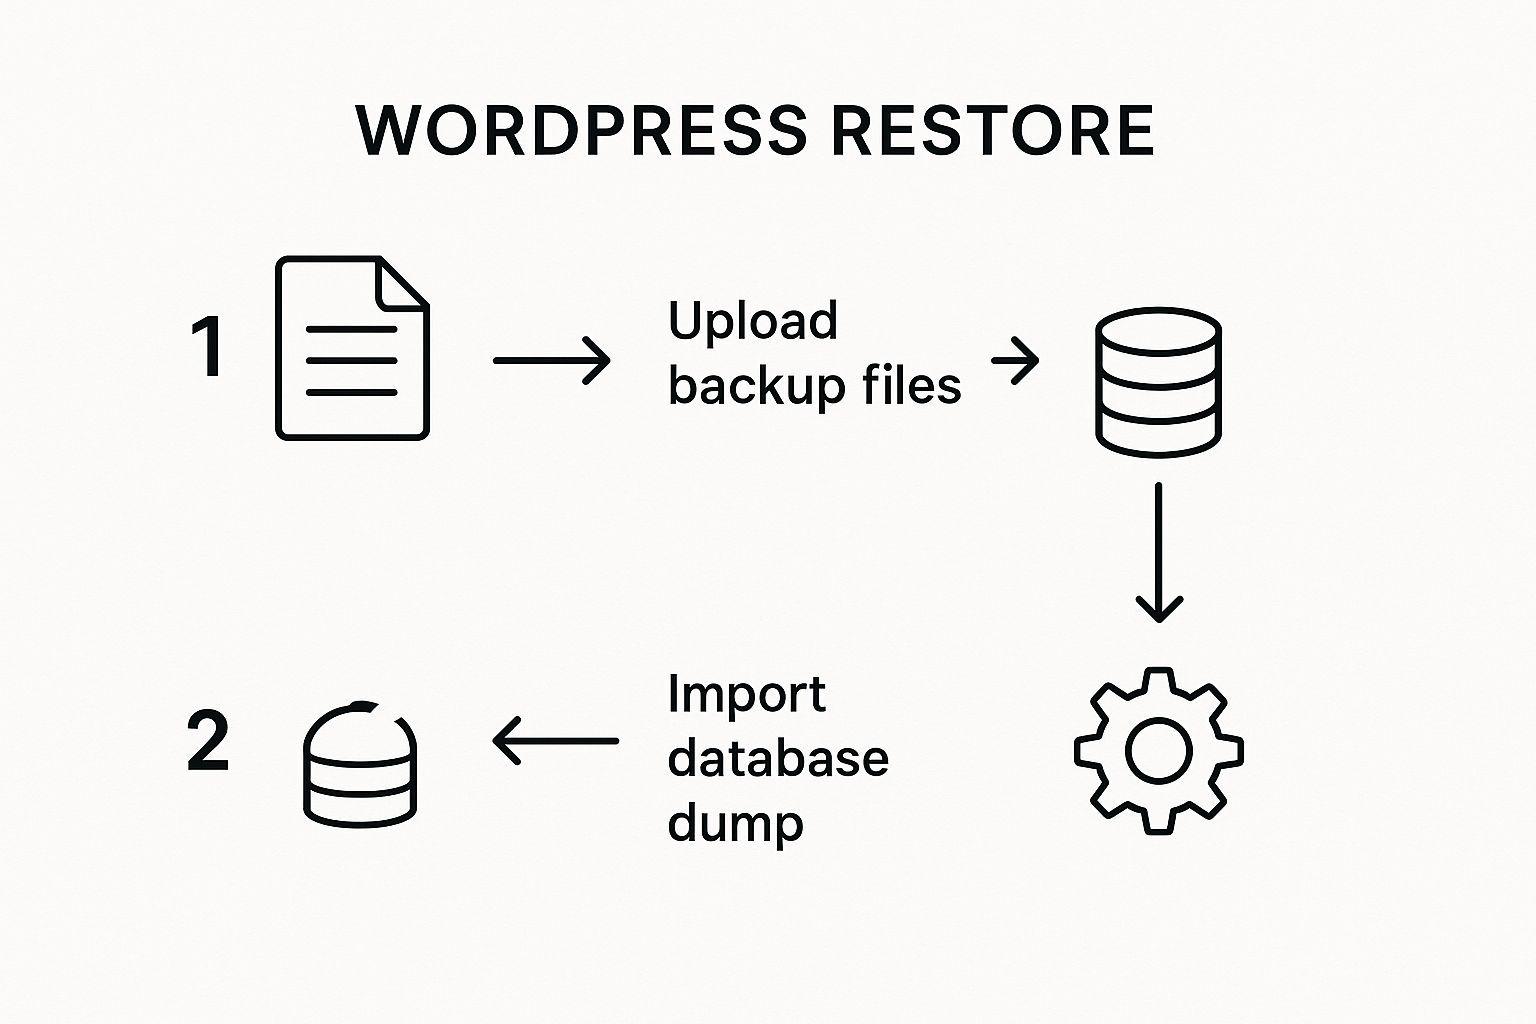
As the infographic shows, a full recovery depends on getting three things right: your files, your database, and the final configuration that connects them.
The Final Connection: Your wp-config.php File
This last step is the glue that holds everything together. You have to make sure WordPress can actually talk to the new database you just restored. That connection is defined in a single, critical file: wp-config.php.
This file lives in your site's main directory and contains your database name, username, and password. If you had to create a new database or user during the process, you must update this file with the new credentials. You can edit it using your host's File Manager or by downloading it via FTP, making the changes locally, and uploading it again.
Crucial Tip: Be extremely careful when editing
wp-config.php. A single misplaced character in the database name, user, or password will trigger an "Error Establishing a Database Connection," and your site will stay down. Double-check everything.
Once you’ve confirmed the details in your wp-config.php are correct, try visiting your site. It should be back online! The manual method might feel a little technical, but it gives you complete control to fix your site when nothing else works.
Troubleshooting Common Restoration Issues
Even with the best planning, sometimes a restoration just doesn't go smoothly. You finish the final step to restore WordPress from backup, hit refresh, and are greeted not by your beautiful site, but a frustrating error. It happens more often than you’d think.
Don't panic. Nearly every issue is fixable with a little detective work. The most common roadblocks usually boil down to a few key areas, and figuring out which one is the problem is half the battle. If you get stuck, a good online troubleshooting guide can also offer solid strategies for solving technical problems.
The White Screen of Death
This is probably the most infamous WordPress error. You go to your site, and there’s just… nothing. A blank white screen. This almost always points to a PHP error, usually caused by a plugin or theme conflict that has exhausted your server's memory.
Your first move should be to disable all your plugins. Since you can't get into your dashboard, you’ll need to use FTP. Just log in, navigate to the wp-content folder, and rename the plugins folder to something like plugins_old. This forces WordPress to deactivate everything.
If your site pops back up, you've found your culprit. Rename the folder back to plugins, then start reactivating them one by one inside your dashboard until the site breaks again. That's the one causing the trouble.
Error Establishing a Database Connection
This error is as clear as it gets: WordPress can't talk to your database. In my experience, this is almost always an issue with your wp-config.php file. The database name, username, password, and host details in this file have to be 100% correct.
After a manual restore, this is the first place you should look if your site is down. I've seen a simple typo in the database password take a site offline for hours until it was spotted. Carefully check each value against the credentials provided by your web host.
If you’re positive the credentials are correct, the database server itself might be down. At that point, it’s time to get in touch with your hosting provider for support.
Broken Images and Incorrect Links
So your site is back online, but it’s a total mess. Images are missing, and every link you click leads to a 404 error page. This is a classic sign of incorrect URL paths, something that happens frequently after moving to a new domain or server.
Luckily, the fix is often surprisingly simple: just reset your permalinks.
- Log in to your WordPress dashboard.
- Head over to Settings » Permalinks.
- Don't change a thing. Just click the "Save Changes" button.
This simple action forces WordPress to flush its rewrite rules and rebuild the entire link structure. If you still have broken links inside your posts and pages, a plugin like Better Search Replace is great for hunting down and updating old domain paths in your database. This kind of proactive site care is a core part of the WordPress website maintenance we recommend to keep things running smoothly.
Frequently Asked Questions About WordPress Restoration
Even with the best guide in hand, you’re bound to have questions when you're staring down the barrel of a full WordPress restore. Let's tackle some of the common things that come up, so you can get your site back online with confidence.
How Long Does a WordPress Restore Take?
This one's a classic "it depends" situation. The two biggest things that affect the timeline are your site's size and the restoration method you're using.
If you have a small personal blog and you're using a handy plugin like UpdraftPlus, you could be back in business in as little as 15 to 30 minutes.
On the other hand, a massive e-commerce site loaded with thousands of products and high-res images is a different story. If you're doing a manual restore with an FTP client and phpMyAdmin, you could be looking at several hours. The file uploads and database import are what really eat up the clock.
Will Restoring a Backup Affect SEO?
If you act fast, any SEO impact should be minimal, if not zero. Search engines like Google expect sites to have short periods of downtime for maintenance. The real trouble starts when your site is down for hours or, even worse, days. That’s when your rankings can take a serious hit.
Your number one job after any restore is to make sure your site is crawlable again. Head straight to Google Search Console, pop your homepage into the URL Inspection tool, and resubmit your sitemap. This tells Google you're back and ready for visitors.
Doing this quickly signals that everything is back to normal and encourages Google to get your pages re-indexed, protecting all that SEO work you've put in.
Can I Restore to a New Domain or Host?
Yes, you absolutely can. This is actually the core process for migrating a website. You can use either a plugin or a manual restore to move a complete copy of your site to a new domain name or a different hosting company.
The most critical step happens after you've moved the files and database. You need to update all the old URLs.
- Simply moving the files isn't enough; the site will be broken.
- Your database is packed with references to your old domain.
- Get a plugin like Better Search Replace and run it immediately. Use it to find every instance of your old URL and swap it for the new one.
This little step is a lifesaver. It fixes all your internal links and image paths, making sure the site works perfectly in its new home.
What if My Backup File Is Too Large?
Running into your server's upload limit is a common headache, especially on shared hosting plans. If your backup file is too big to upload through the normal WordPress dashboard, don't sweat it. There's a straightforward workaround.
Just use an FTP client, like FileZilla, to upload the backup archive directly to your server. You'll need to drop it into the specific folder your backup plugin uses—for example, UpdraftPlus stores backups in a folder like /wp-content/updraft/.
Once the file is uploaded, head back to your plugin's restore page. Look for an option to "Rescan for local backups." The plugin will spot the file you just uploaded, and you can carry on with the restoration from there.
Take the headache out of WordPress management. With WP Foundry, you can install, update, and manage plugins and themes across all your sites from a single desktop app. Secure your work with easy database backups and stay ahead of threats with a built-in vulnerability scanner. Simplify your WordPress workflow today with WP Foundry.
Comments
3 responses to “Restore WordPress from Backup a Complete Guide”
[…] Making this a regular part of your routine—maybe once a quarter or after any big changes to your site—builds a rock-solid disaster recovery plan. For a complete step-by-step guide, see our article on how to restore a WordPress site from a backup. […]
[…] is only unlocked when it works perfectly in an emergency. This is why our complete guide on how to restore WordPress from a backup is such an essential […]
[…] easily sidestep with a bit of proactive testing. For a complete walkthrough, our guide on how to restore WordPress from a backup lays out the exact steps. Successfully restoring your site in a test environment is the only true […]