
It’s tempting to jump straight into installing a new WordPress theme. You’ve found the perfect design, and you can’t wait to see it live. But hold on a second. Rushing this process is a classic mistake that can lead to a world of frustration—broken layouts, lost settings, and a major headache.
Think of it like a pre-flight check for your website. A few simple preparations can mean the difference between a smooth transition and a complete disaster. We're not just talking about avoiding technical errors, but also about protecting all your hard work and keeping your site looking professional for your visitors.
Create a Full Website Backup
If you take only one piece of advice from this guide, let it be this: back up your website. It's your ultimate undo button.
If the new theme conflicts with a plugin, causes a critical error, or you just plain don't like how it looks, a recent backup lets you restore your site to its previous state in minutes. No harm, no foul.
A proper backup needs to include two things:
- Your WordPress database: This is the brain of your site, holding all your posts, pages, comments, and settings.
- All your website files: This means your WordPress core, plugins, existing themes, and every image or file you've uploaded.
Most good hosting providers offer daily backups, which is great. Still, you should always create a fresh, manual backup right before you make a big change like switching themes. You can do this through your hosting control panel or with a trusted WordPress backup plugin.
Key Takeaway: Never, ever change your theme without having a recent, complete backup of your website. This single step is the most important part of the entire process and can save you from catastrophic data loss.
Use a Staging Site for Testing
A staging site is essentially a private copy of your live website. It's a safe, hidden environment where you can play around without any of your visitors knowing. Here, you can install the new theme, tweak the settings, and test everything thoroughly.
This is your chance to find and fix problems before they go public. Does the new theme work with your essential plugins? Do all your forms and special features still function correctly? A staging site lets you answer these questions without any risk.
Making a big change like this can also affect other parts of your site, like how it appears in search engines. Your theme's structure and speed play a role in SEO, so it's a good idea to have some basic knowledge. If you're new to this, a good beginner's guide to search engine optimization can give you the foundational knowledge you need.
Using the Official WordPress Theme Directory
If you're just getting started or simply want the most secure, straightforward option, the official WordPress theme directory is your best bet. It’s built right into your dashboard, giving you a direct line to thousands of free themes. Best of all, every single one has been vetted by the WordPress review team for quality and security.
To get there, head to Appearance > Themes in your admin panel. This is where you'll see all your currently installed themes. Now, look for the “Add New Theme” button at the top and give it a click. This opens up a huge library of designs just waiting for you to find the right one.
Finding the Perfect Theme
The first screen you see will show you what’s popular, the latest additions, and themes marked as favorites. It’s a decent place to start browsing, but the real magic is in the “Feature Filter.” This tool helps you cut through the noise and find exactly what you need.
You can filter themes based on:
- Layout: Specify if you want a grid layout, one column, two columns, or a specific sidebar placement.
- Features: Look for crucial functionality like accessibility readiness, WooCommerce support for e-commerce, or a full-site editing experience.
- Subject: Drill down into themes built for specific niches, whether you're building a blog, a portfolio, or an online shop.
This filtering is a massive time-saver. For instance, if you're building a photography blog and know you need a two-column layout with a right sidebar, you can set those filters and instantly see only the themes that match. No more endless scrolling.
Pro Tip: Don’t just judge a theme by its cover image. Always use the "Live Preview" feature. It’s invaluable because it shows you what the theme looks like with your actual content—your posts, pages, and menus. You get a real-world preview before you commit.
Installing and Activating Your Chosen Theme
Once you've found a theme that feels right, the final steps are a breeze. Just hover your mouse over the theme's thumbnail, and an “Install” button will pop up. Click it. WordPress takes care of the download and installation in the background, usually in just a few seconds.
After the installation wraps up, that button will change to “Activate.” Click it one last time to make the theme live on your site. And just like that, you've successfully learned how to install wordpress themes using the most common method available. With WordPress powering 43.6% of all websites, this is a foundational skill for any site owner.
Of course, a good-looking theme is only half the battle; it also needs to be well-coded for long-term success. To learn what to look for, take a look at our guide on WordPress theme best practices. Following these tips will help ensure your site is not just beautiful, but also fast, secure, and easy for your visitors to use.
Uploading a Premium Theme from a ZIP File
While the official WordPress directory has some great free themes, premium themes are where you'll find advanced features, dedicated support, and truly unique designs. When you buy a theme from a marketplace or a developer, you won't be searching for it in the dashboard. Instead, you'll be uploading a specific file.
This method opens up a whole new world of customization and is a core skill for any serious WordPress user.
Finding the Right File to Upload
First things first, you need to download the theme files from the provider you purchased them from. This is where a lot of people trip up for the first time. Marketplaces like ThemeForest often bundle more than just the theme into the download package—you might find documentation, license info, and even design files like PSDs.
Here's the crucial part: you can't just upload that entire package to WordPress. You have to unzip the main download folder on your computer first. Inside, you'll find the installable .zip file, which is usually named something like themename.zip.
If you try to upload the wrong file, WordPress will hit you with an error that says something like, "The package could not be installed. The theme is missing the style.css stylesheet." That's your clue you've grabbed the wrong .zip.
Using the WordPress Uploader
Once you've located the correct theme .zip file, the rest of the process is pretty simple inside your WordPress admin area.
- Head over to Appearance > Themes.
- Click the Add New Theme button you see at the top.
- On the next screen, you'll see an Upload Theme button. Click it.
An upload form will appear. Just click "Choose File," find the installable theme .zip file on your computer, and select it. Then, hit "Install Now." WordPress takes over from here, unpacking the file and putting everything in the right place on your server. After a moment, you'll see a success message.
From that screen, you can either "Live Preview" the new theme with your existing content or "Activate" it to make it live right away.
This simple infographic highlights a few key things to look out for when choosing any theme, whether it's free or premium.
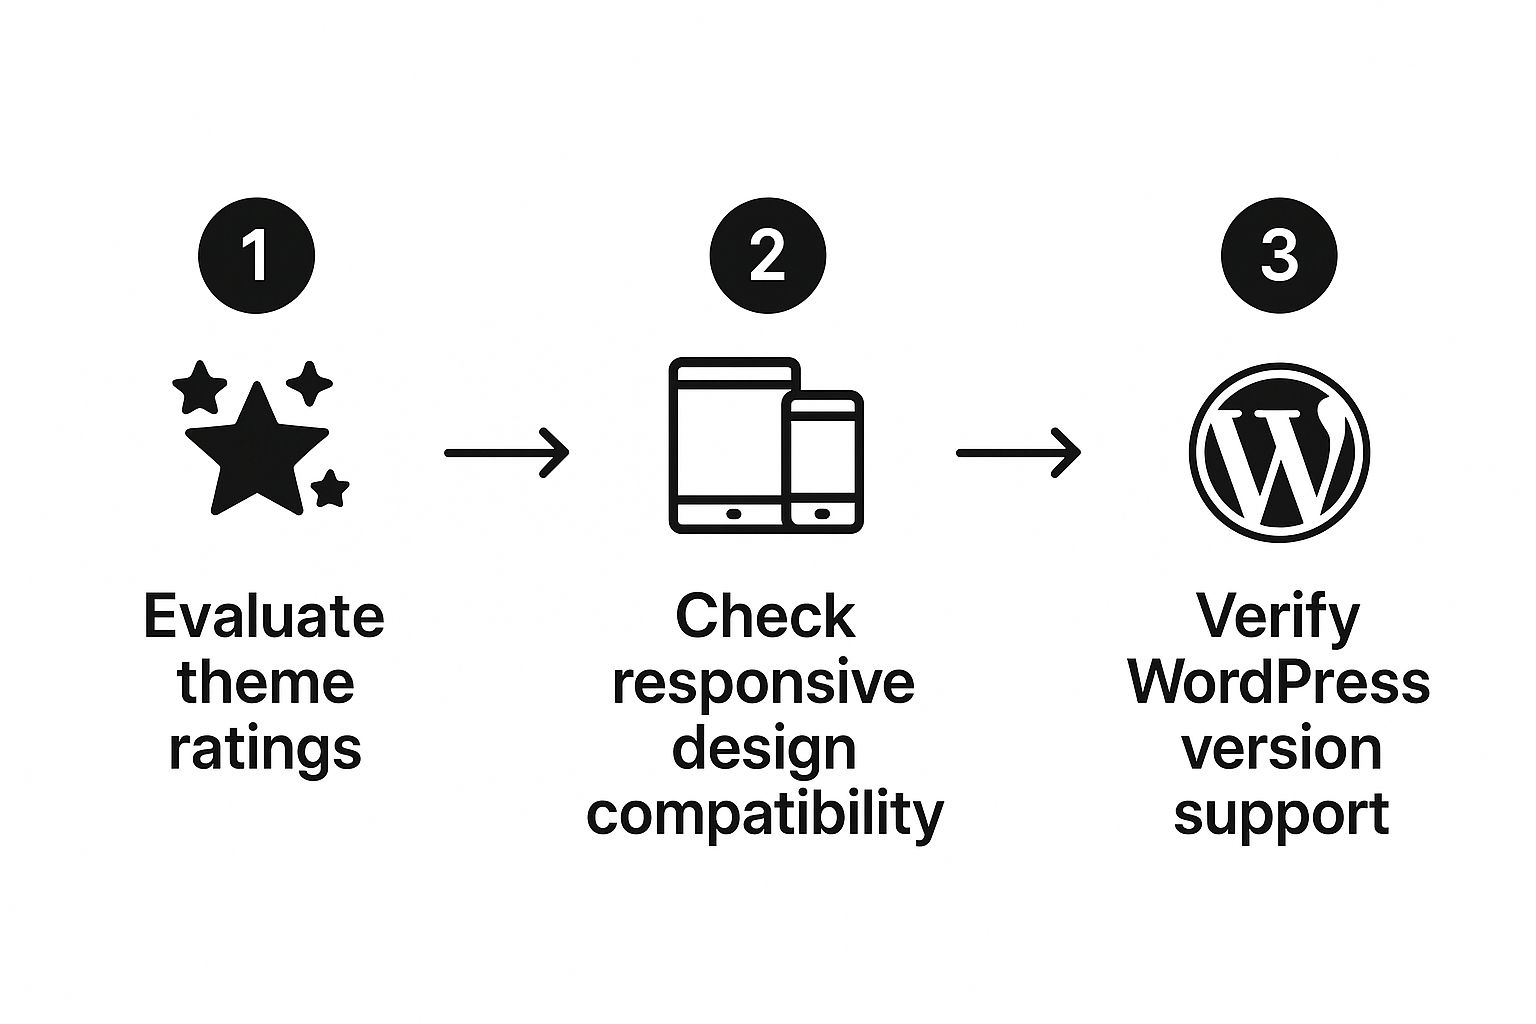
Running through this checklist—from checking ratings to confirming compatibility—helps you pick a theme that's reliable and won't cause headaches later on.
Why Manual Uploads Are So Important
Getting comfortable with this upload method is a vital skill. It’s your gateway to the vast majority of third-party designs, including the 15,000+ premium themes on ThemeForest alone. It’s this rich ecosystem of independent developers that has helped WordPress secure its dominant 62.8% CMS market share.
Providers like Themeisle, known for their extensive catalog of themes and plugins, rely on this direct upload method to get their products to customers. It’s the standard way of doing things outside the official directory.
Key Takeaway: The
.zipfile upload is the standard for virtually all premium and custom-coded WordPress themes. Learning to find the correct installable file and use the WordPress uploader with confidence gives you access to the very best designs the web has to offer.
Installing a WordPress Theme with FTP
Sooner or later, the standard WordPress uploader is going to give you trouble. You might see a cryptic error about your php.ini file, or you'll find out your premium theme's .zip file is way too big for your server's upload limit. It happens to everyone, especially with feature-packed themes.
When it does, knowing how to install wordpress themes using FTP (File Transfer Protocol) is a lifesaver. This method lets you sidestep the dashboard entirely and place your theme files directly on the server. It might sound a little technical, but it's actually a pretty simple process and an essential skill to have in your toolkit.
Connecting to Your Server with an FTP Client
First up, you need an FTP client. This is just a desktop app that connects your computer to your website's server. A great one to start with is FileZilla—it’s free, works on all major operating systems (Windows, Mac, and Linux), and is really reliable.
To get connected, you'll need your FTP login details. You can usually find these in your web hosting account's control panel, under a section like "FTP Accounts." You're looking for four specific pieces of information:
- Host: Your server's address. This is often just your domain name (like
yourwebsite.com) or a dedicated FTP address from your host. - Username: Your FTP account username.
- Password: The password for that specific FTP user.
- Port: This is usually port
21. If your host offers SFTP (Secure FTP), use that instead with port22for a much more secure connection.
Pop those details into your FTP client and hit connect. You’ll see your local computer's files on one side and your website's files on the other.
Uploading the Theme Files Correctly
Now that you're connected, you have to navigate to the right spot. In the remote server panel of your FTP client, find your WordPress installation folder. It's almost always inside a directory called public_html or www.
Once you're in there, the path is always the same: wp-content/themes/. This is the home for all your installed WordPress themes.
Back on your local computer, find your theme's .zip file. This is a crucial step: you need to unzip it first. Unlike the dashboard method, you upload the folder, not the .zip file. Just drag the unzipped theme folder (it will have a name like your-theme-name/) from your local files over to the remote /themes/ directory. The transfer will kick off and might take a few minutes if it's a large theme.
Critical Tip: Double-check you're uploading the right folder. Premium themes often come in a main download package that includes documentation and other files. The actual theme folder is usually inside that main download. If you upload the wrong one, WordPress won't recognize it.
Activating the Theme in WordPress
The final step is back in your WordPress admin area. Once the FTP upload is finished, navigate to Appearance > Themes. You should now see your new theme sitting there with the others.
Just hover over it and click the Activate button. That's it! Your site will immediately switch over to the new design. You've just successfully installed a WordPress theme with FTP—a powerful and reliable skill for any site owner.
Configuring Your New Theme After Activation
Hitting that “Activate” button is really just the starting line. Your site might have a fresh coat of paint, but it probably looks nothing like the polished demo that sold you on it. Now comes the fun part: turning that generic template into something that actually looks and feels like your brand.
Most premium themes, and even many of the more complex free ones, will guide you through the next steps. Keep an eye out for notices that appear on your dashboard right after activation—they're there for a reason and are key to getting set up correctly.
Getting Started With Initial Setup
The first thing you'll often be prompted to do is install a set of recommended or required plugins. These aren't just random suggestions; they're the engines that power your theme's most important features, like sliders, page builders, or custom contact forms. Your theme will usually offer a way to install all of them at once, which is a massive time-saver.
Once the plugins are sorted, look for an option to import demo content. This is probably the single most helpful feature for getting to grips with a new theme. Importing the demo will set up your site with the same pages, posts, and layouts you saw in the theme's live preview.
Key Takeaway: Importing demo content isn't about using the placeholder stuff forever. It’s about getting a pre-built framework you can then take apart and fill with your own content. It makes figuring out how everything works so much easier.
Customizing Your Site's Look And Feel
With the basic structure in place, it’s time to jump into the WordPress Customizer. You can find it under Appearance > Customize. This is where you’ll do most of the visual tweaking.
Here, you can start making the design your own. The specific options will change depending on the theme, but you can almost always expect to:
- Upload Your Logo: Swap out the default theme logo for your own.
- Adjust Colors: Fine-tune the color scheme to match your brand's palette.
- Modify Typography: Change the fonts and text sizes for your headings and paragraphs.
- Configure Homepage Settings: Decide if your homepage will show your latest blog posts or a custom-built static page.
Spend some time clicking through the different panels in the Customizer. This is where you'll handle all the details, from header layouts to footer widgets. As you work, remember that keeping your theme up-to-date is crucial for security. We have a full guide on how to update a WordPress theme that walks you through the entire process.
The final step is to replace all that demo content with your own words and images. You'll also want to set up your site's main navigation menu under Appearance > Menus so your visitors can actually find what they're looking for. By tackling these steps one by one, you’ll methodically transform the stock theme into a polished site that is uniquely yours.
Common Questions About WordPress Themes
Once you get the hang of installing themes, you’ll naturally run into some deeper questions about how they work. This is a normal part of getting comfortable with WordPress, so let's walk through some of the most common ones I hear.
Getting a handle on these details will help you make smarter choices and dodge some classic beginner mistakes.
What Happens to My Content When I Switch Themes?
This is probably the #1 worry for anyone changing their site's look for the first time. The great news? Your core content is completely safe.
All of your posts, pages, images, and other media library files live in the WordPress database and your server's file system. They're totally separate from your theme files. When you switch to a new theme, WordPress just pours all that existing content into the new design's structure. It's all still there.
What doesn't carry over, however, are the features and settings that were specific to your old theme. This is where people get tripped up. Things you'll lose include:
- Theme Options: Any custom colors, font choices, or layout settings you configured in the old theme's control panel will be gone.
- Widgets: The widgets in your sidebars or footer will be deactivated. You'll have to go back in and re-add them to the new theme's widget areas.
- Shortcodes: If your old theme provided its own shortcodes for things like buttons or columns, they'll stop working. Instead, you'll just see the raw shortcode text (like
[button]) on your pages.
Key Takeaway: Your content is safe, but the styling and special features tied to your old theme will vanish. This is exactly why testing on a staging site is so important—it gives you a clear preview of what you'll need to reconfigure before making the switch on your live site.
Can I Install Two Themes at Once?
You can have dozens of themes installed on your WordPress site, but only one can be active at a time. The moment you activate a new theme, WordPress automatically deactivates the old one.
While it's smart to keep a default WordPress theme (like Twenty Twenty-Four) installed for troubleshooting purposes, letting a bunch of inactive themes pile up is bad practice. Every inactive theme is still code sitting on your server. If you don't keep them updated, they can become security risks.
My rule of thumb is simple: if you aren't using a theme, delete it. Keep your installation lean and secure.
Speaking of security, it's always wise to have a safety net. Regularly performing a full WordPress site backup is a non-negotiable security habit. It gives you a clean restore point if a theme switch or update ever goes wrong.
Is It Better to Use a Child Theme?
If you plan on making any custom code changes to your theme’s files—like tweaking functions.php or adding custom CSS to style.css—then using a child theme isn't just better, it's essential.
Here’s why: when you modify a theme's files directly (this is called editing the "parent theme"), all your hard work gets completely wiped out the next time the theme developer releases an update. All those custom changes? Gone.
A child theme acts as a protective layer. It inherits all the looks and functions of the parent theme but keeps your modifications in a separate folder. This setup lets you update the parent theme safely whenever a new version comes out, knowing your customizations are untouched.
Ready to take full control of all your WordPress sites from one place? WP Foundry is a powerful desktop app that lets you install, update, and manage themes and plugins across unlimited sites with a single click. Centralize your workflow and save hours of administrative work. Get WP Foundry today