
Trying to edit your live WordPress site on the fly is a recipe for disaster. I’ve seen it happen too many times—it's like performing surgery on a moving train. One small slip-up and the whole thing can come crashing down. A staging site is your secret weapon: a private, offline copy of your website where you can test updates, squash bugs, and try out new designs without a single visitor knowing.
It’s the professional way to work, and honestly, it’s a non-negotiable for preventing costly mistakes.
Why a Staging Site Is Your Website's Best Friend

Before we jump into the how, let's talk about the why. Too many people see a staging environment as just another technical chore. That's a huge mistake. Think of it as a core business practice—an essential safety net for anyone who takes their website seriously.
Picture this: you're running an e-commerce store in the middle of your biggest holiday sale. You spot a tiny bug and decide to push a "quick" plugin update to fix it. Next thing you know, your entire checkout process is broken. Every minute of downtime is costing you sales and, worse, eroding customer trust.
This isn't some made-up horror story; it's a reality for businesses that work directly on their live sites. A staging site eliminates that risk entirely.
The Professional Standard for Site Management
At its core, a staging environment is simply an isolated clone of your website. It's your private playground. A place where you can break things, experiment with a bold new design, or update critical software without any impact on your live audience.
This isn't just a "nice-to-have." It's a best practice, especially when you consider that WordPress powers around 43.6% of all websites on the internet. With so many sites relying on one platform, having a safe workflow is crucial to keeping things running smoothly.
A staging site really proves its worth when you're:
- Updating Plugins and Themes: Test every update to make sure it doesn’t conflict with your other plugins or your current theme.
- Handling a Major Redesign: You can completely overhaul your site's look and feel behind the scenes, without showing a half-finished mess to the world.
- Adding New Features: Want to add a booking system or a membership portal? Perfect it in staging first, then launch it with confidence.
- Troubleshooting Bugs: Isolate and fix errors without disrupting the user experience on your main site.
One of the most critical times for a staging site is during a major overhaul or migration. It gives you the space to test everything thoroughly and safeguard your rankings during a website migration without any nasty surprises.
Adopting a staging workflow means you shift from a reactive, "fix-it-when-it-breaks" mindset to a proactive, "prevent-it-from-breaking" strategy. It's what separates the amateurs from the professionals.
Ultimately, learning how to set up a WordPress staging site isn't just about gaining a technical skill. It's about protecting your investment, your time, and your business's credibility. It turns website management from a stressful, high-wire act into a controlled, predictable process.
Choosing Your Staging Method
Figuring out how to create a WordPress staging site can seem a bit much at first, but it really just comes down to a few things: your comfort with the technical side, your budget, and what your hosting provider offers. There's no single "best" method for everyone. The right choice is the one that fits how you work.
You have three main ways to go about this. Each has its own pros and cons when it comes to ease of use, cost, and how much control you have. Getting this decision right from the start will save you a ton of headaches later.
Understanding Your Options
Here are the three main approaches for setting up a WordPress staging site:
- Using Your Host's Built-in Tool: This is usually the easiest path. Many managed WordPress hosts offer a simple, one-click tool. It’s built for convenience and is perfect if you're new to this or just want a hassle-free setup.
- Using a Dedicated Plugin: If your host doesn't have a built-in feature, a plugin can do the job. These tools operate right from your WordPress dashboard, so you're already in a familiar environment.
- Building It Manually: This is the most hands-on method. You'll be creating a subdomain and copying your site's files and database yourself. It gives you the most control but also comes with the highest risk if you don't know what you're doing.
The image below gives you a simple flow to follow when deciding which method is best for you.
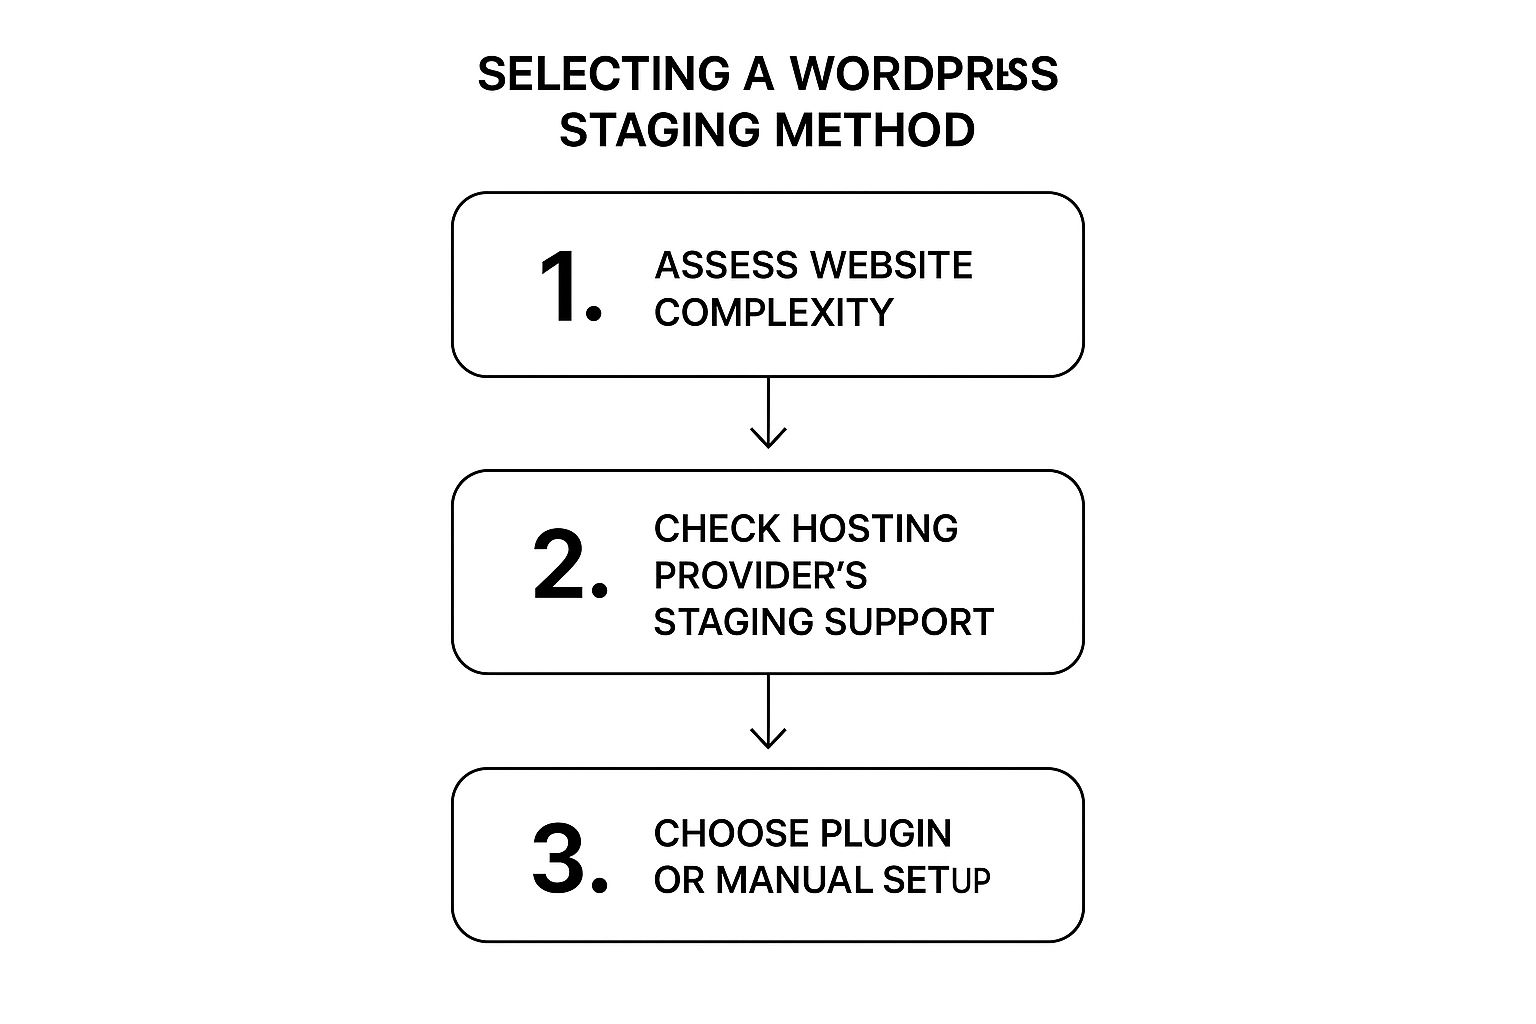
As you can see, the process begins by looking at your site's complexity and your host's features, which will guide you to the right choice.
The need for staging environments has grown right alongside WordPress's incredible popularity—it now holds a 62.8% market share of all content management systems. With more businesses running complex e-commerce or membership sites, having a safe place to test is no longer a luxury; it's a necessity.
Comparing WordPress Staging Methods
To help you decide, here’s a quick breakdown of how the three main approaches stack up against each other.
| Method | Best For | Ease of Use | Cost | Control Level |
|---|---|---|---|---|
| Host's Tool | Beginners, non-tech users, and those who prioritize convenience. | Easiest | Usually included with managed hosting plans. | Low |
| Plugin | Users on shared hosting or whose host lacks a built-in tool. | Moderate | Varies (free, freemium, or premium). | Medium |
| Manual | Experienced developers who need full control over the environment. | Difficult | Potentially free (if you have the technical skills). | High |
Ultimately, this table shows the trade-off you’re making. Simpler methods offer less control, while more control requires more technical work.
Finding the Right Fit for You
For most people, especially if you're just starting out, your hosting provider's feature is the way to go. It handles the cloning and the tricky part of pushing changes back to your live site automatically. There's very little chance of messing things up, which is a huge plus.
If your host doesn't offer that, a staging plugin is your next best option. It’s great to manage everything from one place. This is especially handy when you’re already busy with other site tasks, since good WordPress plugin management is vital for keeping your site running smoothly. Just make sure to check for any known conflicts before you settle on a specific plugin.
The manual method is really only for seasoned developers. While it gives you total power over every single part of the setup, it also means you’re on the hook for everything, from database connections to file permissions.
In the end, choosing your method is a balancing act. Do you need speed and simplicity, or do you require complete control over the staging environment? Answering that question will point you straight to the best solution for your WordPress site.
Using Your Hosting Provider for Staging
For most people, the easiest and most direct way to create a WordPress staging site is to use the tools your hosting provider already offers. This approach takes almost all the technical work off your plate, making the process both safe and incredibly fast. If you're using a quality managed WordPress host, this is often a major selling point.
Just imagine logging into your hosting dashboard, finding a "Staging" or "Dev Environments" tab, and creating a perfect copy of your site with a single click. That’s the exact experience these hosts are aiming for. It’s built to be intuitive, even if you’re not a developer.
This one-click method completely automates what would otherwise be a pretty complex and manual job. When you kick off the process, your host gets to work on two critical actions behind the scenes.
What Happens Behind the Scenes
First, your host clones your website’s files. This means everything—your core WordPress files, your theme templates, all your plugin folders, and every media upload. It's a complete snapshot of your site's entire file structure.
At the same time, it duplicates your WordPress database. This is the heart of your site, holding all your content like posts, pages, user profiles, and settings. Creating an exact copy here ensures your staging site works just like the live one, with all the same data and configurations ready to go.
The end result is a fully functional, private copy of your website, usually hosted on a temporary address like staging.yourwebsite.com.
Accessing and Verifying Your New Staging Site
Once the cloning is done, your hosting dashboard will give you a unique URL and login details for your new staging environment. Your very first step should always be to log in and give it a quick check to make sure everything copied over as expected.
Here’s a simple checklist I run through:
- Admin Area: Can you log into the WordPress dashboard with your normal username and password?
- Frontend Appearance: Does the staging site look identical to your live site? Take a look at the homepage, a few key pages, and some blog posts.
- Core Functionality: Try out the essential features. If it’s an e-commerce site, can you add a product to the cart? For a blog, are the comment forms showing up correctly?
Key Takeaway: The whole point of using your host's tool is simplicity and reliability. It’s designed to create a perfect mirror of your site without you ever needing to touch code or move a database file manually.
After you've confirmed the staging site is a faithful copy, you're all set to start working. You can now safely update plugins, try out new themes, or add custom code in a secure sandbox. None of the changes you make here will impact your public website at all.
But the real magic of this method shows up when you're finished. Most hosts that offer one-click staging also provide a "Push to Live" or "Deploy" button. This feature intelligently merges your changes from the staging site back to your live site, finishing the process just as smoothly as it started. This automation is precisely why going through your host is the best option for most WordPress users.
So what do you do if your hosting provider doesn't give you that nice, one-click staging feature?You're not stuck, not by a long shot. The next best thing is to dive into the massive WordPress plugin ecosystem.
Using a dedicated plugin is a great way to handle staging, especially if you're comfortable working inside your WordPress dashboard.
The beauty of this approach is convenience. You find a plugin you like, install it just like any other, and then you can manage the whole process right from your WP-Admin area. It does all the heavy lifting for you. Some of the go-to options for this are WP Staging or WP Stagecoach.
The general process is pretty much the same regardless of which plugin you pick. Once you install and activate it, you'll usually get a new menu item in your dashboard. Clicking that kicks off the process of cloning your live site.
The Cloning Process and What to Expect
When you start the cloning process, the plugin essentially makes a complete copy of your site—all your files, your themes, your plugins, and your entire database. It then sets up a new, sandboxed environment for this copy.
Typically, this new staging site lives in a subdirectory of your main WordPress installation. This is key: it means your staging site is on the same server, but it's completely walled off from your live, public-facing website.
One thing you absolutely need to keep in mind is server resources. Copying a website, particularly a big one with tons of high-res images and a bloated database, can put a real strain on your server. If you're on a cheaper shared hosting plan, the process might time out or even fail completely. Before you settle on a plugin, it's smart to double-check that your server has enough CPU power and disk space to handle duplicating your site.
Pro Tip: Look for plugins that let you do selective cloning. This feature is a lifesaver. It allows you to skip copying huge files (like video archives) or certain database tables (like security logs). This can dramatically speed up the cloning and take a lot of pressure off your server.
Once the clone is created, the plugin will spit out a unique URL for your new staging site. It's almost always password-protected right out of the box. This is crucial for keeping it private and, just as importantly, preventing Google from indexing your half-finished work.
Pushing Your Changes Back to Live
So, you've used your staging site to test that new plugin, fix a bunch of annoying bugs, or maybe even roll out a complete redesign. Now what? This is where a good staging plugin really earns its keep. You don't have to mess around with FTP or manually migrating database tables.
Instead, you'll use the plugin's "push to live" or "deploy" feature.
This is the magic button. The plugin intelligently scans for differences between your staging and live sites, then gives you the option to push only the things you've changed. The best plugins even offer a "selective push". This lets you choose to sync just the files, just the database, or even specific tables within the database.
This is incredibly useful for something like an e-commerce site. It means you can push your design changes live without accidentally overwriting all the new customer orders that came in while you were working.
Even though staging plugins are incredibly powerful, always do your homework on compatibility. Spend a few minutes reading recent reviews and checking the plugin's support forums. See if anyone has reported conflicts with your specific theme, page builder, or other critical plugins. A little bit of research upfront can save you from a world of headaches later on.
Best Practices for Managing Your Staging Site
Just spinning up a staging site is only half the job. The real magic happens when you stick to a disciplined workflow. A staging environment is an incredible tool, but without some ground rules, it can cause as many headaches as it solves. Mastering how you manage it is what really keeps your live site safe from those heart-stopping "oops" moments.
I like to think of a staging site as a science lab. Every experiment—whether you're testing a new plugin, tweaking some custom CSS, or tackling a major WordPress update—has to be done methodically. Keeping records of what you're changing prevents simple mistakes from snowballing and ensures only clean, tested code ever touches your live site.
Sync Before You Work
This is probably the most common pitfall I see. Imagine you spend a full week perfecting a new page design on your staging site. In that same week, your live site has collected new user comments, blog posts have gone live, and maybe even a few new products were added. Pushing your staging changes now could completely wipe out all that new content. Gone.
To avoid this disaster, always sync from your live site to your staging site before starting any new work. It’s a simple step that ensures you’re working with the very latest version of your website, which prevents data loss and strange compatibility bugs. Most one-click staging tools from hosts and plugins have a button labeled "Refresh Staging" or "Pull from Live" for exactly this reason. Use it.
Block Search Engines and Public Access
Your staging site is your private workshop, not a public sneak peek. It's absolutely critical to keep search engines from finding and indexing this duplicate version of your site. If Google stumbles upon it, you could face duplicate content penalties that tank your hard-earned SEO rankings.
Luckily, WordPress has a simple, built-in way to handle this:
- From your staging site’s WordPress dashboard, go to Settings > Reading.
- Look for the "Search Engine Visibility" setting.
- Check the box that says "Discourage search engines from indexing this site."
It’s also smart to password-protect the entire staging environment. This adds an extra layer of security, keeping your work-in-progress totally private from clients, competitors, and the public until you’re ready for them to see it.
Establish a Rigorous Testing Checklist
Never, ever push changes to your live site without a solid check-up first. Before you even think about going live, spend quality time on the staging site doing some comprehensive quality assurance (QA) testing. This is how you confirm that your updates work perfectly and haven't broken something else by accident.
Your QA checklist will be unique to your site, but it should always cover the essentials. Test your contact forms, run through the full checkout process, check user login and registration, and see how everything looks on a phone. A systematic review like this catches the subtle bugs that a quick glance will always miss.
Always Backup Both Environments
Even with the most perfect staging workflow, things can go wrong. A server can hiccup, or a "push to live" process can fail halfway through. Your final safety net is a solid backup strategy for both your live and staging sites.
Before you push any changes from staging to live, take a full backup of your live site. This creates an immediate recovery point you can restore in minutes if needed. You can learn more about building a reliable WordPress site backup strategy to keep your data safe. Consistent backups are the ultimate insurance policy in website management.
Common Questions About WordPress Staging
Dipping your toes into staging environments for the first time? You probably have a few questions. That's completely normal—most people do. Let's walk through some of the most common ones so you can build, test, and deploy with confidence.
Getting these things straight from the start saves a ton of headaches later on.
Will a Staging Site Affect My Live Site?
Absolutely not, as long as it's set up correctly. A proper staging site is a completely separate, isolated copy of your website. It typically lives on a different subdomain or in a subdirectory that's firewalled off from public view.
The most crucial step is to discourage search engines from indexing it. This is a simple checkbox in your WordPress settings. Ticking it tells Google and other search engines to ignore the staging site, preventing any duplicate content issues or SEO penalties. Your live site’s performance, traffic, and rankings will remain totally untouched while you experiment.
Think of your staging environment as a sandbox. Anything you build, break, or test in the sandbox stays in the sandbox. It can't spill out and mess up your live site.
Moving Changes from Staging to Live
How you get your brilliant new changes from the staging site to your live site really hinges on how you created the staging copy in the first place.
There are a few common routes:
- Hosting Provider Tools: Many hosts offer a "Push to Live" or "Deploy" button. This is usually the safest and simplest method, as they handle all the technical details behind the scenes.
- Staging Plugins: Tools like WP Stagecoach provide a similar one-click push right from your WordPress dashboard. It's designed to be user-friendly.
- Manual Migration: If you built your staging environment from scratch, you'll need to move the updated files and database yourself, likely using a migration plugin. This is a complex process and I'd only recommend it for experienced developers who know exactly what they're doing.
Handling New Data on the Live Site
This is a really important point, especially for anyone running an e-commerce or membership site. While you’ve been working on your staging site, your live site has been collecting new orders, user sign-ups, comments, and form submissions.
This new data doesn't exist on your staging copy. If you just push the entire staging site over to live, you’ll wipe out all that new activity. That's a disaster.
Good staging tools get around this. They often have a "selective push" or database merge feature that lets you sync only your updated files and specific database tables, leaving your orders and users untouched. No matter which method you use, having a solid backup and recovery plan is non-negotiable. It's always a good idea to know how to restore your WordPress site from a backup just in case something goes sideways.
Ready to take control of all your WordPress sites from a single, powerful dashboard? WP Foundry centralizes your plugin management, updates, backups, and security scanning, saving you valuable time and effort. Manage your sites more efficiently with WP Foundry today!
Comments
4 responses to “How to Create WordPress Staging Site | Easy Step-by-Step Guide”
[…] Foundry make creating a staging site incredibly simple. If you're new to the idea, our guide on how to create a WordPress staging site is a great place to start. It’s the professional way to handle website […]
[…] part of a professional migration. To get a better handle on this, you can learn more about how to create a WordPress staging site with our detailed guide. It’s a small step that gives you massive peace of mind and helps ensure […]
[…] With another click, the system intelligently merges the changes from your staging environment over to your live production site. Most modern hosts even offer a "selective push," which lets you choose if you want to push only the files, only the database, or both. This is incredibly helpful. For instance, you might have gotten new orders on your live store while you were busy changing theme files in staging. While this one-click process is powerful, you can find a more detailed breakdown in our complete guide on how to create a WordPress staging site. […]
[…] Once the files are uploaded and the database is ready, you run the installer by navigating to it in your web browser (e.g., https://newsite.com/installer.php). This launches the plugin's deployment wizard. It will guide you through connecting to the new database, confirming the new site URL, and running the installation. This is an essential step when you need to create a WordPress staging site, as it gives you a perfect duplicate for testing. You can learn more about this in our guide on how to create a WordPress staging site. […]