
Knowing how to clone a WordPress site is a non-negotiable skill for anyone serious about managing their website. It really comes down to a few different approaches: you can use a dedicated plugin like Duplicator, lean on your hosting provider's built-in tools, or get your hands dirty with a manual transfer of your site's files and database.
For most folks, just grabbing a good plugin is the fastest and easiest way to create a perfect carbon copy of a website.
Why and When Should You Clone a WordPress Site?
When we talk about "cloning" a WordPress site, we mean creating an exact, fully functional duplicate. This copy includes every single file, the entire database, all your themes and plugins, and every last setting. It’s then moved to a new location, ready to go. This is so much more than a simple backup; it's a living, breathing, independent version of your site.
Knowing when to deploy this technique is what separates a savvy site owner from one who's constantly putting out fires.
By far, the most common reason to clone a site is to set up a staging environment. A staging site is basically a private playground—a replica of your live site where you can safely test major changes. Think new themes, big plugin updates, or custom code snippets. If anything goes sideways, it happens on the clone, leaving your actual, visitor-facing website completely untouched.
Common Scenarios for Cloning
Beyond testing, cloning comes in handy in a bunch of other real-world situations:
- Migrating to a New Host: This is a big one. Moving from one hosting company to another can be a nail-biting experience, but cloning makes it incredibly smooth. You just copy your site to the new server, test everything to make sure it works, and then point your domain over. The result? Minimal, if any, downtime.
- Redesigning Your Website: Planning a major visual overhaul? Clone your site to a separate development environment. This lets you play with new layouts and features using your actual content, so you get a true-to-life preview of how it will all look before you flip the switch.
- Creating a Boilerplate: If you find yourself building the same type of website over and over for clients, this is a massive time-saver. You can clone a pre-configured "base" site that has all your favorite themes, plugins, and settings already installed. This lets you skip hours of tedious setup on every new project.
Key Takeaway: Cloning isn't just a technical task; it's a strategic move. It gives you a safety net for development, testing, and migration, protecting your live site's integrity and ensuring your users always have a great experience.
Given WordPress's massive footprint on the web, these skills are more critical than ever. As of 2025, the platform powers around 43.4% of all websites globally. That's a huge jump from just 21% back in 2014. This incredible growth just goes to show why efficient management techniques like cloning are so important.
Cloning is often just the first step in a larger site transfer. For a full breakdown of the entire process, this guide on migrating your WordPress website has detailed instructions that pick up right where these cloning techniques leave off.
Preparing Your Site for a Flawless Clone
When you're thinking about how to clone a WordPress site, it’s tempting to jump right into the action. But from my experience, the real secret to a smooth, headache-free clone is the prep work you put in beforehand. A few minutes of housekeeping now can save you hours of frustrating troubleshooting later.
The very first thing on your list, without question, is to create a complete backup of your entire website. This is your safety net, so don't skip it. A proper backup needs to include both your WordPress files—all your themes, plugins, and uploads—and your database. If the cloning process hits a snag, you'll have a perfect copy ready to restore, so no data gets lost.
Pro Tip: Don't just make the backup—test it. I've seen it happen where someone's backup file was corrupted, making it totally useless. Download the file and make sure it's complete. A broken backup is no better than having no backup at all.
For a more detailed look at this, our guide on how to back up a WordPress site walks you through the entire process, covering all the different methods you can use.
Slimming Down Your Installation
Alright, with your backup secured, it's time for a digital clean-up. A bloated website is a slow website to clone. It seriously increases the chances of timeout errors, which are especially common on shared hosting plans. Trimming the fat creates a much smaller, more manageable package to transfer.
Start by tidying up your WordPress installation. This is a simple but surprisingly effective way to shrink the size of your clone.
Here’s a quick checklist for your pre-cloning cleanup:
- Delete unused plugins and themes: If it’s deactivated, it’s just taking up space. Get rid of any plugins or themes you aren't actually using.
- Clear out post revisions: WordPress likes to save a ton of old versions of your posts. A simple plugin like WP-Optimize can get rid of these for you in one click.
- Empty spam comments and trash: This stuff just clogs up your database. A quick clear-out can make a noticeable difference.
Checking Server Compatibility
One last check. Take a moment to look at your server environment. If you're moving to a new hosting provider, you absolutely need to make sure the new server’s setup matches or is better than your current one.
The two big things to look for are the PHP version and the MySQL version. Any mismatch here can cause all sorts of problems, from plugin conflicts to the infamous "white screen of death" after the clone is complete.
You can usually find this information right in your hosting provider's control panel. A quick look here is a simple step that can prevent some major headaches down the road and ensure your cloned site runs perfectly in its new home.
Using a Plugin to Clone Your WordPress Site
For most folks, the simplest and most reliable way to clone a WordPress site is to use a dedicated plugin. This approach completely bypasses the need to mess with server files directly or manage databases, which can be a real headache. Instead, a good plugin will wrap up your entire website—files, database, themes, and all—into a single, neat package you can easily move.
The real win here is how accessible it makes the process. Tools like Duplicator or All-in-One WP Migration are built with regular users in mind. They guide you through what would otherwise be a pretty intimidating technical job, handling all the complicated stuff behind the scenes.
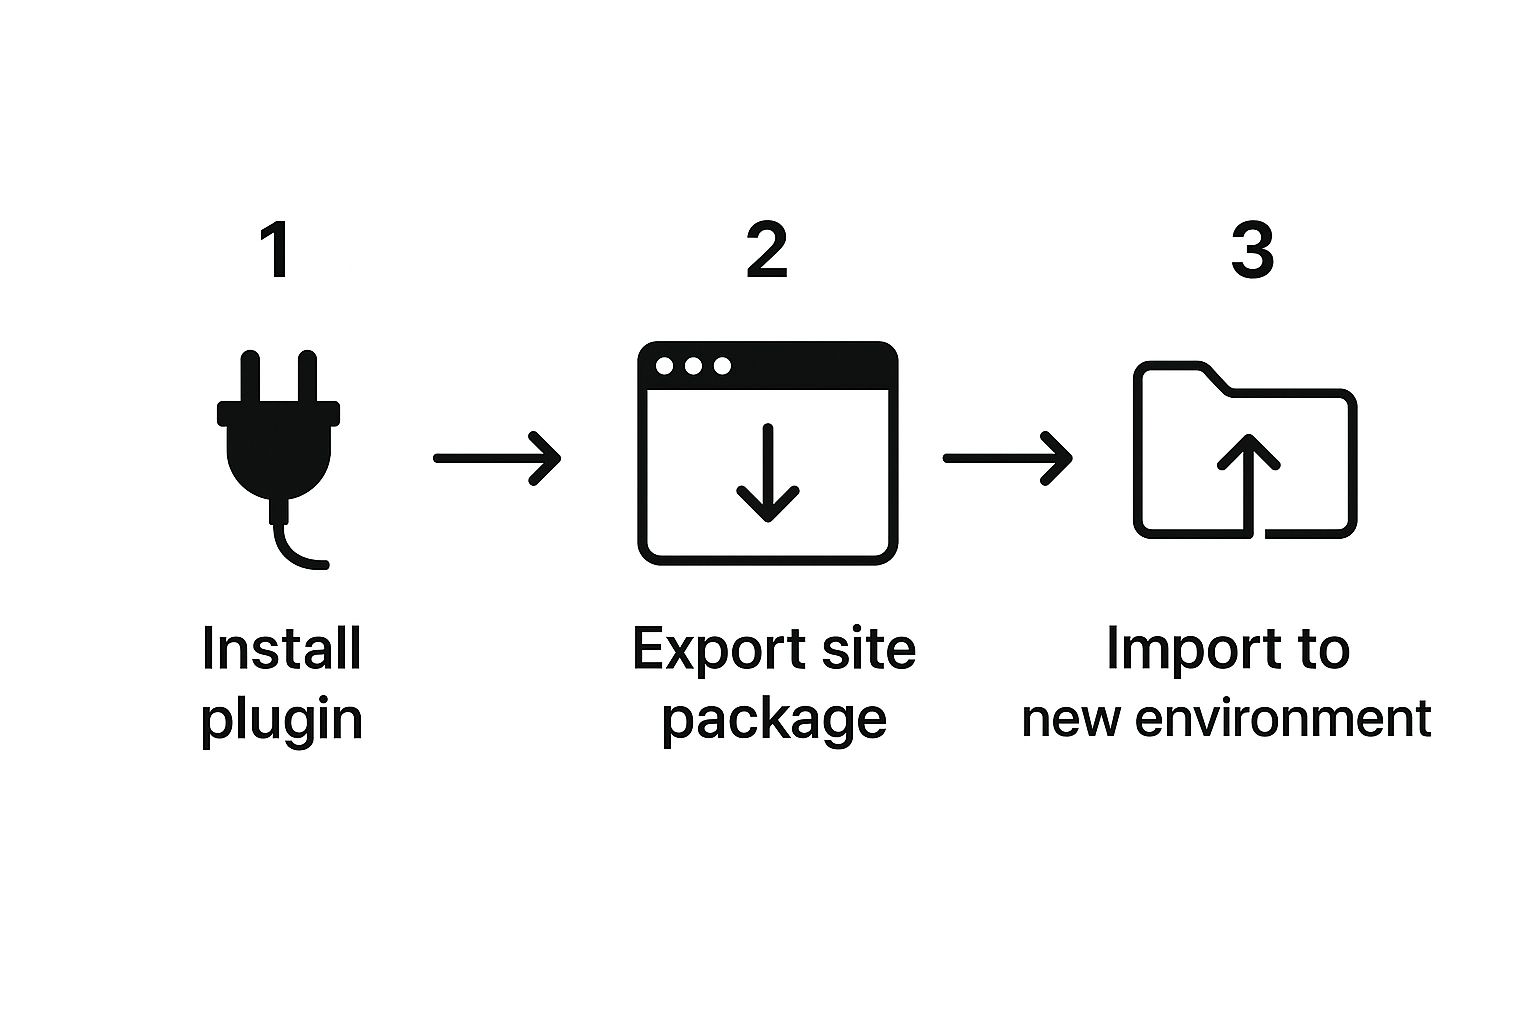
As you can see, the basic workflow is pretty straightforward, which makes it totally manageable even if you don't have a ton of technical experience.
Comparing Popular WordPress Cloning Plugins
With so many options out there, picking the right plugin can feel overwhelming. They all promise to make cloning easy, but they have different strengths and limitations. To help you decide, I've put together a quick comparison of the most popular choices I've used over the years. This should give you a good starting point for finding the tool that best fits your project and comfort level.
| Plugin | Best For | Key Feature | Free Version Limitation |
|---|---|---|---|
| All-in-One WP Migration | Beginners & small sites | Extremely simple drag-and-drop interface for import. | 512 MB upload size limit, which can be a deal-breaker for larger sites. |
| Duplicator | Most users, from small to large sites | Creates a package with a standalone installer script for robust deployment. | No scheduled backups or cloud storage integration in the free version. |
| UpdraftPlus | Users who also need a solid backup solution | Combines powerful backup features with a migration/cloning add-on. | Cloning/migration is a premium feature; not free. |
| Migrate Guru | Large, complex websites | Handles the migration on its own servers, avoiding your server's timeout issues. | Supports a specific list of web hosts; you need to check if yours is included. |
Ultimately, for most standard cloning jobs, Duplicator offers the best balance of power and ease of use in its free version. However, if you have a massive site, Migrate Guru can be a lifesaver, and if you just want something incredibly simple for a small site, All-in-One WP Migration is hard to beat.
How to Create and Deploy Your Clone
Once you've chosen and installed a plugin like Duplicator, the process centers around creating what's often called a "package" or an "archive". This bundle is the heart of the operation and usually contains two main things:
- A ZIP file: This is a compressed folder holding all your WordPress files—the core, your themes, plugins, and all the images you've uploaded.
- An installer script: This is a special PHP file that does all the work on the other end. It unpacks the ZIP and, more importantly, configures the database at the new location.
After you kick off the build process, the plugin will scan your site for any potential problems and then get to work compiling the package. When it's finished, you'll just need to download both the archive (the ZIP) and the installer file to your computer.
The final step is to upload these two files to your new, empty WordPress destination. This could be a new hosting account or even just a staging folder on your current server. Then, you'll navigate directly to the installer script in your web browser (for example, yournewdomain.com/installer.php).
The script will walk you through the last few steps. It will ask for the new database details you've set up, test the connection, and then finish the deployment. It’s a surprisingly smooth process. For more detailed instructions on different tools, you can find guides on how to clone a WP website that cover various methods.
Common Problems and How to Dodge Them
While plugins make cloning much easier, you're not immune to the occasional hiccup. Large websites are the most common source of trouble. I've seen them cause timeout errors during both the package creation and the upload. Most web hosts have strict limits on things like file upload sizes and how long a script can run.
The best defense is a good offense. Always perform that pre-cloning cleanup we talked about earlier. A smaller, cleaner site is always faster and easier to clone.
If you still run into trouble, dig into your plugin’s settings. You can often find options to exclude large, non-essential directories (like old backup folders or media archives) from the package. Sometimes, upgrading to the premium version of a plugin is the only way forward, as they offer features like direct cloud storage integration to bypass server upload limits entirely.
The Manual Method for Cloning WordPress
While plugins are great for convenience, sometimes you just need to get your hands dirty. The manual method for cloning a WordPress site gives you full control and a much deeper understanding of how your site's core parts fit together. It’s a fantastic skill to have, especially if you want to handle any situation without depending on a third-party tool.
Don't let the "manual" part scare you. It’s really just a two-step dance: copy your files, then copy your database. Think of it like moving to a new house. You pack up your belongings (the files) and then bring along the address book that knows where everything should go (the database).
Securing Your Website Files
First things first, you need to grab all of your site's files. We're talking about the WordPress core files, your themes, plugins, and every single image or PDF you've uploaded. The classic way to do this is with a File Transfer Protocol (FTP) client like FileZilla or Cyberduck.
You’ll use the login details from your hosting provider to connect to your server. Once you’re in, you'll see the file structure of your website. The goal is to find your site’s root directory—this is usually called public_html or www—and download everything inside it to a folder on your computer.
As an alternative, most hosting control panels (like cPanel) include a File Manager. This handy tool lets you compress the entire public_html folder into a single ZIP file, which you can then download. This is usually much, much faster than pulling down thousands of individual files one by one over FTP.
Handling the WordPress Database
Once your files are safely on your local machine, it's time to tackle the database. This is where all your posts, pages, user info, and site settings live. The go-to tool for this job is phpMyAdmin, a web-based interface for managing MySQL databases that most hosts provide.
Inside phpMyAdmin, here’s what you’ll do:
- Select Your Database: Find your WordPress database name in the left-hand sidebar and click on it.
- Navigate to Export: Look for the "Export" tab at the top of the main screen and click it.
- Choose the Export Method: For most cases, the "Quick" export option is all you need. Just make sure the format is set to "SQL."
- Download the File: Hit the "Export" button. Your browser will download a
.sqlfile, which is a complete snapshot of your database.
Key Takeaway: The manual process relies on two key components: your WordPress files (everything from the
public_htmlfolder) and your database (the.sqlexport). Keeping these two parts organized is the secret to a smooth, successful clone.
Rebuilding Your Site at the New Location
Now, you just do everything in reverse. Upload the WordPress files you downloaded to the new location's root directory. Then, create a fresh, empty database on the new host and import the .sql file you just exported.
The last and most crucial step is to edit the wp-config.php file. This file is the critical link between your files and your database. You’ll need to open it and update the database name, username, and password to match the new database you just created. If you forget this, you'll be greeted by the infamous "Error Establishing a Database Connection" message.
Knowing how to manually clone your site is a core skill for proper maintenance, especially when you're testing new updates or security patches. With the average WordPress site facing hacking attempts roughly every 32 minutes, having a secure, offline clone for testing has never been more vital. You can find more details about the WordPress ecosystem and its security landscape on Hostinger.com.
If your main goal is to create a safe testing sandbox, our guide on how to create a WordPress staging site walks through that specific process in more detail.
Post-Cloning Checks and Common Troubleshooting
Getting your website’s files and database moved over is a huge step, but the job isn’t quite done. A freshly cloned site can have some sneaky issues hiding just beneath the surface, and skipping a final quality check is a recipe for user frustration and a major headache for you.
Your first move should be to run through a post-cloning checklist. This is the best way to make sure you don't miss anything critical. Start by just browsing the front end of your new site. Click around. Visit every page you can and keep an eye out for obvious stuff like broken links or missing images.
The Essential Post-Cloning Checklist
Think of this as your final inspection before you call the project complete. A systematic review right now can save you from a flood of support tickets later and keeps your site looking professional.
Here's what I always check first:
- Permalink Structure: This is a classic. Head over to Settings > Permalinks in your WordPress dashboard. You don't need to change a thing—just click the "Save Changes" button. This simple action flushes the rewrite rules and is often the quickest fix for those pesky 404 errors on internal pages.
- Core Functionality Test: Does your site do what it's supposed to do? If it's an e-commerce shop, try to buy something with a test order. If you have a contact form, fill it out and see if the email arrives. Test your lead generation forms, newsletter sign-ups, and user registration pages to make sure they all work perfectly.
- Media and Link Integrity: Manually click through your most important pages. Are all the images loading? Do the links go where they should, or are they still pointing to the old domain? For a more thorough scan, a tool like the Broken Link Checker plugin can be a lifesaver, automatically finding issues you might have missed.
A cloned site is only a success if it's a fully functional mirror. A single broken "Buy Now" button or a contact form that goes nowhere can completely defeat the purpose of the website. Testing isn't just a good idea; it's essential.
Solving Common Cloning Glitches
Even when you do everything right, you can still hit a few common snags after you clone a WordPress site. Knowing what to look for makes fixing them much faster.
One of the most frequent problems is a database connection error. Nine times out of ten, this means the credentials in your wp-config.php file are wrong for the new server. Double-check that the database name, username, and password are correct for the new environment.
Another classic is the infamous "white screen of death." This is usually triggered by a plugin or theme conflict, and it's especially common if the new server is running a different version of PHP. The quickest way to diagnose this is to disable your plugins one by one or switch to a default WordPress theme (like Twenty Twenty-Four) to see which one is causing the trouble.
Finally, watch out for mixed content warnings. This happens when your site is running on HTTPS but is still trying to load some assets (like images or scripts) over insecure HTTP. It's a very common issue after a clone. The fix is usually to run a search-and-replace on your database to update every instance of http://youroldsite.com to https://yournewsite.com. This instantly secures those assets and gets your site fully functional again.
Frequently Asked Questions About Cloning WordPress
Even with a clear set of steps, you probably still have a few questions floating around. That’s perfectly normal. We’ve put together the most common questions people ask when they're learning how to clone a WordPress site.
Getting these details sorted out can help you move forward without running into those annoying "gotcha" moments later on.
Will Cloning My WordPress Site Affect My SEO?
The act of cloning itself won't hurt your SEO one bit. The real danger lies in what happens after the clone is created. If you leave the cloned site visible to the public, search engines like Google will eventually find it. That leads to duplicate content, a problem that can seriously mess with your search rankings.
Thankfully, the fix is simple. You just need to tell search engines to ignore your new cloned site. Here are a couple of ways to do it:
- Head to Settings > Reading in the WordPress dashboard and check the box for "Discourage search engines from indexing this site."
- Lock down the entire cloned site with a password at the server level, which you can usually do from your hosting control panel.
Doing this keeps your staging or development area private, so you don't have to worry about your SEO efforts going to waste.
How Long Does It Take to Clone a WordPress Site?
This can vary wildly. The two biggest factors are the total size of your website and the speed of your server and internet connection. A small blog might only take 15-20 minutes to clone with a plugin like Duplicator.
On the other hand, a huge e-commerce site loaded with product images and customer data could take hours. A manual FTP transfer, which moves files individually, can be particularly slow for big sites.
If you're dealing with a massive website, a specialized service like Migrate Guru can be a lifesaver. It handles the migration on its own servers, making the process much faster and more reliable.
Can I Clone a WordPress Site to a Different Domain Name?
Absolutely. In fact, this is a very common reason for cloning a site. Whether you use a plugin or go the manual route, moving your site to a new domain is fully supported.
The most critical part of this process is running a search-and-replace on the new site's database after everything is moved. This step finds every instance of your old URL (like http://oldsite.com) and updates it to the new one (https://newsite.com). This is what ensures all your internal links, images, and other resources work correctly on the new domain.
What Is the Difference Between a Backup and a Clone?
This is a common point of confusion, but the difference is key. Think of a backup as a safety copy—a snapshot of your site's files and database stored away for emergencies. Its main job is disaster recovery, letting you restore your site if it ever goes down.
A clone, however, is a fully functional, live copy of your website running in a completely separate environment. While you might start the cloning process with a backup file, the final result is a working duplicate of your site, not just a file sitting in storage.
Ready to manage all your WordPress sites—including backups, updates, and security—from a single dashboard? WP Foundry centralizes your workflow, saving you time and giving you complete control. Check out what WP Foundry can do for you.