
Understanding Website Caching Without the Technical Jargon

Let's think about caching like your morning coffee routine. The first time you make a pot, you have to grind the beans, heat the water, and wait for it to brew. It takes a few minutes. But what if you could store that perfectly brewed coffee in a high-tech thermos that keeps it hot and fresh? The next time you want a cup, you just pour it—no waiting. This is exactly what caching does for your website.
Instead of your server "brewing" a fresh version of your site from scratch for every single visitor, caching saves a ready-to-serve copy. When someone lands on your page, your server delivers this pre-made version almost instantly. This process is the secret behind how to cache a website effectively. It not only makes for a much faster user experience but also takes a huge load off your server, which is a lifesaver during traffic spikes.
The Key Players in Caching
To really get how caching works, it helps to know where these "thermoses" are located. There are three main spots where your site's data can be stored for quick access. Each one plays a unique part in making your site faster.
- Browser Caching: This happens right on your visitor's computer. Their web browser saves files like your logo, fonts, and stylesheets. When they click to another page or come back tomorrow, their browser already has these key pieces, so the site loads in a flash.
- Server Caching: This is the cache you manage directly on your web server. For a WordPress site, a good caching plugin creates static HTML versions of your dynamic pages. This means the server doesn't have to run complex PHP scripts and database queries every time someone visits.
- CDN Caching: A Content Delivery Network (CDN) is a global network of servers. It stores copies of your website in various locations around the world. When someone from Japan visits your site, they get the content from a server in Asia, not one in North America, dramatically cutting down load times.
Caching isn't a new trick; it became vital as the web evolved beyond simple static pages. As internet use exploded, with over 2 billion users online by 2010, caching was the only way to handle the growing demand for rich media and interactive content. Early on, studies found that caching could reduce page load times by 50-60%. By that same year, an estimated 60% of all web traffic was being served from a cache.
Why This Matters for Your Site
Getting a handle on these concepts is your first real step toward a quicker website. Whether it's a visitor's browser saving your logo or a CDN delivering your homepage to someone across the planet, each layer of caching works together to slash wait times. By smartly combining these methods, you can turn a slow, frustrating site into one that feels impressively responsive.
To help you decide which caching methods are right for you, here’s a quick comparison of the main types.
Types of Website Caching Comparison
A comprehensive comparison of different caching methods showing their benefits, implementation difficulty, and best use cases
| Caching Type | Performance Impact | Setup Difficulty | Best For |
|---|---|---|---|
| Browser Cache | High (for repeat visitors) | Low (often on by default) | All websites, to improve the experience for returning users. |
| Server Cache | High (for all visitors) | Medium (plugins make it easy) | Dynamic sites like WordPress, blogs, and e-commerce stores. |
| CDN Cache | Very High (for global audience) | Medium (requires some configuration) | Businesses with an international audience or high traffic volume. |
As you can see, each caching type offers a different set of advantages. Browser caching is a no-brainer for everyone, while server and CDN caching provide powerful speed boosts for more complex sites and wider audiences. The best strategy often involves using all three together.
Finding the Perfect WordPress Caching Plugin for Your Site
Picking a caching plugin for your WordPress site can feel like a chore. With dozens of options out there, it's easy to get lost in feature lists and marketing jargon. The reality is, there's no single "best" plugin for everyone—the right choice depends entirely on your website. A plugin that works wonders for a simple blog might cause headaches for a busy e-commerce store.
Different types of caching offer different performance benefits. Understanding this helps you see why a good plugin is so important for managing them all.
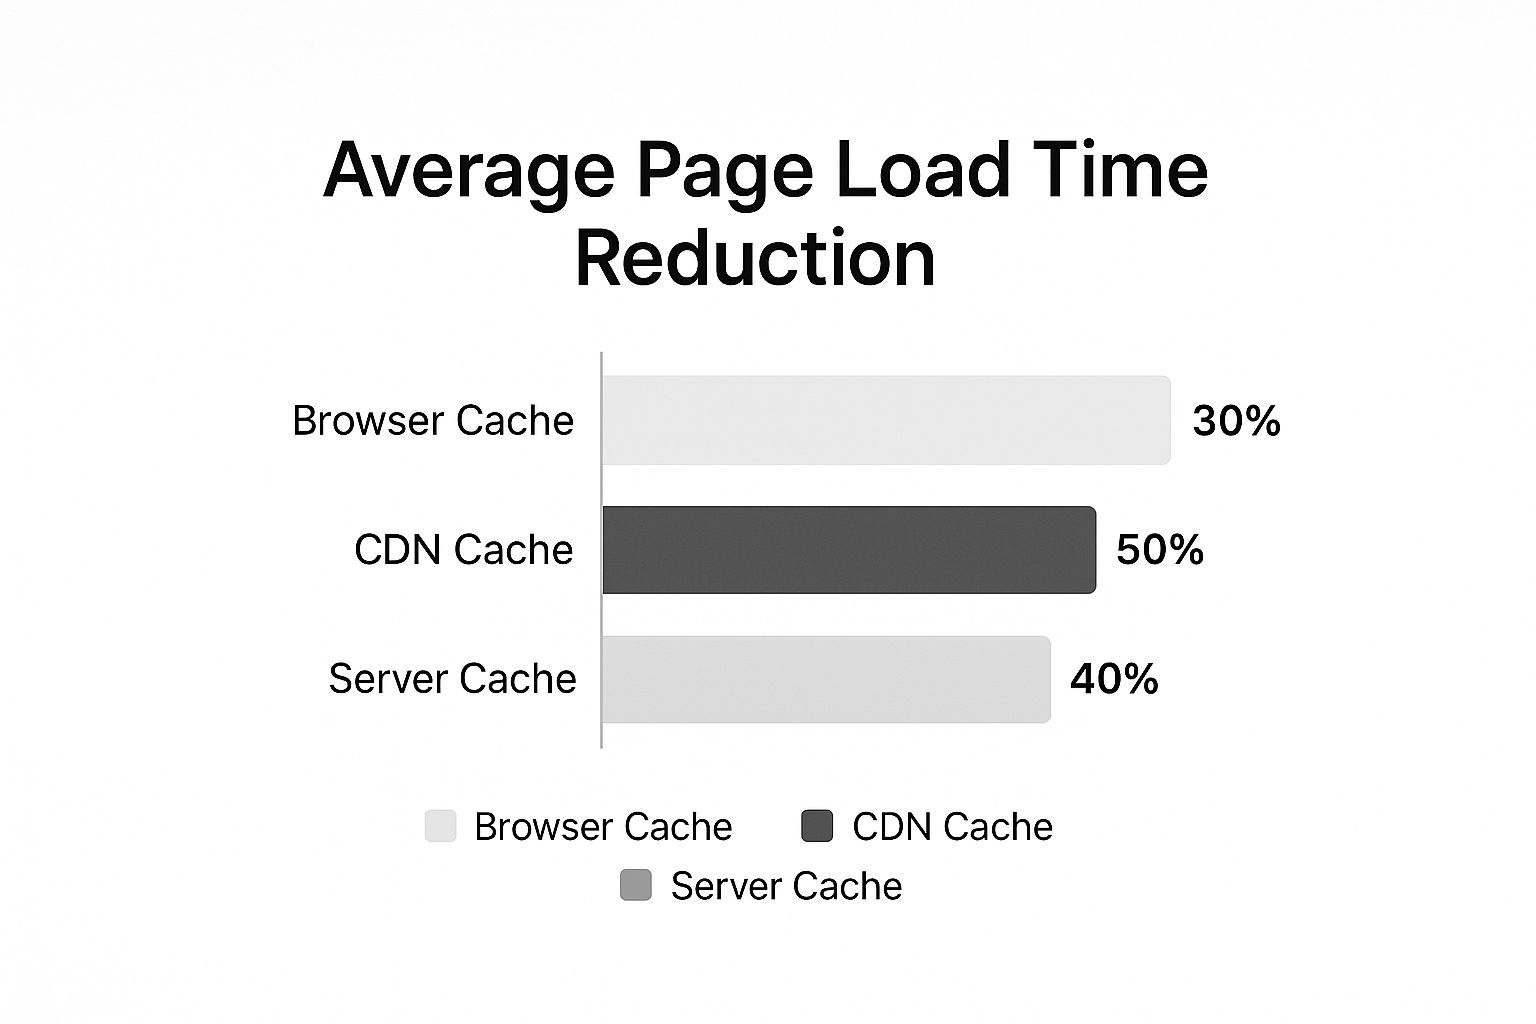
As the graphic shows, a Content Delivery Network (CDN) often delivers the biggest speed improvement, but server and browser caching are also essential for a fast website. A solid plugin helps you coordinate all these layers without having to be a technical expert.
Matching a Plugin to Your Website's Needs
The secret is to look past generic recommendations and consider your site's actual function. For instance, a high-traffic blog or news site primarily needs a plugin that’s great at serving static content to many users at once. In this scenario, a straightforward plugin like WP Super Cache can be highly effective. If your host uses a LiteSpeed server, the free LiteSpeed Cache plugin is a fantastic, resource-light option that integrates directly at the server level.
An e-commerce site running WooCommerce, however, is a different beast. You absolutely cannot cache the shopping cart or checkout pages, as this could expose one customer's private information to another. This is where a premium plugin like WP Rocket often justifies its cost. It comes with pre-configured rules that automatically exclude these critical pages, preventing major store-breaking issues from the get-go.
While a plugin like W3 Total Cache is incredibly powerful and offers a ton of settings, its complexity can be a double-edged sword. For less experienced users, it can be easy to misconfigure a setting and cause conflicts. The main goal when learning how to cache a website with a plugin is finding that sweet spot between raw speed and reliable compatibility. Don't just grab the most popular one; think about your site's unique features.
To make your decision a bit easier, here’s a look at how some of the top contenders stack up.
WordPress Caching Plugin Feature Comparison
This table offers a side-by-side comparison of popular caching plugins, focusing on their features, cost, and general performance to help you see which one might be the best fit for your project.
| Plugin Name | Price | Key Features | Performance Score | Ease of Use |
|---|---|---|---|---|
| WP Rocket | Premium | All-in-one, e-commerce safe, easy setup | 9/10 | Excellent |
| W3 Total Cache | Freemium | Highly configurable, CDN integration | 8/10 | Difficult |
| WP Super Cache | Free | Simple, effective static file caching | 7/10 | Moderate |
| LiteSpeed Cache | Free | Server-level, dynamic content caching | 9/10 | Moderate |
Ultimately, WP Rocket is often the best choice for beginners or store owners who need something that works well without much tinkering. For those who love to tweak every setting and have the technical know-how, W3 Total Cache offers unmatched control. For simple sites on standard hosting, WP Super Cache is a reliable workhorse, and for those on LiteSpeed hosting, the LiteSpeed Cache plugin is a clear winner.
Implementing Your Caching System the Right Way
Alright, this is where the magic happens—turning all that caching theory into real-world speed. But hold on a second before you jump into installing plugins. There's one critical action you absolutely must take first: create a full backup of your website. Seriously, think of this as your "undo" button. If a setting doesn't play nice with your theme and messes up your site's layout, you can just restore the backup and breathe easy. Tools like UpdraftPlus make this incredibly simple. Once that backup is secure, you're ready to get started.
Installing and Configuring Your First Cache
We're going to use a popular and beginner-friendly plugin, WP Rocket, as our example because its default settings are safe and effective. The best part? As soon as you install and activate it, page caching is automatically enabled. You don't have to do anything else to see an initial performance boost. For anyone just learning how to cache a website, this immediate win is a huge confidence booster.
To really unlock the power of your caching system, though, you’ll want to dive into the settings panel. Here are a few key tweaks I always recommend for the biggest impact with the lowest risk:
- Minify CSS and JavaScript Files: You'll find this in the ‘File Optimization’ tab. These settings shrink your code by stripping out unnecessary stuff like comments and extra spaces. My advice is to turn these on one by one, checking your live site after each change to make sure everything still looks and works correctly.
- LazyLoad for Images: This is a must-have, especially for pages with lots of photos. Located in the ‘Media’ tab, LazyLoad stops images from loading until a visitor actually scrolls down to them. This makes the initial page view load much, much faster.
- Cache Preloading: This is a true game-changer. Instead of waiting for someone to visit a page to create a cached version, preloading tells the plugin to build the cache for your pages ahead of time. This ensures that the very first person to visit a page gets that super-fast, cached experience.
Verifying Caching Is Working
So, how can you be sure all this work actually paid off? The quickest check is to open a new incognito or private browser window. Go to your website, then right-click anywhere on the page and choose "View Page Source." Scroll all the way to the bottom of the code. If everything is working, you should see a comment that says something like, “This page is cached by WP Rocket.” That little line is your proof that you’re serving speedy, cached pages.
For a more data-driven approach, use a speed testing tool like GTmetrix. Run a test on your site before activating your caching plugin, and then run another one after. You should see a significant improvement in your "Time to First Byte" (TTFB) and your overall page load times. These numbers are the hard evidence that your site is now running on all cylinders.
Mastering Browser Caching and CDN Integration
Once you have a caching plugin running, the next level of speed optimization involves two powerful tools: browser caching and a Content Delivery Network (CDN). This is where many website owners experience those "wow" moments with speed improvements. However, it's also where a small misconfiguration can cause headaches. If you want to learn how to cache a website like a seasoned pro, getting these two elements right is crucial.
Optimizing Browser Caching Manually
While a top-notch plugin like WP Rocket automatically handles browser caching rules, it's helpful to understand what’s happening behind the scenes. These rules are simply instructions your server sends to a visitor's web browser, telling it how long to keep files like your logo, CSS stylesheets, and JavaScript scripts stored locally. The longer the browser holds onto these assets, the faster your site will load on subsequent visits because it doesn't need to download everything all over again.
You can often set these rules, known as cache-control headers, yourself through your hosting control panel or by carefully adding code to your site’s .htaccess file. A common real-world example is setting a rule to cache images for one year, since things like your site's logo or background images rarely change. This hands-on approach gives you precise control over your site's performance, making sure static files are served as efficiently as possible.
Integrating a Content Delivery Network (CDN)
Think of a CDN as a global network of mini-servers that store copies of your website's static files. When a user from another country visits your site, the CDN delivers images, scripts, and other assets from the server that is physically closest to them. This dramatically cuts down on latency and loading times. For any business with an international audience, a CDN is practically a requirement for a good user experience.
The great news is that setting up a CDN is more straightforward than ever. Many services, such as Cloudflare, provide a generous free plan that is more than enough for most small to medium-sized websites. The integration process often just involves updating your site's nameservers, and your CDN provider will walk you through the steps. While premium CDNs offer more advanced speed and security features, even a free option provides a significant performance boost. Just make sure it’s compatible with your caching plugin; most popular plugins have built-in integrations to make this connection smooth.
This type of caching is a fundamental part of the modern web. The market for transparent caching was valued at $5.87 billion in 2023 and is expected to grow to an incredible $61.45 billion by 2032. This explosive growth is driven by the massive demand for faster content delivery for everything from video streaming to cloud applications, with North America leading the way due to its robust infrastructure. You can explore the data behind these market trends to see just how vital caching has become. By integrating a CDN, you're positioning your website at the forefront of this performance-focused shift.
Measuring Performance and Fine-Tuning Your Results
Now that your caching system is up and running, it's time for the fun part: seeing the actual speed improvements on your site. This isn't just about chasing a high score; it's about understanding what the numbers mean so you can make smart adjustments. Simply turning on a plugin is a solid start, but the real magic in learning how to cache a website comes from the fine-tuning you do afterward.
Interpreting Your Speed Test Results
Tools like GTmetrix, Google PageSpeed Insights, and Pingdom will become your go-to resources. When you get your test results, it’s tempting to only look at the overall grade, but the most valuable information is hidden in the details. Keep an eye on these specific metrics:
- Time to First Byte (TTFB): This tells you how fast your server responds to a request. A low TTFB is a clear signal that your server-side caching is doing its job effectively.
- Largest Contentful Paint (LCP): This metric tracks how long it takes for the main content of your page (usually a large image or block of text) to become visible. A good LCP, ideally under 2.5 seconds, makes your site feel incredibly fast to users.
- Fully Loaded Time: This is the total time it takes for every single element on your page to load. While it's a useful number, the LCP often has a bigger impact on a visitor's perception of speed.
I always recommend running tests from several different geographic locations. Most testing tools provide this option, and it’s a great way to check how well your CDN is distributing your content. A quick load time in New York won't help much if your audience in Singapore is stuck waiting.
Advanced Caching Adjustments
With your initial performance data in hand, you can start digging into more advanced settings. Most good caching plugins offer options that let you go beyond the default configuration for even better performance. Two key areas to explore are cache preloading and strategic exclusions. Preloading tells your plugin to build cached versions of your pages ahead of time, ensuring that even the first person to visit gets a speedy experience.
However, you don't want to cache everything. Dynamic content, like a shopping cart, a personalized user dashboard, or a "logged-in" area, must be excluded. If you accidentally cache these pages, you can cause major problems, including showing one user's private information to another. Dive into your plugin's settings and specify which pages, cookies, or user roles should never receive a cached version. This is absolutely critical for e-commerce stores and membership sites. After you've measured your performance, you can find more comprehensive website speed optimization tips to keep improving. This cycle of testing and refining is what truly separates a fast site from a fully optimized one.
Solving Caching Problems Before They Break Your Site
Even with a solid caching strategy, you’ll eventually run into some puzzling issues. You push a small design change, but the old version hangs around. A user complains your contact form isn’t working. Even worse, your e-commerce checkout starts acting up during a sale. Knowing how to troubleshoot these moments is a crucial skill for keeping your site running smoothly.
The first question to ask is: "Is caching really the problem?" The classic tell-tale sign is when a change you made in the WordPress admin doesn't show up on the live site for your visitors. Before you start digging into plugin settings, clearing the cache is your most important diagnostic tool. If that one click instantly fixes the problem, you've confirmed the cause. This simple action resolves most issues related to content updates or minor display glitches. If you're unsure how, you can find simple guides on how to clear a WordPress cache, as it's a fundamental step.
When Caching Causes Deeper Conflicts
Sometimes, just clearing the cache doesn't cut it. An overly aggressive caching setup can interfere with the dynamic parts of your site, causing more significant headaches. Here are a few real-world scenarios I've seen pop up time and again:
- Broken Forms and Login Systems: If your contact forms or user login pages suddenly stop working, they are prime suspects for being cached improperly. These pages often rely on unique, session-specific security tokens to function. When a cached, generic version is served to a user, those tokens are invalid, and the submission or login fails.
- E-commerce Checkout Glitches: This is a red-alert situation. Caching pages like the shopping cart or checkout is a major security and usability flaw. It can cause one customer to see another person's cart items or, in a worst-case scenario, their personal information. With nearly 70% of online shopping carts being abandoned, a confusing or broken checkout process will absolutely hurt your sales.
- Membership Site Issues: Much like e-commerce sites, membership platforms serve personalized content to logged-in users. Caching these private areas can lead to users seeing the wrong account information or being blocked from content they’ve paid for.
The Solution: Strategic Exclusions
The answer to these problems isn't to turn off caching completely and lose all the speed benefits. Instead, you need to get more precise. The key is to tell your caching plugin not to cache specific, highly dynamic pages. Any good caching plugin, whether it's WP Rocket or W3 Total Cache, will have a feature labeled "Exclude Pages" or "Never Cache URLs" in its settings.
Here is a short list of pages that should almost always be on your exclusion list:
- My Account
- Cart
- Checkout
- Login / Register
By adding these critical URLs to your plugin's exclusion list, you ensure they always remain dynamic and function as expected. Meanwhile, the rest of your site—your homepage, blog posts, and about page—can still get that fantastic performance boost from caching. This balanced approach is central to learning how to cache a website effectively without breaking its most important features.
Maintaining Peak Performance Over Time
Getting your initial caching system up and running is a fantastic start, but the real challenge is keeping your website fast over the long haul. Think of it like a high-performance car; you can't just tune the engine once and expect it to run perfectly forever. As your site evolves with new blog posts, plugins, or a surge in visitors, your caching strategy must evolve with it. If you neglect it, you risk a slow, gradual decline in speed that might go unnoticed until it's already hurting your user experience.
Create a Realistic Maintenance Schedule
A common pitfall is treating caching as a "set and forget" feature. To prevent performance from slowly degrading, you need to be proactive. A great place to start is by checking your cache hit rate once a month. You can usually find this metric in your caching plugin's dashboard or your CDN's analytics. It shows you the percentage of requests served directly from the cache. A consistently high rate, ideally 90% or more, is a strong signal that your setup is working as intended.
Your schedule should also include revisiting your caching rules. Did you just launch a new community forum or add a custom post type for portfolio projects? You'll need to confirm these new areas are being cached properly. Or, if they contain dynamic content, you'll need to make sure they are specifically excluded from the cache. This is a fundamental part of any solid WordPress website maintenance plan, as it stops new features from unintentionally dragging down your entire site's speed.
Adapting to Growth and Change
Website maintenance is less about fixing what’s broken and more about preparing for what's next. A major site redesign or a big update to a plugin like WooCommerce demands a complete review of your caching configuration. During these significant changes, I always recommend a few key actions:
- Temporarily turn off caching on your staging site to ensure all the new functionality works correctly without interference.
- Carefully test dynamic elements like checkout processes, contact forms, and user logins before you turn caching back on.
- Once the new version is live, purge the entire site-wide cache. This guarantees every visitor sees the latest and greatest version of your site.
As your traffic climbs, you might discover that your current caching setup can't keep up. This is a good time to reassess your tools. Is your shared hosting plan becoming a bottleneck? It could be time to move to a provider that offers more robust server-level caching. Is your audience now spread across the globe? Upgrading to a premium CDN could provide a huge return on investment by bringing your content closer to your users. The goal is to view performance maintenance as a continuous cycle: monitor, adapt, and optimize.
Juggling maintenance for one WordPress site is a chore, let alone several. WP Foundry brings all your essential tasks—like plugin updates, security scans, and database backups—into a single, efficient desktop application. Instead of managing dozens of browser tabs, you can streamline your workflow. Discover how WP Foundry can give you back your time and simplify your site management process.
Comments
3 responses to “How to Cache a Website: Easy Speed Tips in 60 Seconds”
[…] dive into one of the most effective speed-boosting techniques, you can find a guide that explains how to cache a website to significantly improve load […]
[…] But this is more than just a technical tweak. A faster site delivers a much better user experience, which often translates to better SEO rankings and less strain on your server. When you learn how to cache a website, you’re making a direct investment in those results. For a deeper dive, check out our comprehensive guide on the topic: https://wpfoundry.app/how-to-cache-a-website/ […]
[…] This guide will show you how to cache a website, but exploring other strategies to improve overall website speed will take your results to the next level. For an even more detailed walkthrough, you can check out our other tutorial on how to properly cache a website. […]