
Cloning a WordPress website is simply making an exact, working copy of your site. If you're serious about managing your WordPress site properly, this is a skill you absolutely need to master. It’s the key to creating a safe "staging" area where you can test out new plugins or theme updates without the fear of breaking your live site.
Why and When to Clone Your WordPress Website
Knowing how to clone wp website setups isn't just some techy task for developers. It's a fundamental part of managing a WordPress site safely and efficiently. Once you grasp the real-world situations where cloning is a lifesaver, you'll completely change how you handle website maintenance.
Creating a Safe Testing Environment
By far, the most common reason to clone your site is to create a staging environment. This is just a private copy of your live website, hidden from the public, where you can mess around without any consequences.
Think about it. You see a cool new plugin or a big theme update is released. Your first thought is often, "What if this breaks my site?" A staging site completely removes that anxiety. You can install that plugin, apply the update, or even test a major WordPress core update on the clone first. If anything goes sideways, your live site is still up and running perfectly.
This is just professional website management 101. It's especially crucial for complex sites like WooCommerce stores, where you can't afford any downtime while testing a new feature.
Key Takeaway: A staging site is your safety net. It gives you the freedom to experiment, update, and fix things without affecting your live traffic, sales, or user experience one bit.
Speeding Up Development and Migration
If you're a freelancer or run an agency, cloning is a massive time-saver. Instead of building every new client website from the ground up, you can create a "base" installation. This starter site has all your favorite plugins, themes, and go-to settings already configured.
When a new project kicks off, you just clone the base site. What used to take hours of setup now takes minutes.
Cloning is also the secret to a pain-free server migration. Moving a site to a new web host can be a nerve-wracking experience, full of potential downtime. By cloning your site to the new server first, you can get everything set up and test it thoroughly before you ever change your domain's DNS settings. The result is a seamless switch with zero interruption for your visitors.
This is a common practice, and for good reason. With WordPress powering over 43% of the web and facing hacking attempts constantly, having a secure way to test is non-negotiable.
And don't forget, a full clone is the ultimate backup. It’s more than just a folder of files; it’s a fully working, ready-to-deploy replica of your entire online business.
Comparing WordPress Cloning Methods
When it comes to cloning a WordPress site, there's no single "best" way. It really boils down to finding the right tool for the job you need to do. Your own technical comfort level, what your hosting provider offers, and how complex your site is will all point you toward the best approach.
Your main options are using a cloning plugin, taking advantage of your web host's built-in tools, or rolling up your sleeves and doing it manually with FTP and phpMyAdmin.
Think of it like this: a plugin is a guided tour—it’s easy, handles the tricky parts for you, and gets you to your destination reliably. Your host’s cloning feature is like a dedicated airport shuttle—incredibly simple, but it only goes where it’s programmed to go. The manual method? That’s like building your own car. You get total control, but one wrong move and the whole thing can fall apart.
Weighing Your Options
For the vast majority of people—from bloggers to small business owners—a good cloning plugin is the way to go. Tools like Duplicator or All-in-One WP Migration are built to walk you through the process, packaging up your files and database into a single, neat bundle. Crucially, they automate the messy task of updating database paths, which is where manual clones so often go wrong.
The one catch with plugins is that they can sometimes struggle on cheap shared hosting. Strict server limits can cause the process to time out, especially on bigger websites. This is where your host's own cloning tools can be a real lifesaver. Many managed WordPress hosts offer one-click cloning or staging environments. It’s often the easiest option by far, but you're trading flexibility for that convenience, as you’re stuck within their system.
The image below breaks down the key differences between using a plugin and going the manual route.
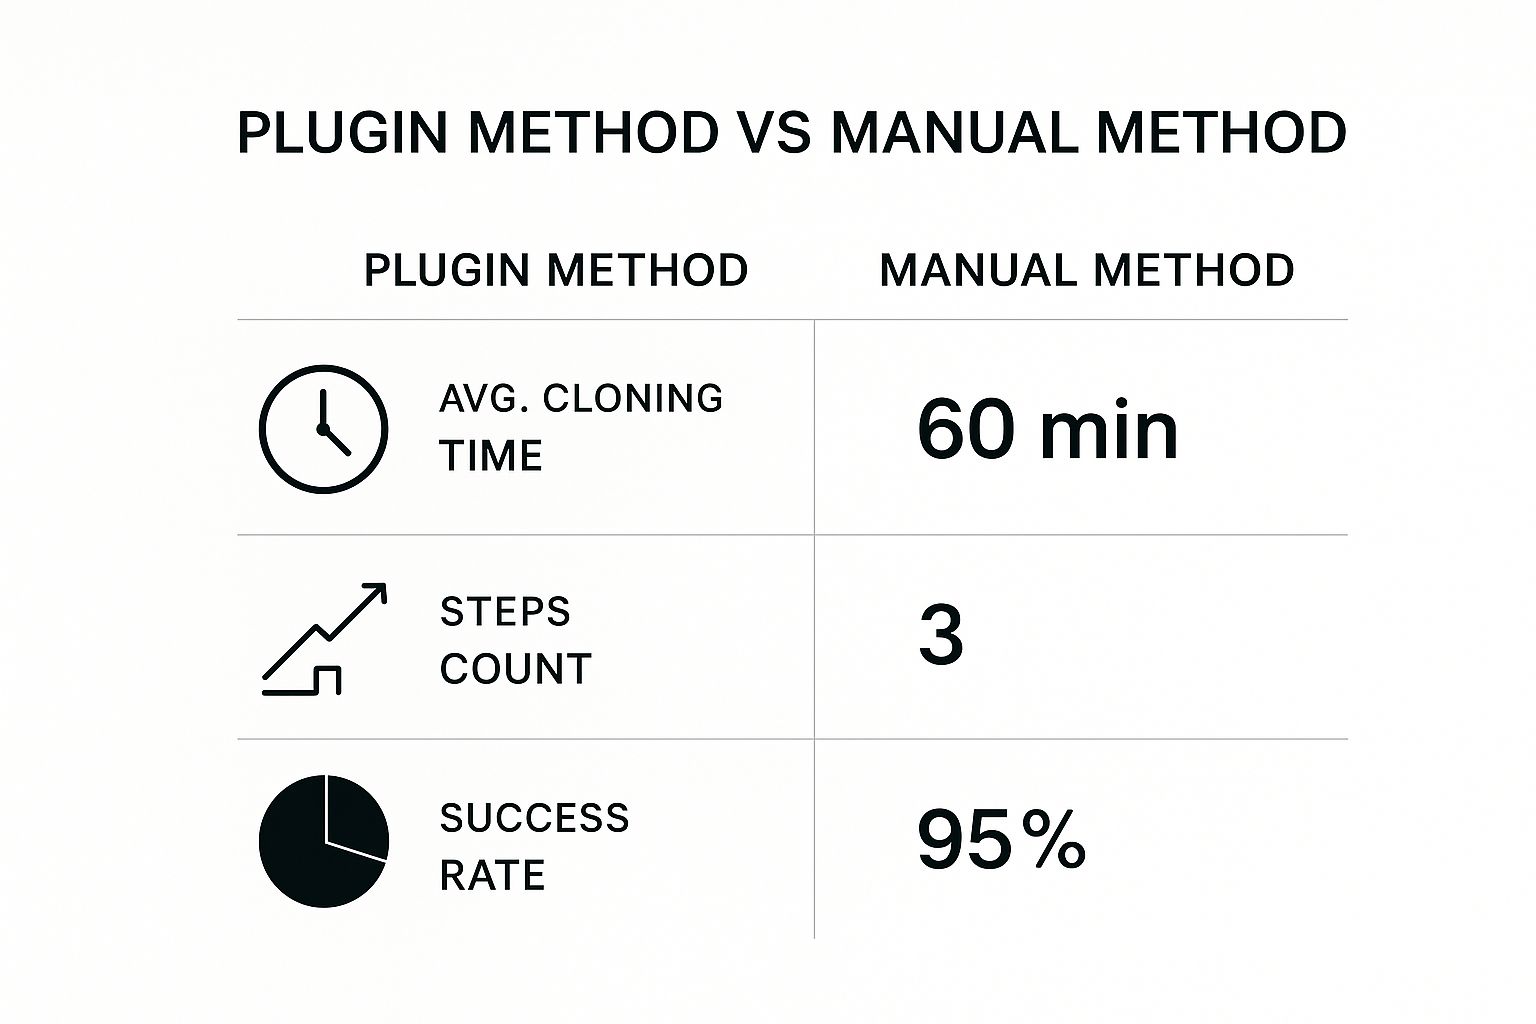
As you can see, a plugin is typically much faster and requires fewer steps, which directly translates to a much higher chance of success for most users.
To help you decide at a glance, here’s a breakdown of the common cloning methods.
WordPress Cloning Method Comparison
A side-by-side comparison of the most common methods to clone a WordPress website, helping you choose the best approach based on your needs.
| Method | Best For | Ease of Use | Cost | Key Advantage |
|---|---|---|---|---|
| Plugin | Beginners, most users, staging, and migrations. | Easy | Free / Premium | High reliability and automates complex database updates. |
| Host's Tool | Users on managed hosts needing a quick staging site. | Easiest | Usually Included | One-click simplicity and seamless integration with your host. |
| Manual (FTP/phpMyAdmin) | Developers and advanced users needing full control. | Difficult | Free | Total control, no third-party reliance, and bypasses server limits. |
| Desktop App (WP Foundry) | Professionals managing multiple client or personal sites. | Moderate | Free / Premium | Centralized management and powerful offline capabilities. |
This table should make it clear which path aligns best with your situation and skillset.
Control Versus Convenience
The manual method—downloading your site files with an FTP client and exporting the database through phpMyAdmin—gives you ultimate control. It costs nothing but your time and is a fantastic skill for any aspiring developer to master. You’re not dependent on any third-party tools and can work around the kinds of restrictions you find on some hosting plans.
But here’s the big drawback: it's incredibly risky. A tiny mistake—a typo during the database search-and-replace or a wrong entry in your wp-config.php file—can take the entire cloned site down. It demands a very careful, step-by-step process and a solid grasp of how WordPress files and the database work together.
The decision really comes down to how much risk you're willing to take. While the manual method is powerful, a plugin-based approach has a 95% success rate for a reason—it automates the most error-prone steps.
So, to make your final choice:
- For Beginners & Most Users: Just start with a reputable cloning plugin. Their reliability and ease of use are perfect for creating staging sites or moving a site to a new host.
- For One-Click Simplicity: If your web host offers a cloning or staging tool, use it. It’s almost always the fastest way to get a test environment up and running on their platform.
- For Developers & Experts: The manual method is your go-to when you need absolute control, are stuck on a restrictive server, or just want to learn how WordPress ticks under the hood.
Using a Plugin to Clone Your Website

For most people running a WordPress site, whether you're a blogger or a business owner, a plugin is the simplest and most dependable route to clone a WP website. This approach cleverly avoids the technical headaches of manual database edits and file transfers, bundling your entire site into one tidy, portable package.
The real advantage of using a plugin like All-in-One WP Migration or Duplicator is the guided process. These tools do the heavy lifting for you. They don't just copy files; they package your database, themes, plugins, and media into a single archive. Critically, they also automate the database search-and-replace, a step where manual cloning efforts often go spectacularly wrong.
This is about more than just convenience—it's about reliability. By taking care of the complex parts, these plugins slash the risk of error and make cloning accessible even if you aren't a seasoned developer.
Preparing Your Site for Cloning
Before you even think about installing a cloning plugin, a bit of prep work can make a huge difference. Think of it like organizing your stuff before a big move; a clean site is always easier and faster to clone.
Kick things off with a quick audit. Delete any themes and plugins you aren't using. They just add extra weight to your final package, which can lead to timeouts during the cloning or upload process. It's also a good idea to clear out old post revisions, empty the spam comments folder, and purge your trash.
Finally, double-check that your chosen plugin plays nicely with your hosting environment. Most high-quality plugins run a server check before starting, but being proactive doesn't hurt. This is particularly important on budget shared hosting plans, which can have tight limits on script execution times and memory.
Creating the Website Package
With your site prepped, the first real step is creating the "package" or "archive." This is a complete snapshot of your website at that exact moment. We'll use Duplicator as an example here, since its workflow is pretty typical for top-tier cloning plugins.
Once the plugin is installed and activated, you’ll find its menu in your WordPress dashboard where you can start a new build. The plugin will scan your site, looking for potential hang-ups like server configuration issues or files that are too large.
Assuming the scan gives you the green light, you can build the package. The plugin will compress your entire wp-content folder and export the database into an .sql file. It then bundles everything into two essential files:
- An archive file (.zip): This contains all your site files and the database dump.
- An installer file (installer.php): This is a small PHP script that works as the setup wizard at the new location.
After the build finishes, you download both of these files to your computer. That's it—you now have a complete, self-contained copy of your website.
Pro Tip: If your site is especially large (we're talking several gigabytes), the package creation process can sometimes time out. If that happens, dig into the plugin's settings for options to exclude big directories, like your uploads or backup folders. You can always move those larger folders over manually with FTP after the core site has been cloned.
Deploying the Clone in a New Location
With your archive and installer files ready, it’s time to deploy the clone. The "new location" could be a staging subdomain, a completely different live server, or even a local development environment on your computer.
The first task at the new location is to set up a blank slate. This involves two key things:
- A clean directory: Use an FTP client or your host's file manager to upload your archive and
installer.phpfiles into an empty folder on the new server. - A new database: You’ll need to create a fresh, empty MySQL database and a corresponding database user. You can do this through your hosting control panel (like cPanel or Plesk). Make sure to write down the database name, username, and password—you'll need them in a minute.
Once the files are uploaded and the database is ready, you run the installer by navigating to it in your web browser (e.g., https://newsite.com/installer.php). This launches the plugin's deployment wizard. It will guide you through connecting to the new database, confirming the new site URL, and running the installation. This is an essential step when you need to create a WordPress staging site, as it gives you a perfect duplicate for testing. You can learn more about this in our guide on how to create a WordPress staging site.
The installer unpacks the archive, imports your database, and—most importantly—updates all database entries to use the new site’s URL automatically. That last part is what makes the plugin method so powerful.
The massive scale of the WordPress ecosystem is why this plugin-based approach is so popular. As of mid-2025, WordPress powers over 532 million websites, representing about 43.4% of the entire internet. This huge user base has led to a library of over 59,000 free plugins, including dozens of robust cloning tools that are constantly being tested and improved by a global community.
The Manual Cloning Method with FTP and phpMyAdmin
While plugins are great for cloning a WordPress site, sometimes you need to get your hands dirty. You might be in a restricted hosting environment or you just want total control over the process. This is where the manual method comes in, using an FTP client and phpMyAdmin.
Fair warning: it's more complex and has more places where things can go wrong. But mastering it gives you a much deeper understanding of how the pieces of a WordPress site actually fit together.
The whole process boils down to moving two things: your website files and your database. The files are the skeleton—your themes, plugins, and media uploads. The database is the brain, holding all your content, settings, and user info. We'll move both, one at a time.
Securing Your Website Files via FTP
First up, you need to grab a complete copy of your site's files. The best tool for this is a good old-fashioned FTP (File Transfer Protocol) client. I personally use FileZilla (it works on everything), but Cyberduck is another solid choice, especially for Mac users.
Your web host will provide the FTP credentials you need: a host address, username, password, and port number. Once you punch those in and connect, you’ll see your local computer on one side and the remote server on the other.
On the server side, navigate to your site’s root directory. This folder is usually called public_html, www, or something similar.
Now, select every single file and folder inside that directory and drag them over to a new, empty folder on your computer. This can take a while, especially if you have a lot of large images or plugins. Just be patient and let it run. Make sure you don't see any failed transfers when it's done.
Exporting the WordPress Database
With the files safely downloaded, it's time to export the database. For this, you'll use phpMyAdmin, a tool you’ll find inside most hosting control panels (like cPanel).
Log into your hosting account's cPanel and click the phpMyAdmin icon. On the left, you'll see a list of databases. You need to pick the right one for the site you're cloning. If you’re not sure which it is, pop open the wp-config.php file you just downloaded—the database name is defined right in there.
After selecting the database, click the Export tab. You’ll see two options:
- Quick: This is fine for tiny sites, but it's better to have more control.
- Custom: This is the one you want. It lets you see what you’re doing. Make sure all tables are selected and the format is set to SQL.
Stick with the Custom method, but you can leave most settings as they are. Just double-check that the output format is SQL. Click the "Export" (or "Go") button, and your browser will download a single .sql file. This is literally a text file containing every piece of content and configuration from your site.
Important Note: If you have a massive database, phpMyAdmin can time out during the export. If that happens, you might have to export tables in smaller chunks or, if your host allows it, use a command-line tool like SSH to get the job done.
Deploying the Clone to a New Server
Alright, you now have your two key ingredients: a folder full of files and one .sql database file. It's time to put them on the new server. This is basically the first part of the process, but in reverse.
- Create a New Database: In your new hosting account, create a brand new, empty database. You'll also need to create a new database user and give that user "All Privileges" to access the database. This is critical: write down the new database name, username, and password. You'll need them in a minute.
- Upload the Files: Fire up your FTP client again. Connect to the new server and upload all the files from your computer into the new site's root directory.
- Import the Database: Head over to phpMyAdmin on the new server. Select the empty database you just created and click the Import tab. Choose the
.sqlfile you downloaded earlier and hit "Go". This will populate your new database with all the data from your old site.
Final Configuration and Search-Replace
Your files and data are in place, but your cloned site is still broken. Don't panic. This is where most people trip up during a manual migration. You need to do two final things: tell WordPress how to connect to the new database, and then update all the old URLs inside that database.
First, on the new server, find and edit the wp-config.php file. You need to update these three lines with the credentials for the new database you created:
define( 'DB_NAME', 'new_database_name' );define( 'DB_USER', 'new_username' );define( 'DB_PASSWORD', 'new_password' );
Save the file. Your site can now talk to its database.
Finally, you have to run a search-and-replace on the database to swap out the old domain for the new one. Just changing the siteurl and home values in the wp_options table isn't enough—your old URL is hard-coded all over the place.
The safest and most thorough way to do this is with a dedicated script like Interconnect/it's Search Replace DB. If you have command-line access, WP-CLI is even better. This step is absolutely mandatory; skipping it will leave you with a mess of broken links and images.
Your Post-Cloning Checklist and Final Steps
Getting your website’s files and database moved over is a huge step, but the job isn't quite finished. A truly successful effort to clone a WP website is only complete after you've run a thorough post-launch check. This final verification is what separates a simple copy from a fully working, professional site. It's how you prevent those common, frustrating issues that can confuse visitors and damage your brand.
I like to think of it as the final walkthrough after building a house. The walls are up and the roof is on, but you absolutely have to check the plumbing, test the outlets, and make sure the doors lock. The same idea applies here. A few careful checks now will save you from some major headaches down the road.
Flushing Permalinks and Clearing Caches
One of the first things I always do on a newly cloned site is reset the permalinks. It’s a classic source of those dreaded 404 "Page Not Found" errors after a migration. The fix is incredibly easy but absolutely critical.
Head over to Settings > Permalinks in your WordPress dashboard. You don’t have to change a thing. Just click the "Save Changes" button. That one click is enough to flush the rewrite rules in your .htaccess file, forcing WordPress to recognize the new URL structure.
Next up, you need to be aggressive about clearing out old caches. Caching is fantastic for site speed, but it can be your worst enemy right after a clone. It loves to hang onto old file paths and data, which can make your new site act strangely.
- Plugin Cache: If you're using a caching plugin like WP Rocket or W3 Total Cache, find the "Purge All Caches" button in its settings and click it.
- Server Cache: Many managed hosts use their own server-level caching. You'll usually find an option to clear this inside your hosting control panel.
- Browser Cache: Don't forget to clear your own browser's cache. This ensures you're seeing the live, fresh version of the site, not a copy your browser saved from earlier.
A cloned site that looks broken is often just suffering from old, cached data. Before you dive into deep troubleshooting, make sure you've cleared every possible layer of caching. This simple step resolves a surprising number of post-cloning glitches.
Comprehensive Functional Testing
With the initial cleanup done, it's time to test every important function on your site. Don't just give the homepage a quick glance. You need to systematically click through your entire website as if you were a brand-new visitor.
- Navigation and Links: Check your main menu, all the footer links, and any links you've placed inside your content. Make sure they all work and point to the correct pages on the new domain.
- Forms: Submit a test entry on every single form. This means contact forms, newsletter sign-ups, and especially your e-commerce checkout process. Verify that the submissions are actually being received.
- User Logins: Try logging in with different user roles—Administrator, Editor, or Customer, for example—to make sure their permissions are still working correctly.
- Media Files: Click around on various pages and posts to confirm that images, videos, and any downloadable files are loading properly and not showing up as broken icons.
This testing phase is not optional. It’s the foundation of any good WordPress website maintenance routine. Our guide on the topic can help you build an even more robust checklist for ongoing care.
Hunting Down Mixed Content Errors
A very common problem after cloning, especially if you've moved a site from non-secure (HTTP) to secure (HTTPS), is the "mixed content" error. This happens when some of your assets—like images or scripts—are still being loaded over the old, insecure HTTP protocol.
The quickest way to find these is with your browser's developer tools. In Chrome, just right-click anywhere on your site, choose "Inspect," and open the "Console" tab. Keep an eye out for any warnings in yellow or red that mention mixed content. The console will point you to the exact files causing the trouble so you can go in and fix their URLs.
Given the dominance of WordPress, mastering these post-cloning steps is a vital skill. In major markets like the United States and Germany, WordPress commands a CMS market share of around 78.69%. That's a massive number of sites relying on this platform, making the ability to properly clone and verify a site essential for developers and managers everywhere. You can discover more insights about these WordPress statistics to see just how big the ecosystem is.
Common Questions About Cloning WordPress Sites

Even with a solid game plan, you're bound to have a few questions when you first clone a WP website. I've been there. Let's tackle some of the most common ones I hear, so you can sidestep any potential headaches and get this done right.
Will Cloning My WordPress Site Affect SEO?
This is the big one, and for good reason. The short answer is: it all comes down to how you handle the clone.
If you're simply cloning your site to a private staging area (something like staging.yoursite.com) for testing, it will have zero negative impact on your live site's SEO. The non-negotiable step here is blocking search engines from seeing the duplicate. You can do this in a second by checking the "Discourage search engines from indexing this site" box under Settings > Reading in your staging site's dashboard.
Where people get into trouble is when they clone a site to a new live domain and forget to set up proper 301 redirects from the old URLs. If you skip this, search engines see two competing sites, which dilutes your authority and will absolutely tank your rankings.
Key Insight: The act of cloning isn't what hurts SEO; it's the mismanagement afterward. Always use clones for testing in a no-index environment and plan a rock-solid 301 redirect strategy for any permanent moves.
What Is the Biggest Challenge When Cloning a Large Site?
When you’re dealing with a large site—and I mean anything over 1-2 GB—your number one enemy is the server timeout. I’ve seen it happen countless times: you’re halfway through an upload or an archive creation, and everything just stops.
This usually happens because the process is eating up more resources than your web host allows. Those cheap, shared hosting plans are especially bad for this, with their notoriously low script execution times and memory limits.
To get around this, you have a couple of solid options:
- Use a premium plugin built for this. Many have a "chunking" feature that breaks the migration into smaller, bite-sized pieces to prevent timeouts.
- If you're going the manual route, use SSH and command-line tools. Running
mysqldumpto export and import a huge database file is far more reliable than trying to upload it through phpMyAdmin’s tiny limits.
A pro tip: before you even start, check the resource limits on both your old and new servers. A few minutes of investigation can save you hours of frustration.
Can I Clone a WordPress Multisite Network?
Yes, but tread carefully. Cloning a multisite network is a whole different beast compared to a standard single-site install. It's significantly more complex.
A multisite network shares one WordPress core and a single, deeply intertwined database. All the subsites are linked together in a delicate web. If you try to clone it with a basic file copy and a simple database search-and-replace, you're practically guaranteed to break the entire network. The relationships between tables and domain mappings are just too complex.
For this job, you absolutely need a tool specifically designed for multisite, such as:
- Duplicator Pro
- All-in-One WP Migration (with its multisite extension)
Honestly, a manual multisite clone is an expert-level task. It requires an intimate knowledge of the WordPress database schema, and I wouldn't recommend it for beginners.
Do I Need a Full Clone for a Simple Test?
Not always. It really depends on what you're trying to accomplish. If you're just tweaking a bit of CSS in your theme or testing a very simple plugin that doesn't mess with your content, you can probably get by with a more lightweight setup.
But for anything that touches your site's content or database, a full clone is the only way to be sure. You need an exact replica. This is crucial for situations like:
- Updating a major plugin like WooCommerce.
- Installing a new form or membership plugin.
- Testing a major WordPress core update.
A complete clone ensures that what you see in testing is exactly what will happen on your live site. It’s also a cornerstone of any good backup plan. For a deeper look at that, check out our guide on creating a reliable WordPress site backup to keep your data safe.
Comments
One response to “Clone WP Website Easily: The Right Way to Copy Your Site”
[…] smooth process. For more detailed instructions on different tools, you can find guides on how to clone a WP website that cover various […]